Turn your Mac, Linux or Windows machine into a retro gaming powerhouse – Batocera on a USB stick
4th June 2022
LaunchBox Retro Gaming on a £35 Android TV Box – Setup, RetroArch and standalone emulators
17th July 2022Using a £35 Android TV box as a retro games system with Emuelec – better than a Pi 4
The Raspberry Pi 4, or even the Pi 3, are great devices for retro gaming. But at the moment in June 2022 you just can’t get hold of one without going onto the black market on eBay and paying upwards of £100 for a 4GB model.
But don’t despair. There’s a great alternative in the form of these cheap Android TV boxes.
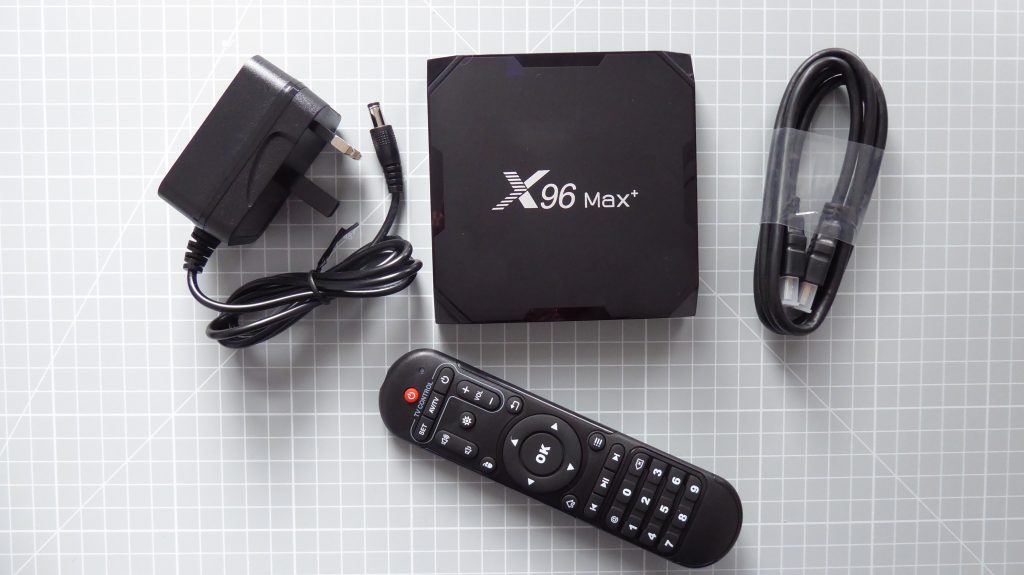
This one is labelled as an X96 Max+, but they are fairly generic units which do roughly the same job but in different boxes. Where there are significant differences are in the processor, RAM and Flash storage options.
Choosing the Right Processor, RAM, Flash
The main choice you’ll need to make when buying one of these units is the processor. They all use System-on-a-Chip (SoC) devices, usually from Allwinner, Amlogic or RockChip. All of them work well as a TV box, but when it comes to retro gaming, some are better than others. Of these three manufacturers I would go for an Amlogic device as they tend to provide much better performance at the same price point.
Further, within the Amlogic powered Android boxes, you also see a range of Amlogic processor options. For me this really breaks down into two choices based on cost.
If you want a £40 gaming system, that can cope with everything up to and including the PlayStation 1 and Nintendo 64, with a bit of PSP, then go for an Android box powered by either the S905X3 or S905X4. Between these two there isn’t much performance difference, but the X4 is marginally better. These devices give you about the same performance as a Raspberry Pi 4. Indeed an S905X3 with 4GB of RAM powers the Odroid C4 which is a direct competitor to the Pi4 with slightly better performance.
If you’re happy to move up to around the £120 mark, then you can go for an S922X powered device. These will give you around a 40% to 50% performance increase over the X3 or X4 boxes. With these you will have pretty much full PlayStation Portable and Sega Dreamcast game play.
Once you’re decided on a processor go for the most RAM you can get within your budget. The more and faster RAM you have the better for emulation.
Built in Flash storage is not so important. If you plan to use the device as an actual Android TV box then yes, you need flash storage to hold your apps and data in exactly the same way as your mobile phone. But with the main emulation strategy in this video we’re going to replace the built in Flash dive with our own external SD card and run the entire device from that. So the built in Flash isn’t used.
My Box
So the box I have here is powered by an Amlogic S905X3 with 4GB of RAM and 32GB of Flash storage. I picked this up from Amazon for £35 with no stock issues so you should be able to get hold of one without any problems and I’ll put some links to this and some similar products in the video description.
The unit is about twice the size of a Raspberry Pi but comes in a sleek case with the connections on two of the box sides.
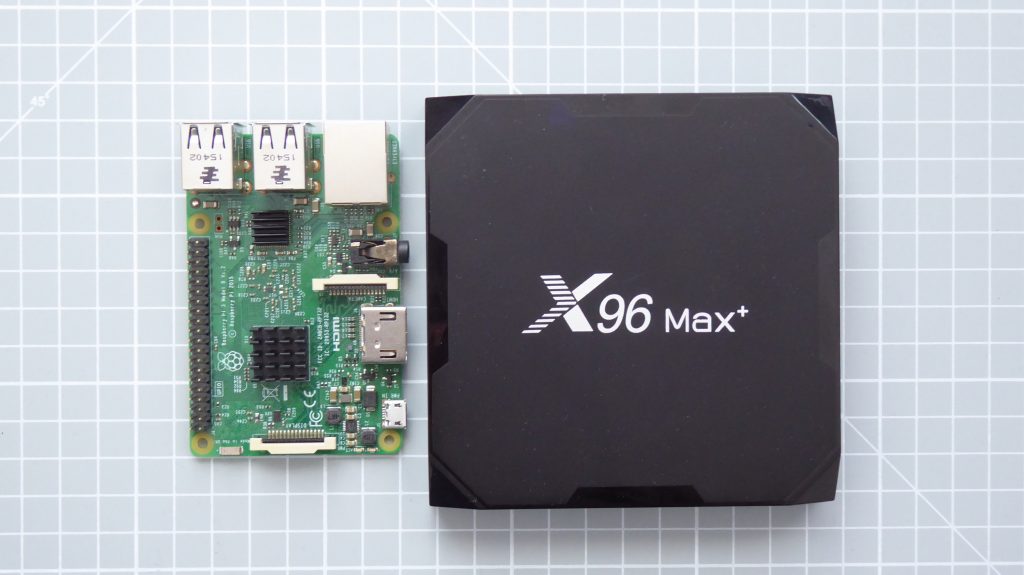 On one side you’ve got a USB 3 and a USB 2 port along with the micro SD card slot. On the other you’ve got Gigabit Ethernet, a headphone socket, IR remote extension, optical sound output and the power input. This is from the supplied power supply which is a standard 5V DC unit but using a cylindrical power plug rather than some sort of USB cable.
To control the box you get an infra-red remote, but you can also connect a game controller and USB keyboard and mouse to make things a bit easier.
As An Android TV Box
If we power the device up we get it running in its default mode as an Android version 9 TV box. This is basically the same as your Android phone. You have access to the Google Play store so we can download and install a whole range of applications.
As a media device it works really well. YouTube, Amazon Prime and Netflix all run seamlessly from the pre installed apps. To get the Disney App installed I had to side load it using an APK file as the App Store said it wasn’t compatible. But as we’ll see in a while this isn’t hard to do so you should be able to get all the apps you need up and running.
Android Gaming
For native Android gaming this unit will perform as a low to mid range device. But, as it is Android we can of course install the Android based emulation packages such as RetroArch. This works well with everything up to the original PlayStation and some of the less intensive Nintendo 64 titles so this is definitely an option if you don’t want to turn run this as a dedicated retro games console. But to squeeze a little bit of extra performance, as well as getting a much better front end system, we will need to ditch Android and use one of the Linux based gaming systems.
Emuelec
There are a few retro gaming frontend systems to choose from with Batocera and Emuelec being the main contenders. In this video I’m going to use Emuelec, simply because I’ve just made a video on Batocera for Mac and desktop PC’s. If you think it would be useful to see Batocera being installed on this do let me know in the comments.
So Emuelec is another package that uses Emulation Station, RetroArch and a few other standalone emulators to create a unified retro gaming console. As I said earlier it runs from a separate SD card and bypasses the internal software of the unit, replacing the Android operating system with its own version of Linux. The original operating system is left untouched, so as soon as you remove the SD card and reboot you’re back to your Android TV system.
So lets get Emuelec installed!
Identifying the Hardware
To start with we do need to make sure that we’ve actually got the hardware that we paid for. Devices shipped through the major online outlets tend to be OK, but if you’re buying direct from China to get the cheapest prices do be aware that they are not always quite so honest about what they’ve put inside the box.
To do this we need to use a package called Aida64. This should be available through the Google Play, but if you don’t see it listed you can side load it using an APK file. This is a really good way of installing apps if you haven’t got access to the Play Store or for ones that the Play Store may hide from you. This is how I was able to try out the Disney App. The easiest way to do this is to install the APKPure app from https://apkpure.com/. This is a site that provides direct access to the app installation files bypassing the need for the Play Store. If you don’t want to install the APKPure app you can still download and install the APK files manually, it just makes it a lot more convenient.
Installing APKPure
To install the app we do need to go through the manual install process once.
Visit https://apkpure.com/ and click on the app download button on the right hand side. This should download an APK file to your computer. Save it onto a USB drive or a microSD card that you can plug into your Android TV box.
While we’re going through this manual install we should also download the LibreElec Reboot app. I’ve found this one isn’t listed in Google Play, or in APKPure for that matter even though it’s available for download. Go to
https://m.apkpure.com/root-libreelec-reboot-from-android-tv/info.androidtv.libreelec
I’ll put this in the video description and on the project page on bytesnbits.co.uk.
Save the apk file to your USB drive as well.
Power on your Android box and pop in your memory stick. We now need to use the file manager app to locate and install the downloaded .apk files. You can do this using the included remote control but it is so much easier if you can plug-in a keyboard and mouse.
Opening the file manager app gives you access to all your storage devices. You should see a local disk drive (the internal flash storage) and another drive possibly labelled as General USB Drive as mine is here. This is your SD card or USB stick. If you don’t see it try unplugging the drive and re-inserting it.
Open the drive by selecting it or double clicking it and you should see the APKPure APK file. Select this to install.
Applications need a special permission to be allowed to install software so you may get a warning message. Just click the settings link and click the slider to allow FileBrowser to install unknown apps.
Click back (right mouse button on my device) and you should be back to the FileBrowser. Reselect the APK file again and you should now be able to install the app. Then repeat the process for the LibreElec Reboot app.
Once you’ve installed APKPure we need to give it permission to install apps. Go to the settings screen, then select Device Preferences, Security and then Unknown sources. This takes us back to the installation permissions screen, so make sure that APKPure is allowed to install apps.
Installing the Device ID Software
We can now use the APKPure app to install the software we need.
Open up the APKPure app and use the search bar to find Aida64. Click the install button and let it download and install the apk file.
Reading the Device ID
Opening Aida64 shows us a whole set of system information.
From the System tab you can see the box make and model. The board and device show you the SoC processor code. Mine comes up as an Amlogic Franklin device with 4GB of installed RAM. You can check the Amlogic series names to find out what actual processor this is. So Franklin is listed as either an s905X2 or S905X3.
Back in Aida64 we can go to the CPU tab to get a bit finer detail on the processor. So with 4 ARM Cotex-A55 processors we can again check online with a search for S905X3 specifications and this confirms that we have the X3 model installed.
So from this info everything is as it should be.
Why Do We Need To Check
You might wonder why we need to go to this trouble in identifying the processor. When we install Emuelec (or Batocera) we need to give it a setup DTB file specific to the processor we’re using. If we get the wrong file the system won’t boot.
Plus it lets you confirm you’ve got what you paid for!
Boot From SD Helper
There’s now just one more helper app we need before we install Emuelec. To get the TV box to boot from our SD card it needs to be in update mode. You can usually achieve this press holding down a reset button located somewhere on your device, usually on the bottom or inside the headphone socket. But a much more elegant way of doing this is to use either the LibreElec Reboot app, which needs your device to be rooted, or a terminal emulator, which also has the advantage of adding a Linux style terminal to your setup.
From the Play Store or APKPure find the Terminal Emulator app and install it.
If you open the app you’ll see that we now have a command line interface for our Android box. We can again get an id verification for our processor. Use the command
This will list the processor device tree code. It’s worth making a note of this as it can help with identifying the right dtb file later on.
Preparing Your Emuelec Boot Disk
At last we’re ready to get Emuelec up and running. We first need to download the correct boot disk image and burn it to an SD card.
Go to
https://github.com/EmuELEC/EmuELEC/releases
This will latest the latest emulator releases.
At the time of making this video it was 4.5. If you scroll down a bit you’ll come to the actual image file downloads. Unless your device is one of the named versions you should use the generic download.
Once you’ve got the file downloaded you need to use either BalenaEtcher or, my preference, the Raspberry Pi Imager App to burn the image to your SD card. Just boot up the imager app. For operating system scroll to the bottom and select custom. Then find and select the image you’ve just downloaded. Then select the SD card you want to burn it to and click WRITE.
Your Emuelec SD card will now be created.
Selecting Your .DTB file
Once the card is ready remove it and then reinsert it into your PC.
Open up your file manager and you should see the EMUELEC drive listed. Select this drive and then open up the device_trees folder. These are the device tree files that are needed to set up Emuelec so that it matches with your TV box. This stage can be a bit confusing as the information we’ve gathered already doesn’t always match with the names you find here.
If I scroll down this list I don’t find a file that matches my device tree info we got using the terminal emulator. There are some sm1 files but not exact matches. It’s always best to check the CoreElec list at
You’ll either find your actual TV box or board listed, or search by SoC and RAM. Here you’ll see a number of options for S905X3 devices. The 100Mbit and 1Gbit variations refer to the network interface speed. Unless you know different I’d select the 100Mbit version. So this points me to using the sm1_s905x3_4g.dtb file as I have the 4GB model.
Again, use all the information from the areas we’ve looked at to give you the best informed choice of dtb file. If your boot fails you might have selected the wrong version. Check back and try another.
We now need to copy this dtb file to the root folder and rename it to dtb.img.
Our SD card is now ready to be used!
Booting Up To Emuelec
There are two main ways to get Emuelec to boot. The TV box needs to be in update mode to boot from the SD card.
The first way is to find the update button. Hold in the button while you power on the box and it should boot from to Emulelec.
The more elegant way is to use the Terminal in Android. Boot up the device and pop in the SD card. We can now use the Terminal Emulator app we installed earlier to issue the command
The unit will restart and boot from the SD card. I prefer this method as it lets me jump between the two systems without plugging and unplugging the card. There is also an option inside Emuelec to reboot back to Android.
If you have installed the LibreElec Reboot app you can also use this. This app requires root access so you may find, like me, that it doesn’t work. But if it does it will save you time typing in the reboot command.
First Boot
As Emuelec starts for the first time it will go through some house keeping and expand the drive image to use the full size of your SD card. Just let this run through and eventually you’ll get to the main system select screen.
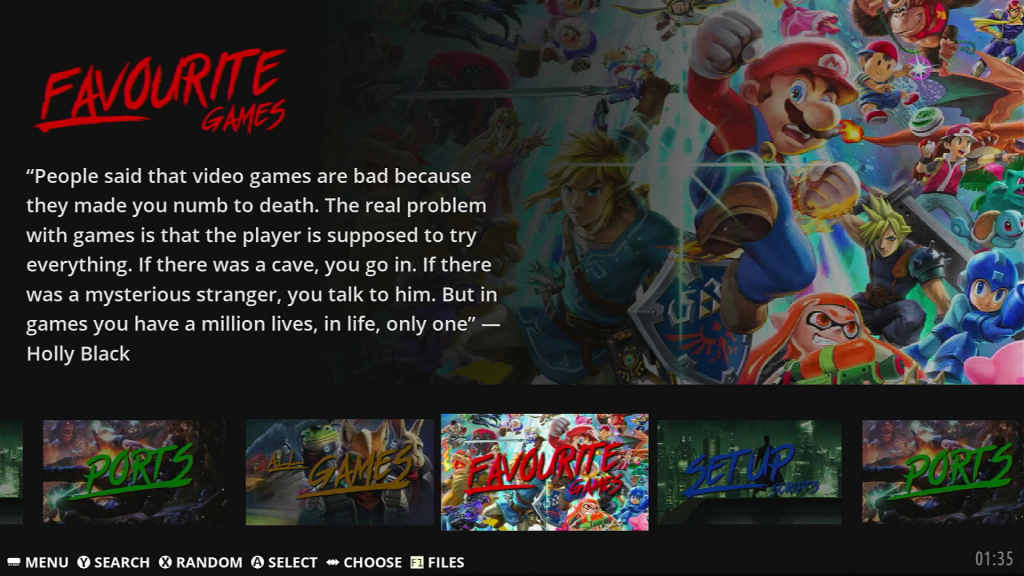
If you find it gets stuck on a blank screen for more than a few seconds it’s gone wrong. You’ll need to power off your device and check the SD card. I had a few issues with mine to start with so here’s my experiences.
I had an extension installed on my PC to allow it to read Linux formatted disks (Ext2Fsd). It really didn’t like the Emuelec SD card. It would lie about moving and renaming files. So my first boot was done without any dtb.img file. Check your’s has been saved correctly.
Using the wrong dtb file causes the same blank screen. I tried this to see what happens. If you had a couple to choose from just work through them to get the one that works.
Controller Setup
Once you’ve got the system up and running you’ll need to attach your game controller and map its buttons. Just hold down a button until Emuelec recognises it, then go through the mapping process. If your controller doesn’t have a button just hold any button down until it jumps past.
The Hotkey allows you to quit games and call up the RetroArch menu. Usually people set this to the Select or Back button.
Setup the Network
Once you’ve got your controller mapped you should be able to navigate the user interface.
The first thing I always do is to set up the network. If you’ve got an Ethernet cable just plug that in and you’re ready. Otherwise we’ll need to set up the WiFi link.
Press the Start button to get to the menu and select Network Settings. By default this will be off, so select the Enable WiFi option to turn it on. Once you’ve turned it on you’ll get the options to select your network and enter your password. Select the SSID first, then use the back button to return to the network settings and enter your password.
Use the back button (B) to get back to the main user interface and you should now be connected to WiFi.
Loading Games
All that left is to get some games onto the console. There are a few ways to do this but the easiest two are over the network share and directly onto the SD card.
To copy games onto the SD card you’ll need to power down, pull out the card and pop it into your PC. You’ll find it appears as two or three removable drives. The EMUELEC drive is the system drive where we added the dtb file. The EEROMS drive is for all your ROM files. If you open this up you’ll see folders for each of the supported systems and one for the BIOS ROMS. Just copy your games files to the relevant folders and pop the SD card back into your box.
To save the hassle of powering off and pulling out the SD card you can also copy files over the network connection. Make sure Emuelec is running and open up your file manager on your main computer. Emuelec automatically creates a Samba share to let you access the ROMS folders.
Enter the network address
\\emuelec
This should try to connect to your Android box. You might be asked for credentials. The username is root and the password emuelec. Make sure you remember the credentials so you can easily get back in. Click OK and you’ll see the full SD card data area.
If you open up the ROMS folder you’ll again see all the system specific folders. From here you just need to copy over your game files by dragging and dropping them into the correct locations.
Some consoles need BIOS files to work so my advice is to copy them all over now so you can play any system you want to. I’ve found that you can get hold of complete BIOS sets if you search for Batocera BIOS files on Google. If you do get hold of these files just drop them into the BIOS folder on the SD card.
Registering Games
If you’ve rebooted your Emuelec device you’ll have the games listed. If you’ve copied over the network you’ll need to refresh the games list.
Press the Start button to get to the menu. Then select Game Settings and then Update Gamelists. When you go back to the main screen you should now see your some of the consoles and computers have been activated. Just select the console you want to play and you’ll get a list of the games. Select one and you’re straight into some gameplay.
To get out of a game hold down the Hotkey (probably the select or back button) and press the start button. You’ll probably have to do it twice to confirm the exit.
Getting Game Art and Media
If you’re looking at one of the game sections you’ll see the games are just cartridge images. It would be much better if we had proper box art and some video previews. To get these we need to go through a scraping process.
To get this working you’ll need to set up a free account with Screen Scraper.
It’s free to join but they do ask you make a small contribution. If you can, please do so we can all help keep this project going.
Once you’ve done that it’s back to the Emuelec device. Pull up the main menu and select Scraper. Make sure ScreenScraper is selected and then go to Scraper Settings. Hree you can set what sorts of images to use in the user interface. I like to use screenshots for the main image, 3D box art and wheel logos. You can then select any other bits you want. Videos will give you short gameplay clips while you browse the games but they do take up space on your SD card. Not much, but after a few thousand games it will mount up.
Now scroll down to the bottom and enter your account username and password.
Click back and then Games To Scrape For. As this is our first scrape just select All.
Now go back and select Systems Included. This lets you specify which systems you want to gather media for. You can turn each on and off, or just select all.
Now go back and select the Scrape Now button. You should see the scraping progress appear in the top right.
Once that’s finished go into the game settings and update the game list. Now you should be able to browse your game collection with full image and video clips.

Performance
All that’s left now is to play the games. So let’s see how well our little £35 retro console performs.
For everything up to Super NES and Megadrive we’ve got full speed emulation. This is all with the default settings so no issues there.
For PlayStation you’ll need the BIOS ROMs installed, but once those are in place we’ve got full speed emulation for even some of the more intensive games.
Moving on to Nintendo 64. This is where we start to get to the limits of the system. With the default emulator we get around 40 frames per second, but it’s really the sound that takes the most loss of quality.
However, we can switch emulators to make it more playable. From the game select screen you simply hold down the game select button until the game menu appears. This lets you see other information about the game, such as the game manual if you’ve downloaded one. But it also have an advanced options section where you can switch the emulator core.
If you switch to the Parallel core we get slightly a slightly less accurate emulation, but full speed and perfect sound. And this worked on all of the titles I tried out, including the harder to emulate games. So with this setup you’ve got full Nintendo 64.
Once we move on to the Sega Dreamcast and PlayStation Portable we do hit the limits of the S905X3 device. Some lower power games will work but any of the medium to high processor power games will not. With the S922X devices you’ll probably get these systems to work fine, but obviously at the higher price point.
Conclusion
These little Android TV boxes are a great way to build a retro gaming system for your TV or as a standalone unit. Not only do you get all of the smart TV features from the Android powered operating system, but you also get all of the consoles up to and including the Nintendo 64, all of the home computers and all of the arcade classics. And all for around £35. Plus you can actually buy one right now.
Compared to the Raspberry Pi 4 performance is at least on a par, if not marginally better. Plus the unit comes in it’s own sleek case, with power supply, HDMI lead and remote control. Overall a great bargain.
Get your own TV box….
Amlogic S905X3 powered boxes
Amazon UK – https://amzn.to/3HIBJsM
Amazon US – https://amzn.to/3N5L5Qo
Amlogic S922X powered boxes
Amazon UK – https://amzn.to/3xMFKIc
Amazon US – https://amzn.to/3Oe7rAE

