Play Windows 95 & 98 games on your modern computer – VirtualBox PC emulation
4th February 2026
Turn your computer into a Wii U and play every game – Cemu complete install and setup tutorial
15th February 2026
Play every Wii U game from a backup file – how to backup disks and install WUX WUD and APP files
(DAT and KEYS file help at the bottom of page!)
Pretty much the biggest feature of modding any console, including the Wii U, is to be able to run your games from backup files. This means that you don’t need to keep using your precious disks and risking damaging them. Obviously, it also means that you can use any game backup files but do be aware that practically all of these will contain copyrighted code so do make sure you check the laws in your region to ensure that you’re not breaking any rules if you decide to go this route.
So in this video I’ll be showing you how to dump your Wii U disks to create your own backup files and then how you can install them onto an external hard drive or USB drive attached to your console.
So let’s grab some homebrew software and get started.
Homebrew Software
To be able to use backup files you’ll first need a modded Wii U console. If you haven’t already please do have a look at my Wii U modding tutorial where I show you how to use ModMii to easily hack the Wii U and vWii and get it fully set up with all the base homebrew applications.
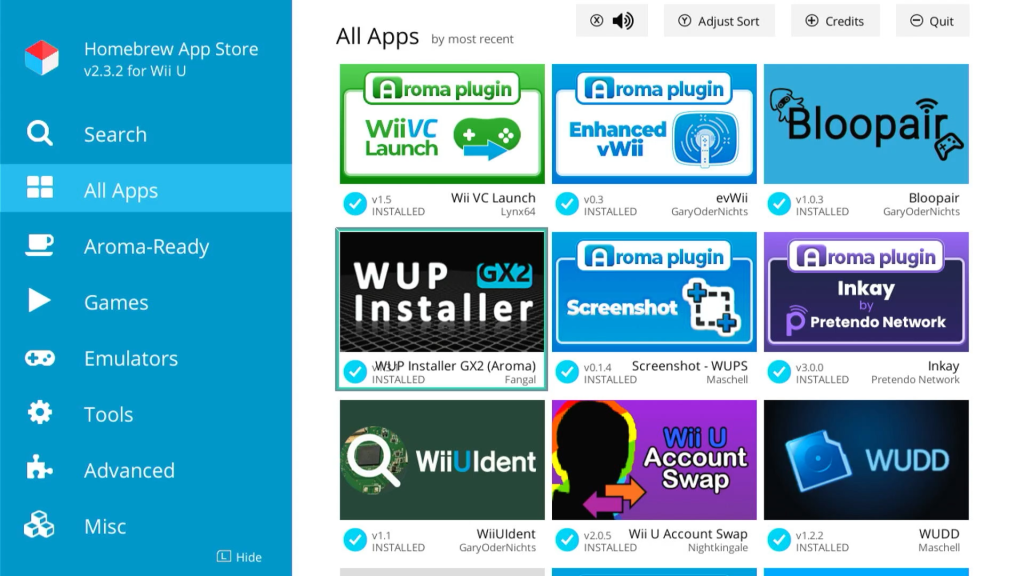
For this project we’ll need two Homebrew Apps. The Wii U Disk Dumper and the WUD Installer GX2. I’ll be running everything inside the Aroma environment so if you’re on an older system like Tiramisu you’ll just need to get versions of the apps for your environment. Having said that I’d highly recommend upgrading to Aroma. The ModMii route will install Aroma side by side with your existing setup so you can take advantage of the newer features.
If you’ve got Internet access on our console the easiest way to get the apps is to install the Homebrew Store app. This allows you to simply browse and install software directly onto your Wii U. To install it please have a look at my Homebrew Store video. As with any app you just need to download the wuhb file or zip folder and copy it into the wiiu/apps folder on your SD card.
If you’re not using the store app you can download the installation files from the main store website. Again extract the file for both apps from the zip files you download. You’ll usually find they are stored in a wiiu folder with the correct directory structure so you can simply copy the whole wiiu folder to the root of your SD card and it will put all the files in the right place.
Pop the SD card back into your console and if you’ve got everything set up correctly you should find you now have both apps on your main Wii U menu.
Disk Extraction Software
The Wii U backup files come in three main formats. The App format is the one we need to install the games onto the Wii U, but you’ll usually find backups are created in the WUX or WUD formats. These are sort of like zip files where the game files have been packaged into a single file to make it easier to distribute.
So we’ll need some software that can take a WUX or WUD file and extract the game files to create an App format package.
At the moment the best package to do this is NKit2, but as of Feb 2026 it is still in development. It all works but the developer Nanook hasn’t yet released an official version. To get hold of the app you’ll need to subscribe to their Discord channel. Visit the NKIT2 project GitHub page and scroll down to the bottom. You need to join their Discord server so click the invite link to get connected. Once you’ve joined the Discord server you’ll find links to download the app for Windows, Mac and Linux in the releases section.
For the app to work we also need some decryption keys. These can be found in this shared Google Drive folder, so just download the two zip files ready for use.
https://drive.google.com/drive/folders/1i5Nkw5V2N__ewh-oeXZGOA_uHmW-4pjm
Once we’ve got all of this downloaded we’re ready to go.
SD Card
Before we start one point to check is the spare space on your Wii U SD card. When we dump disks or want to install games we need to be able to put the files onto our SD card before installing them to a USB drive or external hard drive. These games can be over 10GB so make sure you’ve got enough room to hold at least one full game.
Need a bigger SD card – https://amzn.to/4qy0gWa
Hard Drive or USB
With that sorted we now need to get our game storage disk ready. This is where the Wii U is going to place the game files so that we can play them. You’ll need some sort or USB attached drive. This can be a USB thumb drive, but I’d advise getting hold of an actual hard drive unit. This does need to have a USB connection so you might need some sort of SATA to USB converter cable.
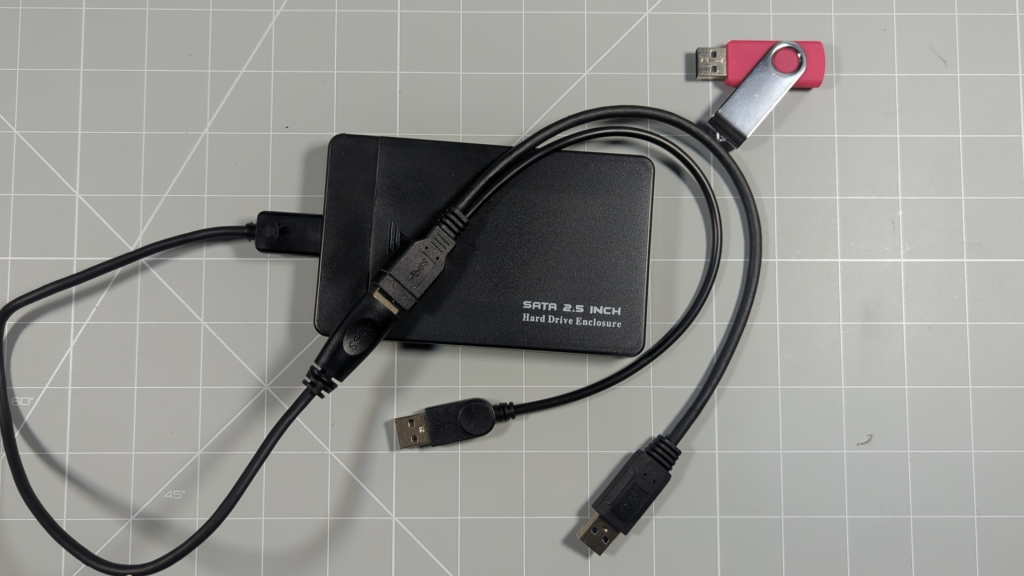
If you’re using an SSD drive this will plug straight into the Wii U, but if you’re using a mechanical laptop drive like mine you’ll need a Y splitter cable. This connects to both USB ports on the Wii U so that it can draw double the power. The Wii U USB ports are known for their poor power delivery so using this splitter just makes sure your hard drive has enough current to keep going.
Parts:
USB splitter cable – https://amzn.to/3OdjZgq
USB SATA adapter – https://amzn.to/3OdjZgq
SSD drive – https://amzn.to/3OdjZgq
Laptop hard drive – https://amzn.to/3OdjZgq
Drive enclosure – https://amzn.to/4cvh3FU
The first thing we need to do is to pair the drive with the console. The Wii U uses it’s own special drive format to combat software piracy so when we connect the hard drive it’s going to format it. This will delete everything on the drive so do make sure you’ve not got anything you want to keep on it.
This also means that you can’t use the same drive that you use for the vWii USB Loader. You will end up with one drive for your Wii and Gamecube games, and one for your Wii U games. And you can’t keep both plugged in at the same time.
Now there is a way around this and I’ll be covering how to set up a single hard drive to store all your games by partitioning the drive. But it’s not a straight forward process and requires a special homebrew app to set it up so I’ll show you how to do this in a separate video. If you want to use that method make sure to subscribe to the channel, or check this video’s description to see if I’ve already made the tutorial.
For now, turn off your console and unplug any other external drives. Plug your dedicated Wii U hard drive into the USB port at the back of the console. Power on and you should see a pop up telling you that the drive needs to be formatted. If you don’t get that message you might have turned it off during the modding process so go into your settings and then data management. In there you’ll find an option to format your USB drive. Again you’ll see warnings about it deleting all the data from the drive, but go ahead and format it.
Once it’s formatted we’ll be able to use it for the next step.
Backing Up Your Own Disks
First we’ll look at how we can back up our own disks. This lets you use the game backup file we’ll store on the hard drive rather than wearing out the real disk.
So pop your disk into the console and then start the WUDD application.
You’ll get to this blue screen with a number of options.
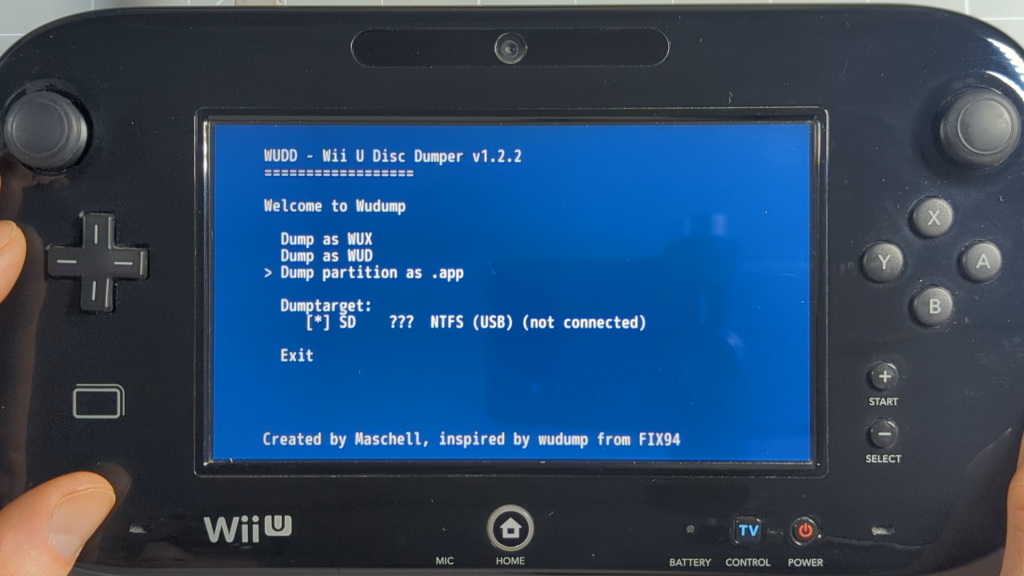
First we need to select the Dump Target. This is where WUDD is going to save the game files. There’s probably only one valid target, your SD card, but you can see that there is the option to dump to an attached NTFS drive if you wanted to backup a whole pile of disks in one go.
Next we need to decide what format we want to dump to. As we mentioned earlier .app is the format that will allow us to install the game onto the WiiU hard drive. But WUX and WUD backups are easier to move around and can be played on WiiU emualtors. So depending on what you want to do with the backup you can select the appropriate format. For this video I’ll back up as an App format so I can show the full installation process, but we’ll also look at how we can use WUX and WUD files to install games as well.
Highlight and press A on the .app format. The dumper app will now scan the disk and show the game title. You can ignore any other data that’s listed. Select the game data and press A again to dump it.
The app will now scan through the disk and extract the files and save them to your SD card. Just let it run through.
Once that’s finished you can either dump another game or press the Home button to exit back to the main menu. You can now take the disk out of the console.
At this point our .app backup will be in a wudump folder on the SD card so we’ll need to take it out and use our computer to get the files ready for installation.
Installing A Game Backup
Back on the computer we can open up the SD card and then the wudump folder. You should find a WUD folder in there and inside that a coded folder which is the game backup. If you look inside that you’ll see all the game files which will be our .app game data files with .h3 header files.
So that I know what game I’ve backed up I’m going to back out one level and then rename the game folder to something recognisable.
We’ve now got a game folder with the App format game files inside it. This is our required starting point for installing any game to the Wii U. When we look at the WUX and WUD backups in a second we need to transform them to this exact format first. After that all games are installed in the same way.
At this point if you want to keep a copy of the game backup you can just copy it to somewhere on your computer.
To install, we now need to create a special folder on the root of the SD card. Navigate there and create a new folder and call it install, all lower case. When we use our WUD installer app it will look in this folder to see what games we want to install.
We now just need to move our backed up folder to this install folder. So go back into the wudump and WUD folder. Cut the game folder out and then navigate back to the install folder. Inside there paste the game data.
If you now go back to the root of the SD card we can delete the wudump folder to just clear up the unwanted files.
Now it’s time to install the game.
Plug the SD card back into the Wii U and power on. Once you get to the main menu start the WUD Installer GX2 app. This will scan that install folder looking for installable content. You should now see your game listed.
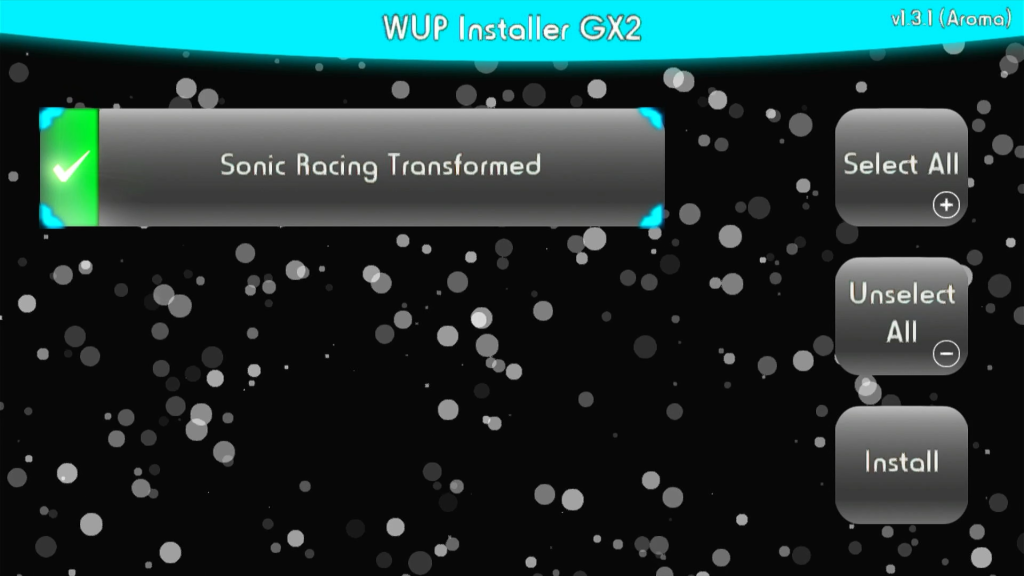
All that’s left to do is to select the game and click the install button. If you’ve loaded more than one game, or additional update and dlc files you can also use the select all option and then let the installer handle them one after the other.
Once the installation is finished we can exit back to the main menu and you should have your game ready to play from your hard drive.
Using WUX and WUD Backup Files
So that’s the basic process for backing up and installing a game. But as I mentioned earlier you won’t always have your backup file in App format. That’s where we need to use the NKIT2 software to unpack our WUX and WUD packages to create the App version.
Back on your computer we can re attach the SD card from the console. The game we’ve just installed will still be in our install folder but we don’t need it there any more. All the files are on our hard drive. So just delete whatever is inside the install folder ready for the next game.
Now we need to get the NKIT app ready.
Go to where you downloaded the application and extract the contents of the zip folder into a new folder. You should now have a set of files like this. First we need to run the nkit-ui.exe file to let it set up its folder structure. Just quit out of the app and you should now have this set of folders.
Next we need to set use the dat and key files we downloaded. Each WiiU game needs a special unlock code to allow it to run on the console. These codes are stored in the key file. To install these copy the zipped key file and paste it into the keys/wiiu folder in the NKIT folder.
The dats files tell the NKIT app information about the games and that too can be copied as the zip file into the dats/wiiu folder.
Back to the main NKIT folder. You should have an out folder. This is where the games will be saved once we process them. If you don’t have that folder just create it. We also need an in folder to line up our game files so you’ll need to create that one.
To process a game you just need to copy your WUX or WUD file into the in folder in the NKIT area.
Then start the NKIT application.
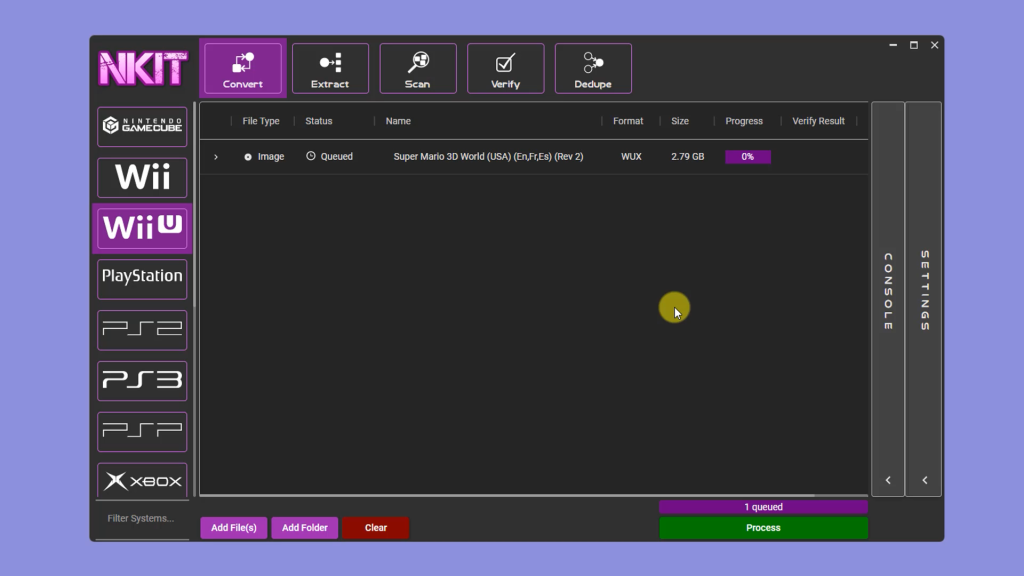
NKIT can be used for a range of systems so make sure you select the WiiU option on the left. Make sure the Convert option is selected at the top and then select the settings tab at the right.
Under Convert Options select the APP output option to convert to .app format and then select the Dynamic verification method. Under output preferences tick the Rename out put option to use the DAT file data if it’s there.
Lastly we need to set the system paths to tell NKIT where to save its files. For the base in path select the in folder that we created in the NKIT folder, and for the out path select the out folder.
We’re now ready to convert the game. You can click either the Add Files or Add Folder button at the bottom of the window. As I want to process all the games in my in folder I’ll select Add Folder and then find and select my NKIT in folder.
You should now see a list of your games with the status queued. If you’ve got any more games, updates or DLCs to process just add those as well.
Once you’re happy click the Process button to start the conversion. This is going to take some time so just leave it running.
Once that’s finished we can close the NKIT app and head back to our NKIT folder. Inside the out folder we should now have a folder for each of our games. Inside there you’ll see the .app and .h3 files we need.
All we need to do now is copy the whole App game folder into the install folder on or SD card.
Pop that back into our console.
Open up the WUP Installer app and install our games.
If all’s gone well you’ll now have another game on your Wii U Menu.
Dat and Key files
Download form this Google drive link
https://drive.google.com/drive/folders/1i5Nkw5V2N__ewh-oeXZGOA_uHmW-4pjm
Where to find games?
A great resource for WiiU (and many other systems) games is the Myrient project at https://myrient.erista.me/
Do make sure to give a donation if you find it useful. We need to keep these projects alive.