Is Windows 11 dead, broken or spying? Cutting through the hype about Windows 11.
17th February 2026
My Ultimate Nintendo Console – Every device ever made in one machine
3rd March 2026
Run your Wii U and vWii games from a single hard drive – Modded Wii U ISFShax setup
One of the great things about modding your Wii U console is that you can play your games from backup files stored on an external hard drive. To do this you simply need a USB adapter to plug in your hard drive and once connected the console will see it and format it to its own special setup. This all works great and my recent video shows you how to get it all set up and working.
But the Wii U also allows you to mod its virtual Wii console. This again means that you can play Wii and Gamecube games from backup files stored on an external drive. The problem is that the Wii U and vWii drives are not compatible. You end up needing two drives. This gets even worse as you can’t leave both drives plugged in, you have to swap them over so the Wii U or vWii doesn’t get confused about which drive to use.
So in this video I’ll show you how to get around this problem and put both sets of games onto a single hard drive.
So let’s get ISFSHax set up.
Parts used:
WiiU – https://amzn.to/46dHv31
SSD – https://amzn.to/4k86yKv
Hard drive – https://amzn.to/4auPFH2
Micro SD card with adapter – https://amzn.to/3M2IDj1
USB splitter cable – https://amzn.to/4a5FQOe
Wiimote – https://amzn.to/4k7yRsF
What Is ISFSHax?
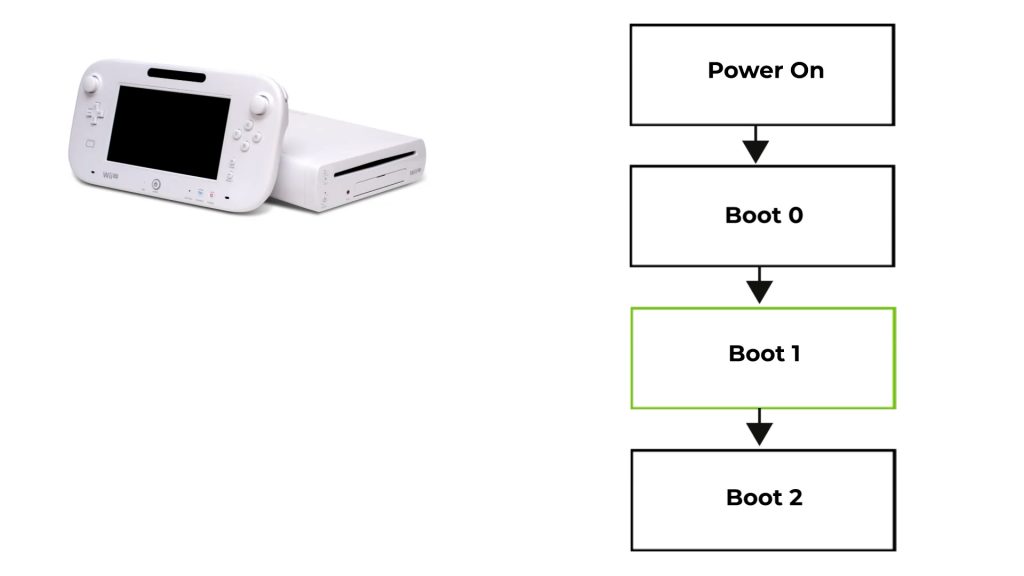
ISFSHax is a homebrew application that runs at a very low level in the boot sequence of the Wii U.
When you power on your console it starts to run through a number of boot stages before you get to the actual Wii U menu.
First the actual hardware initialises itself. It then looks for some internal ROM memory that’s hard coded with the base IO system so that the processor can start to use the console’s peripherals, including the programmable NAND memory that stores the system firmware. This is the Boot 0 stage.
Once that’s complete the processor reads the Boot 1 firmware contained in the NAND chips and starts to prepare the console for the operating system software. It’s this Boot 1 code that the ISFSHax code exploits.
This means that it can take control of the console before any of the main firmware is executed and modify it to change the way in which the console behaves. The upshot of this is really in two parts.
If you’ve managed to make a complete mess of your main console software so that it isn’t able to boot into the main menu or you’ve corrupted the Boot 2 sections of your NAND then you’ll have the opportunity to stop the boot process before the system crashes and fix the bricking code by using a NAND backup. This is an incredibly important feature and one we’ll be making use of in the setup process so that we can protect our consoles if something does go wrong.
The second feature is that we can get the firmware to look at what drives are attached to the Wii U and change how these are reported back to the main code. This is how we’re going to trick the Wii U into only seeing our Wii U drive, and then allow the vWii to see its backup drive.
Installing ISFSHax
So now that we know what our ISFShax code it going to do let’s get it installed.
This video assumes you’ve modded your Wii U and are running the Aroma environment. If you’re not then please make sure you follow instructions for your setup. They will probably be the same but the code we’re modifying can completely brick your console so just make sure you know exactly what you’re doing.
First power down your console and put the SD card into your computer.
Open up your browser and head over to this web page.
This is the official download page for the plugin.
You’ll also see a link at the bottom for the installation Guide. This is a very useful document that we’ll refer to a couple of times during the setup.
One important point is to please do make sure that you download the code directly from here as the software needs to be completely correct. If you download a modified version or a corrupted version this will break your Boot 1 code and that sort of brick is not recoverable without getting out your soldering iron. So do be warned.
Once you download the file you’ll have a zip file so that needs to be extracted. This should give you a folder called sd and inside that you’ll see a range of files and folders. These have all been assembled so that you can copy everything to the root of your SD card and it will drop all the files into the correct place.
Once those are copied eject your SD card and pop it back into your console, but don’t power on yet.
We need to boot into our payload menu. So hold down the B button on the gamepad and then press the power button. Keep the B button held down until you get to the payload menu. It can take a minute or so.
Once the menu pops up select the fw_image_loader option and this will drop you into the minute menu.
This menu can’t use the gamepad buttons so we’ll be using the power button on the console to move our selection and eject to select.
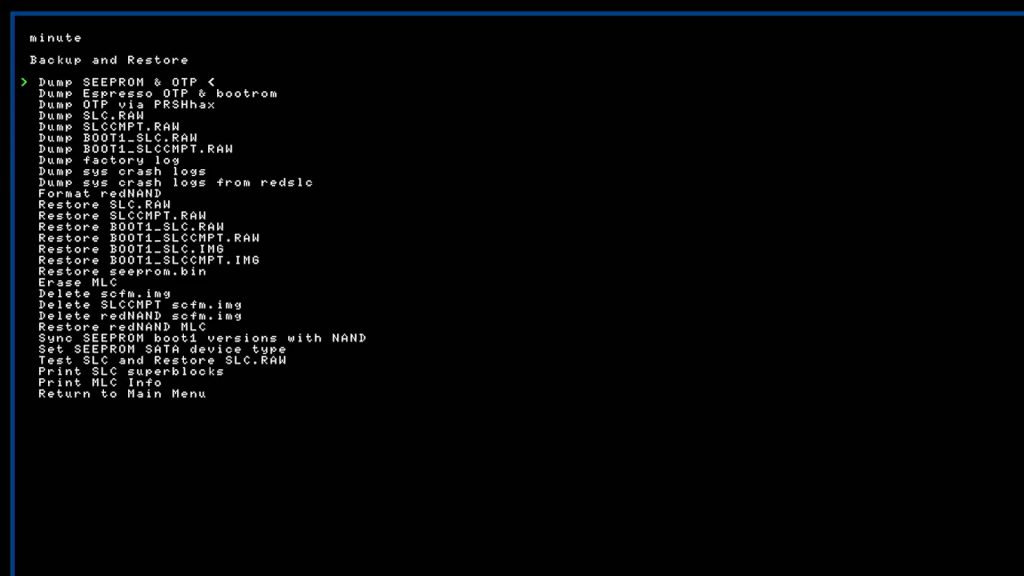
Press the power button to get down to Backup and Restore, then eject to select.
This allows us to backup our current system software, so we now want to dump our SEEPROM and OTP data. The OTP or one time programmable memory is a 1024 byte block with your console’s unique key for decrypting your NAND data. The Serial Electrically Erasable ROM contains 512 bytes of data containing your USB encryption keys. This data is essential to your console, but can also be used by emulators. The files will be copied over to your SD card.
Next select dump SLC Raw. This will take a backup of your System Linear Cell data which is a 512MB NAND chip with all the low-level system data and code including the boot1 loader that we will be modifying. This backup is the safe snapshot before installing ISFShax. So let that run through as well. Once that’s complete use the power button to get down to the very bottom and return to the main menu.
This means that we’ve now got a full backup of our console’s important system data so that if anything goes wrong we can recover back to our starting point.
We now want to boot the IOS image which will trigger the ISFShax installation so that it can modify the SLC NAND.
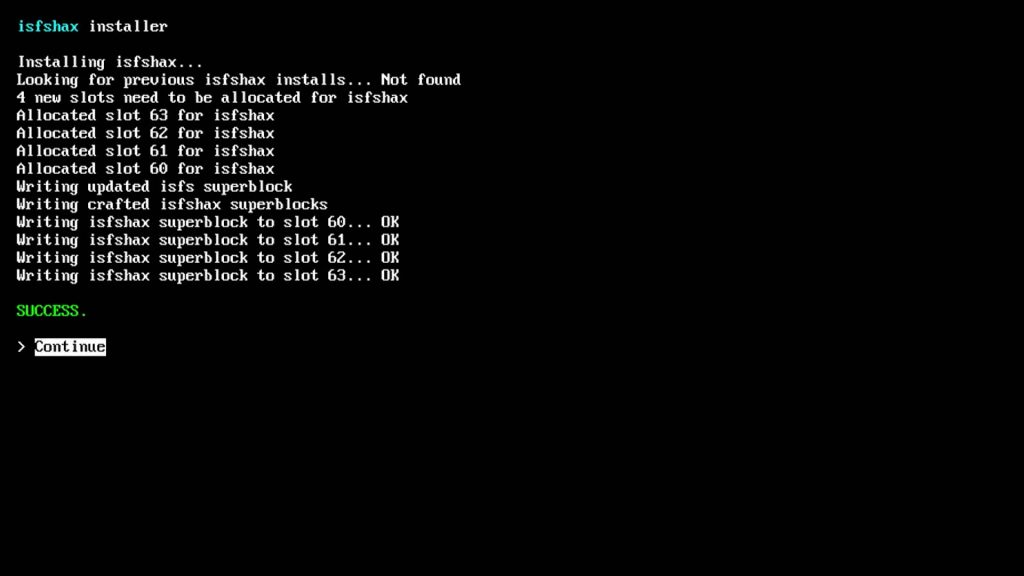
Click on the eject button to accept the warning message and once the installer starts it will run a check on your system and it should say that everything is OK to install. Just click the eject button to continue and then select Install ISFShax. To confirm the command you’ll need to select the Yes option and then click eject to start the process. This should run through and you should end up with a SUCCESS message.
Click eject to continue and then select the power off option so we can reboot the console.
When you power back on you should drop straight into the minute menu. We now need to do another backup to capture the NAND with the ISFShax software installed. So down to Backup and Restore and this time we only need to dump the SLC Raw content. This dump will overwrite the previous backup but that’s fine as we want this version to be our default starting point.
Once that’s finished press the power button to get back to the backup menu, and then use the power button to go to the bottom option to return to the main menu.
We now need to make sure everything is set up correctly so go down to the Patch (sd) and boot IOS (slc) option, which should be the third one down. You’ll see the screen change and a bunch of data being displayed but your console should now boot out to the main Wii U menu.
If you’re at this point everything is working as it should.
Autoboot to Wii U Menu
In that last reset you probably noticed that the default behaviour at the moment is to boot to the minute menu. We don’t really want to do this so we need to add a bit of boot code to bypass minute and go straight to the Wii U menu. So power off and pop your SD card back in your PC.
Backups
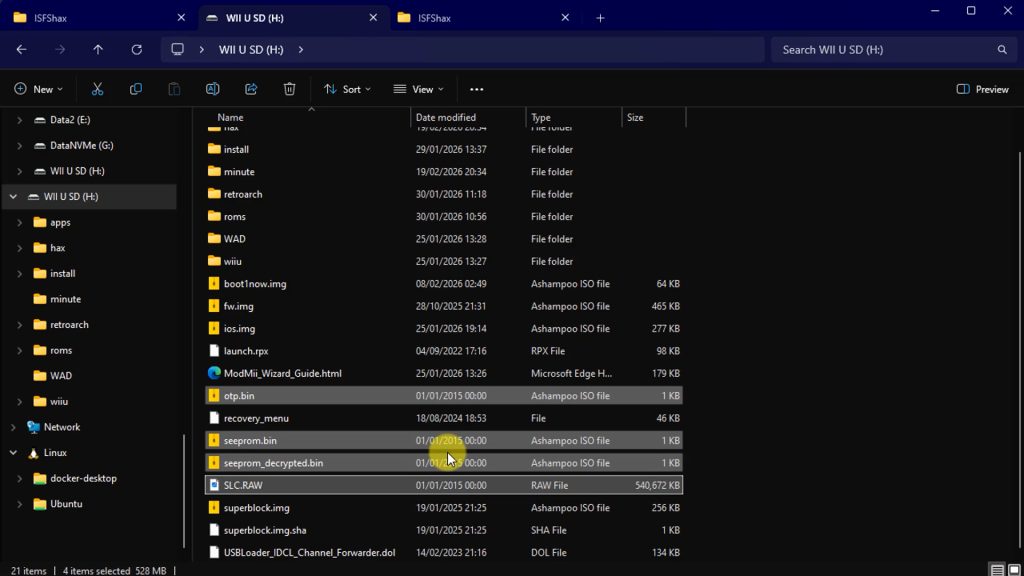
First we need to safely store our NAND backups. On the SD card you’ll need to make sure you’ve got your file extensions turned on from the view, show, file name extensions menu. This lets you see the file type after the file names. You should see an opt.bin, seeprom.bin, seeprom_decrypted.bin and an SLC.RAW file. These are your system backups so these need to be kept safe. I’m copying them to a cloud backed up folder on my PC. If your console ever gets bricked these files, teamed with ISFShax will get you back up and running.
Once the files are backed up you can delete them from the SD card.
AutoBoot Setup
To autoboot to the Wii U menu we need to create a settings file for the minute menu system. On the root of the SD card you should have a folder called minute, all lower case. If you don’t just create one now. Inside there should be empty at the moment.
We next need to create an initialisation file. So on my Windows PC I’m right clicking to bring up my context menu and I need a new text document. Once that’s created rename it to minute.ini. Again make sure you can see the file extensions.
The code we need to put in here is on the ISFShax guide in the Autobooting with SD section. There’s just three lines of code that creates a [boot] settings section. Highlight and copy the code. Then go back to the new ini file we created and right click on it and open it with notepad. Paste in the three lines of code and then save the file.
That’s all we need, so eject the sd card and jump back on the console.
When you power on now it should boot straight into the Wii U menu as normal.
Install Plugins
We’re now ready to install the plugins to add functionality to ISFShack. Pop the SD card back into your PC and head over to the guide page and to the Aroma / Tiramisu section.
You’ll see a link to get hold of the 5payldr.ipx file. This plugin pauses the system software while the external hard drive initialises so that it can check for the dual drive setup we’ll be setting up. The link should take you to the latest release and you can then click on the ipx file to download it. It needs to be saved onto the SD card, in the wiiu folder and ios_plugins. The file is downloaded in the correct format so you can just save it there.
Next we need the USB drive partition manager plugin.
Again back on the guide page you’ll see there’s loads more information about what you can do with ISFShax so do have a look through. But we need to scroll down to the Plugins section and click on the link for the USB Partition plugin.
This page gives you some information about how the plugin works but we just need to scroll down to the installation section where you’ll find another GitHub link. Again that should take you out to the latest releases section for the code.
Be careful on this page to download the right version. We need the 5usbpart.ipx file. This one will look for a Wii U partition on our USB drive. Again this can be saved directly onto the SD card in the wiiu/ios_plugins folder.
So that’s all the code we need.
Partitioning the Drive
The next step is to set up the partitions on our hard drive.
Partitions allow us to divide a single drive into multiple parts. This is how we’ll fit two hard drives onto the one physical drive.
You will of course need a hard drive that’s big enough to hold all your games. It needs to be formatted as an MBR partition scheme which we’ll talk about in a second which limits the size to 2TB. It is possible to use larger drives than 2TB but they need to be a specific type of drive that allows them to be used as MBR. I’m not going to cover those in this video but basically you need a special Western Digital branded hard drive that allows this setup. For now we’ll just stick to a 2TB or smaller drive to avoid any confusion.
If you’re using an SSD drive you can use a standard SATA to USB converter. If you’re using a 2.5in laptop hard drive you’ll need a Y splitter cable to allow it to draw power from both USB ports on the back of the Wii U. The console ports aren’t great at supplying power so we need to double up the current supply.
This process is going to wipe the drive. If you’ve been using it as your vWii drive you’ll need to back up all the files so that you can copy them back onto the newly formatted drive. If you’ve been using it as your Wii U drive you’re going to lose your game files as we can’t copy those using a PC. All your games saves are stored on your console but you’ll have to re install the games.
To start with you’ll need to plug the drive into your PC.
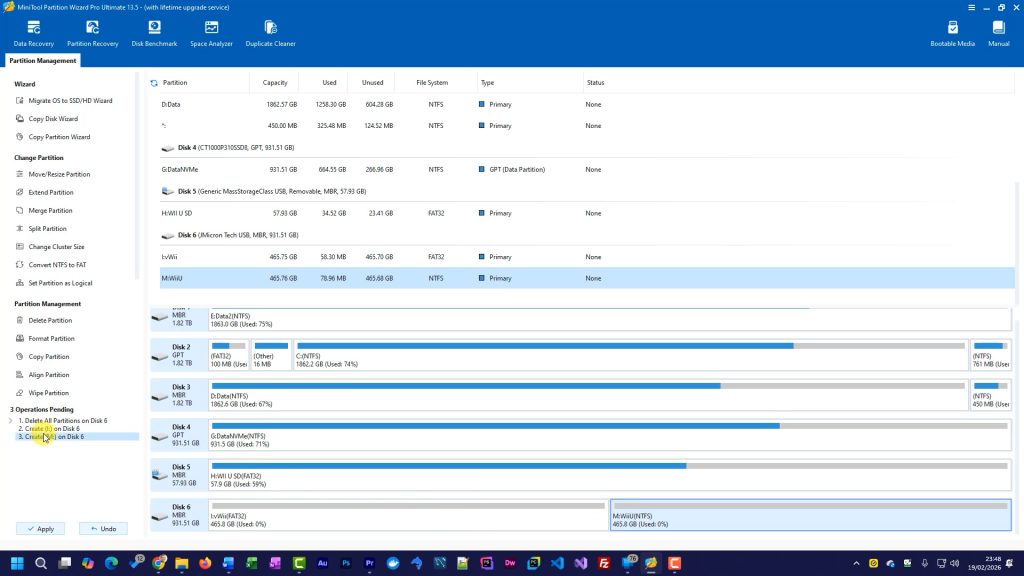
We now need some partitioning software to get it all set up. My preferred application is the Minitools Partition Wizard. If you head over to the site you can download their free version as that will do everything we need. Just download the application and install it.
If you open up Partition Wizard it will scan your drives and show a list. Make sure you’re able to identify the drive you’re going to use for the Wii U. If you’re not sure which one it is unplug the drive, wait until the list refreshes and then plug it back in again. You should see one drive appear.
On my system I have drive I listed as my 1TB drive for the Wii U.
The first option to check is that the drive needs to be structured as an MBR drive. This is the older partition scheme which limits drive size to 2TB, but the only one that the Wii U can read. My drive is currently a GPT drive so I’ll need to change that.
If I right click on the drive icon I can select the convert GPT to MBR option. You’ll see this task appear in the operations pending list on the left. Partition wizard makes a list of commands rather than executing them straight away. This allows you to review the actions before committing, just to make sure you don’t end up formatting your Windows drive!
If you click the apply button the drive will be restructured to MBR.
We now need to create the partitions.
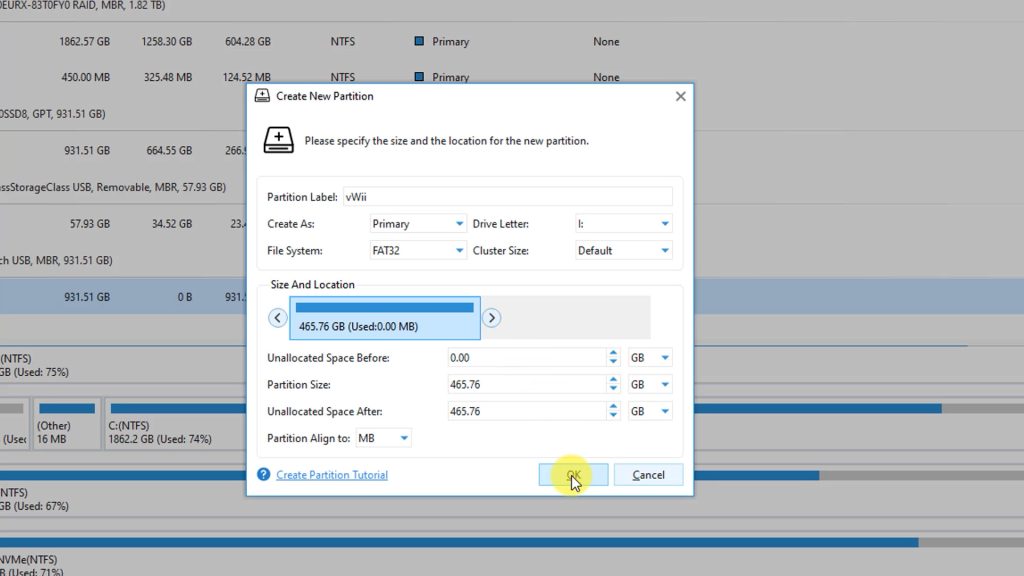
First right click on the drive and select delete all partitions. This will clean to drive and allow us to divide it up the way we want. Next right click on the unallocated space and Create a new partition. This first partition will be for the vWii files. It wants to be a primary partititon. The file system has to be FAT32 with a 32KB cluster size. You can then give it a label so you know which partition is which.
Lastly we need to set the size. This part is entirely up to you. This vWii partition will hold all your Wii, GameCube and retro console games if you use RetroArch. The Wii U partition will hold your Wii U games including any virtual console titles. Once you set the sizes it will be hard to change them. I’m going to make it easy and just split the drive in two.
In the size and location section you can see the partition size with drag handles at either end. This vWii partition must start at the left hand edge to place it first on the drive surface. You can then move the right hand end to set the size. My drive shows as 930GB of usable space so I’m going to slide the right side across to around 465GB – you don’t have to be very accurate! Once that’s set click OK.
You should now see the drive with one partition and the other half as unallocated space. Right click on the unallocated space and create a partition. This want to be a primary partition but this time using NTFS. Again give it a label and the size should automatically be set to the remainder of the disk drive. Click OK and the whole drive should now be divided in two with the first partition an FAT32 vWii drive and the second an NTFS Wii U section.
We’ll have those changes listed under the operations pending section so you can now apply them. Just let that run through and the drive is now ready.
You can close partition wizard.
Formatting the Wii U Drive
We now need to get the Wii U console to format the Wii U partition to its own special format. So pop the SD card and hard drive into the Wii U and power on.
You should get a message saying that it’s detected an external drive that needs formatting. If like me you’ve got that message turned off you’ll need to go to your settings and then to the Data management section. In there you’ll find an option to format the USB storage so select that and then go through the warning screens. Either way you’ll end up with a button that will format the new drive. Let the system do that and then we need to check to make sure everything has been set up correctly.
So power down the console and take the hard drive back to your computer.
Checking the Drive
Back on the computer, plug in the hard drive. You might get a message talking about it needing to be formatted. Just cancel that as it’s just the Pc not recognising the way the Wii U has formatted its partition. Start up Partition Wizard and you should see your vWii and Wii U partitions both sitting on the drive.
If you’ve only got one partition listed the Wii U has taken over the whole drive so you’ll need to go through the partitioning and formatting process again.
Otherwise we’re all set to load our games.
Adding Games
To add games you can now treat the new drive as two separate USB drives. If I look in my file explorer I’ve got my vWii drive listed. Depending on how your computer handles unformatted drives you may or may not see the Wii U partition.
For my Wii and GameCube games I can just use the appropriate games manager apps to package and install my game files directly onto the drive. I’m not going to cover that here so please check out my Wii game installation video. If you’ve backed up your old Wii hard drive you can simply copy all the files from there back onto the drive. Here I’ve got my old drive so I can just copy everything over. That’s our vWii setup complete. I can now plug the hard drive back into the Wii U.
For the Wii U games unfortunately we have to start from scratch. Any game saves will still be in place but we need to go through the installation process again. If you’re not sure how to do that then check out my video on playing games from Wii U backup files. Basically we need to package up the game files, put them on the Wii SD card and then use the WUP Installer package on the Wii U to install them to the hard drive.
Once you’ve got that all completed you should be able to play all your Wii U and vWii games without having to swap drives.
Other ISFShax Features
So that’s our dual use hard drive set up and working. But we’ve also installed a very powerful tool in ISFShax. It does provide a very robust brick and system protection. As you saw in the guide there’s a whole load of other tasks that you can get it to do.
The brick protection is a big feature but you can also get it to help with EMMC chip failures and so on, so definitely worth a closer look in some following videos.