Play all the retro consoles and all the games on your TV – mini PC + emulators = FUN!
7th September 2025
Turn your TV into the Ultimate Arcade cabinet with a £15 Raspberry Pi
23rd September 2025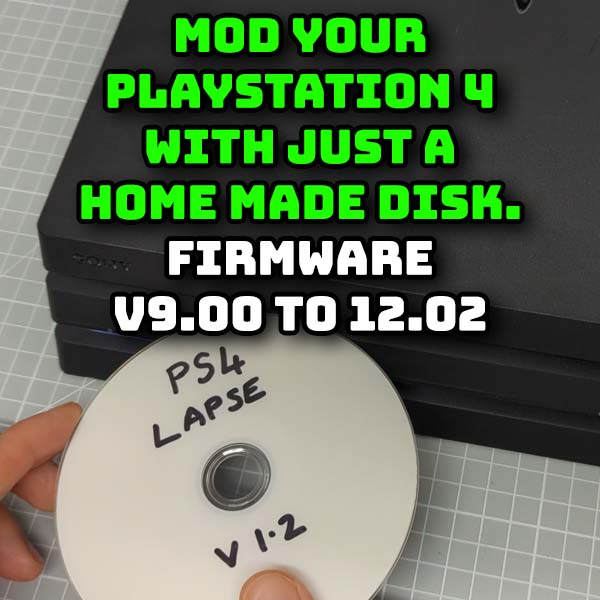
Mod your PlayStation 4 with just a home made disk – BluRay Lapse exploit V1.2 firmware 9.00 to 12.02
A few months ago the latest PlayStation 4 exploit was released that allows us to jailbreak firmware versions up to and including 12.02. This Lapse Exploit uses a vulnerability in the PS4 firmware to allow its code to get privileged access to the kernel so that it can then load a custom software payload such as GoldHen into the system to complete the jailbreak and give us a homebrewed console.
The PlayStation 4 modding community has been involved in a running battle with the Sony engineers since the console was first launched. Every time a software exploit is found and made available for us to use, Sony blocks it on the next firmware release.
At the time of this video in September 2025 the official firmware release is at 12.52 and the modding community’s Lapse exploit has jailbroken versions up to 12.02.
To check your firmware version go to the Settings option on your PS4 and go to the System section and then System Information. There you’ll see your version number.
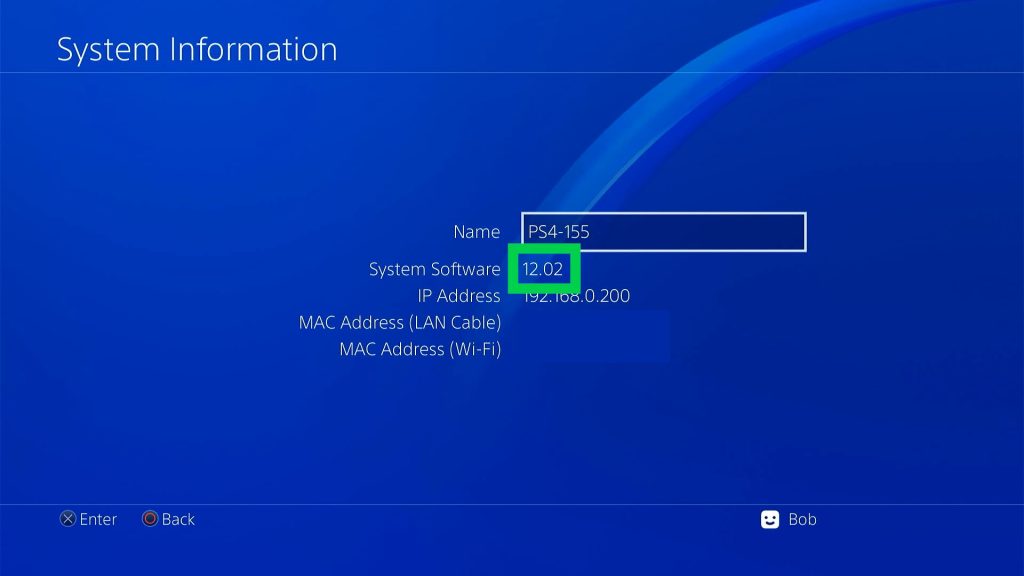
So if you’re on a firmware version of 12.02 or lower you’re in luck – and please make sure you turn off your automatic updates immediately. If you’re above 12.02 then you’ll have to wait for the next exploit to be found. But again please turn off your auto updates to keep your waiting time as low as possible.
Triggering the Lapse Exploit
The issue with Lapse has been how to trigger it. We can’t just run the exploit code like a game, we need a second vulnerability to give us initial access at a lower level that can then run the Lapse code to take control of the PS4.
Initially consoles on firmware versions above 11.00 needed to use a Lua game vulnerability to trigger Lapse. This involved buying a Japanese game, downloading a modified save file and then using that to get it all to work. Naturally the small range of games jumped in price and became hard to get hold of.
But recently a new Blu Ray drive exploit has been created that makes the whole process as simple as inserting a disk.
That’s what we’ll be covering in this video.
What You Need
Parts :
Internal Blu Ray Drive used in video : https://amzn.to/46Cag9d
Other Internal Blu Ray writers : https://amzn.to/4phmtbC
External Blu Ray writers : https://amzn.to/3Ig22ev
PlayStation 4 : https://amzn.to/4pfZii1
PS4 controllers : https://amzn.to/460vKxq
USB thumbdrives : https://amzn.to/47CmKjc
The exploit really is as simple as burning a Blu Ray disk image and then putting one file on a USB drive. The problem of course is that you need a Blu Ray disk writer. I’ll be burning my own disk in this video to show you how, but naturally a number if budding entrepreneurs have already started selling ready made Blu Ray disks on eBay and other outlets. So if you don’t fancy laying out around £80 for a Blu Ray writer you can pick these disks up for around £10.
One thing to make sure of before you buy. Do check that the disk is using version 1.2 or above of the exploit otherwise you’ll need to add some extra steps in the activation process which just gets in the way when you want to play. But more on that in a second.
You’re also going to need an exFAT formatted USB drive for the first time you run the exploit. After that the exploit will just run from the disk.
Building the Disk and USB
The exploit disk image is available from the main GitHub repository from Gezine at this web address.
https://github.com/Gezine/BD-JB-1250
If you head over there you’ll see a bit of information about the exploit and the versions available.
As we mentioned earlier the exploit is built from two parts.
The Blu Ray Jailbreak or BD-JB exploit provides the delivery mechanism. This actually works on firmware version 12.50 as well so perhaps this will also help exploits for that firmware.
The second part is the Lapse exploit code. As you can see from the repo releases this has recently been updated to version 1.2. The big fix in this version is the AIO fix. This bug caused some games to crash and the earlier versions of Lapse needed a patch to be loaded after jailbreaking the console. In version 1.2 this fix is built into the main code. So again if you’re buying a disk make sure it’s running version 1.2 or above otherwise you need an extra step in jailbreaking your PS4.
To build the disk you just need to download the provided disk image iso file and then burn that to a blank BD-R or BD-RE Blu Ray disk. Don’t use any high capacity disks for this project as they might not work on the PS4. You can do this on whatever type of computer you want, it’s not locked to a Windows machine.
If you do want to get your own Blu Ray writer you can pick them up from Amazon for under £100 or $100 and I’ll put a link in the description to the one I’m using. Be very careful when you buy a drive. A lot of the cheaper drives are sold as Blu Ray and DVD writers. What they really mean is that they are Blu Ray players and can only write to DVDs. I nearly got caught out until I checked the disk compatibility.
It’s also worth looking at drives with BDXL support. Blu Ray disks contain writable layers. Each layer can hold about 25GB of data. A 50GB disk uses 2 layers, but some drives can use 4 layers to get up to 128GB onto a single BDXL disk – yes the maths doesn’t work out for me either!
I’ve used an internal drive on my PC but you can get USB connected versions.
To burn the disk I’m using a Windows application called ImgBurn, but any Blu Ray burner software will do the job.
For me I just pop a blank disk into my drive, open up the app, browse and select my disk image. Make sure that you’ve got the Verify option ticked and then click the burn icon. This will then write the data to the drive and verify it to make sure it’s all been copied over correctly.
That’s the disk completed!
All we need now is the latest release of the GoldHen payload. You can use other payloads but GoldHen is pretty much the best one to go for unless you have a specific reason not to.
If you head over to SiSTRo’s page at
You’ll get to the download page.
The developer doesn’t charge for the download but if you want you can make a donation. Do remember that a lot of work has gone into this software and your support will help fund future exploit development.
If you don’t want to donate just enter a zero for the amount and the system will not charge you for the download.
At the end of the process you’ll get a download link to download GoldHEN. Just save this onto your PC.
If you now open up the archive file you’ll find a range of data inside. This software is used in a range of different PS4 exploits, but all we need is the goldhen.bin file. Make sure your exFAT formatted USB drive is plugged in and copy the file onto the root of that drive.
Next we need to rename the file on the USB drive to payload.bin, all lower case and we’re done.
Homebrew Store
At this point we have the entire exploit ready to go, but it’s worth adding one homebrew application to make our life easier.
If you head over to the PKG Zone website at
you can download the PS4 version of the Homebrew Store. This will download a .pkg file that you can save directly onto the root of your USB drive.
This application makes it really easy to install a wide range of Homebrew application directly from the Internet rather than having to use a USB drive.
So we’re now all set up to exploit the console.
Activating the Exploit
We now need to jump onto the PlayStation 4 and get that ready for the exploit.
First we need to go through the normal blocking and cancelling firmware updates.
Go to the Settings option and Network and turn off your Internet connection.
Then back to settings and System and Automatic Downloads and turn off all the update options.
Now back out to the System settings again and scroll down to Enable HDCP. Make sure that option is turned on otherwise the PS4 won’t be able to play Blu Ray disks.
Lastly go to your notifications page and the downloads section. If there are any firmware updates listed or downloading just highlight them and press the options button to delete them.
Next plug your USB drive into the console and insert the Blu Ray disk.
You should see the disk popping up on your XMB.
If you now highlight it and select it to play it you’ll either get the exploit running or you’ll get a message saying that Blu Ray playback hasn’t been enabled.
If you get the error message you’ll need to go back to your Settings menu and Network and turn the Internet back on. At this point you’re safe as we’ve also turned off any automatic updates. Then go back to the main XMB and try the disk a second time. At the error message say OK. You may now get a message asking to allow the drive to connect to the Internet. Allow that and the exploit should run.
So eventually you’ll get the exploit running and you’ll see a list of information appearing on the screen.
If all goes well you’ll get a SUCCESS message followed by series of pop up messages telling you that the USB payload has been found and that GoldHEN has been copied over to the internal hard drive. After that you’ll get the normal GoldHEN startup messages about FTP and BinLoader setups.
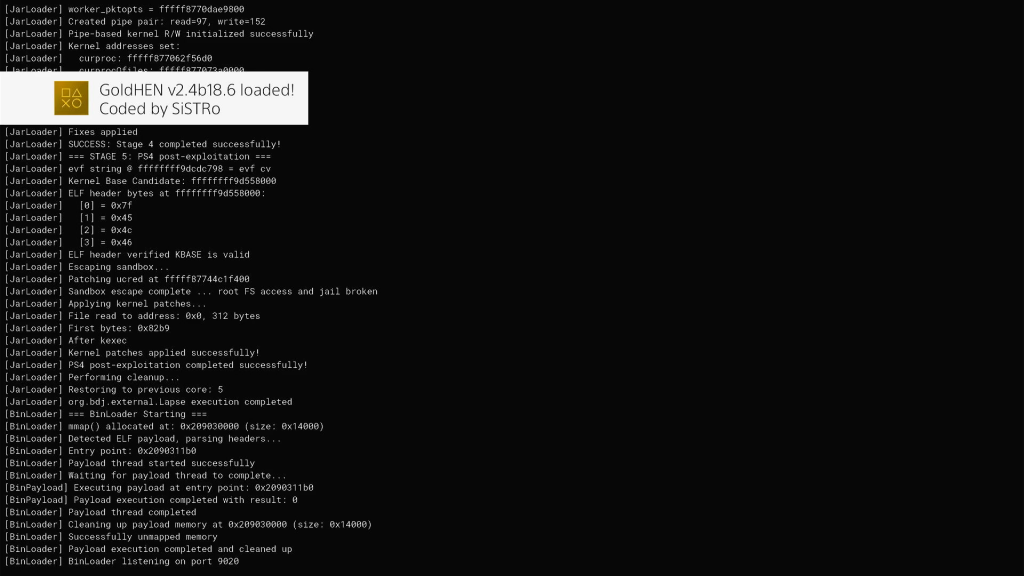
At this point you now have a fully exploited PS4.
If the Blu Ray application doesn’t automatically close just press the PS button on the controller and wait for the XMB to appear. Then press options on the Blu Ray application and close it.
If the exploit doesn’t work just power down the console, restart and rerun the exploit. This is normal for the mod as it works about 70-80% of the time on each run. So just keep going until you get a successful run.
From now on you’ll need to run the exploit every time you turn on or reset the machine but you’ll only need the Blu Ray drive, not the USB drive. If you do need to update GoldHEN as new released come out all you need to do is to pop the new version onto your USB drive as payload.bin again and restart the exploit with the USB drive plugged in. It will always check the USB first and use and copy that version if it’s there.
To finish this first run you can now go back to your Settings and Network and turn the Internet connection back on. This will allow applications to use the Internet, but now that GoldHEN has been activated it will block any communication with the Sony servers so your console is safe from getting blocked or updated.
Homebrew
So let’s finish this video by installing our first bit of Homebrew code.
On the XMB go to the GoldHEN option and select that.
This brings up the GoldHEN menu. In the Debug Settings option you’ll find the package installer. If you select that it will scan the USB drive for any .PKG files so you should see the Store-R2 package ready for installation.

Just select it and the PS4 Homebrew store will be installed to your internal drive.
Once that’s installed you should now have a HomeBrew store icon on your XMB. If you run that you’ll get a number of notifications, but just accept all of those, and then you’ll drop into the store itself.
From here you can start to download and install other homebrew application directly over the Internet.
What Next?
So you’ve now got your fully modded PlayStation 4 all ready for some fun.
Over the next few videos I’ll be showing you what you can do with it. Playing your PS4 games from backup files, playing PS2 and PS1 games, loading a whole range of retro console emulators and much more.