
Commodore Amiga Emulation in RetroPie Using AmiBerry on the Pi Zero 2W, 3B+, 4 or 400
14th January 2022
Don’t Scrap Your Old Laptop. Upcycle It! Use 1 – Coding Development System
23rd January 2022Installing Atari ST Emulation in RetroPie Using a Pi Zero 2W, 3, 4 or 400
The Atari ST was the first of the powerful 16 bit, 68000 based, home computers to be launched in 1985, just a few months ahead of the Commodore Amiga. A fast processor, 512KB of RAM, great graphics and full digital sound made this machine stand out from the 8 bit competition. Using the first full colour Windows, Icons, Menus, Pointer, or WIMP, operating system you could see the difference as soon as you booted up.
With emulation you can relive this system right now on your trusty Raspberry Pi.
We’ll be using RetroPie in this tutorial. If you’ve not got that installed please have a look at my RetroPie installation video. I’m using my Pi Zero 2W for this setup so again check out my installation videos to get RetroPie working on the Pi Zero 2 and how to overclock your pi Zero 2 for a bit more processing power. The Atari ST runs fine on the Pi Zero 2 so it will work great on the Pi 3B, 4 and 400.
In Retropie the emulator is not installed by default. We’ve got two flavours to choose from. The Libretro core and the standalone Hatari. I recommend the full standalone version so you’ve got full control over the emulator setup, and that’s the one I’ll show you how to install in this video.
So lets get that up and running.
Installing the Hatari Emulator
To install Hatari you need to boot up RetroPie and go to the RetroPie menu and RetroPie Setup.
Once that loads up it’s a good idea to update the startup script if you haven’t done so for a while. This just brings the setup coding up to date with the latest additions and software.
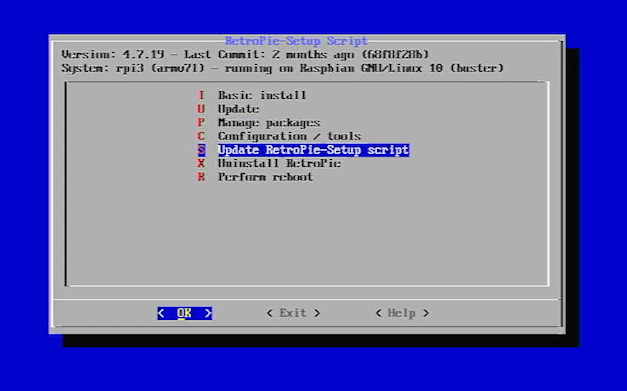
Just select the option from the menu and run through the process. This will take a while, especially if you haven’t run it for some time.
Once that’s all updated we next need to install the emulator.
Select the Manage Packages option, Manage Optional Packages and then scroll down to find the Hatari listing.
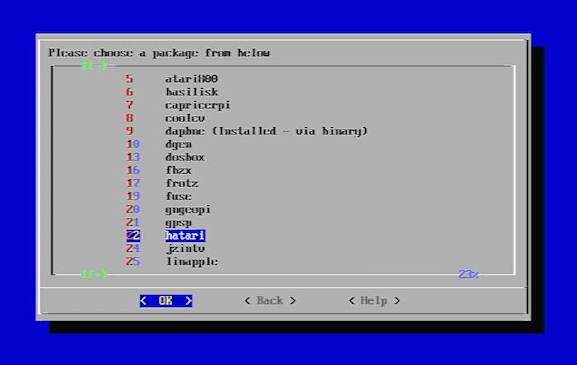
Select that and you’ll see the installation options. If you want the fastest install pick the install from pre-compiled binary option, but to use the latest version of the software click install from source. This process will take about 25 minutes on my Raspberry Pi Zero 2W so just leave the Pi doing its thing.
Once that’s finished you can just back up through the menus and then reboot the Rasberry Pi.
Installing the Bios
When you reboot back into RetroPie you’ll find that the Atari ST option is not showing. We first need to set up the emulator and add some games.
Our first job is to find and install some BIOS ROMs. There are 2 options here. The real BIOS ROMs are still under copyright so you’ll have to find those for yourself out there on the Internet. To be honest they are not hard to find. As per the RetroPie documentation you’ll want the 1.04 TOS ROMs for the best gaming compatibility. If you want to explore the whole Atari ST line right up to the Falcon, you’ll also need to find other versions.
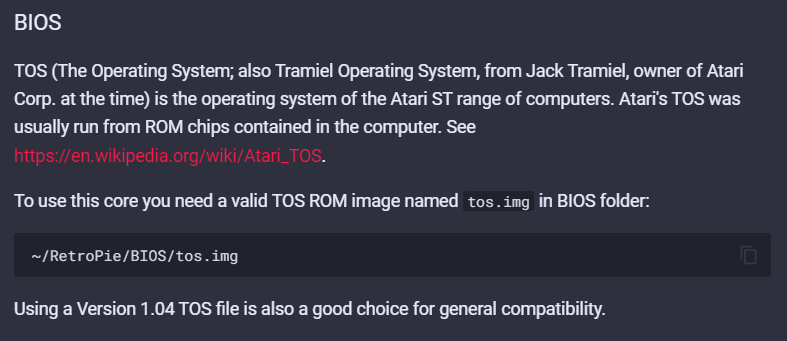
The second, and legal route, is to use the ROMs from the EmuTOS project at
https://emutos.sourceforge.io/
This project replaces the original ROMs with a fully compatible (and upgraded) set of software which will work for the full range of Atari models. I’ll be using this ROM set in my setup.
So from the EmuTOS website I want to download the 512K version. If I open up that zip file I’ll find a whole range of country specific ROMs. So for me I’ll be using the UK version.
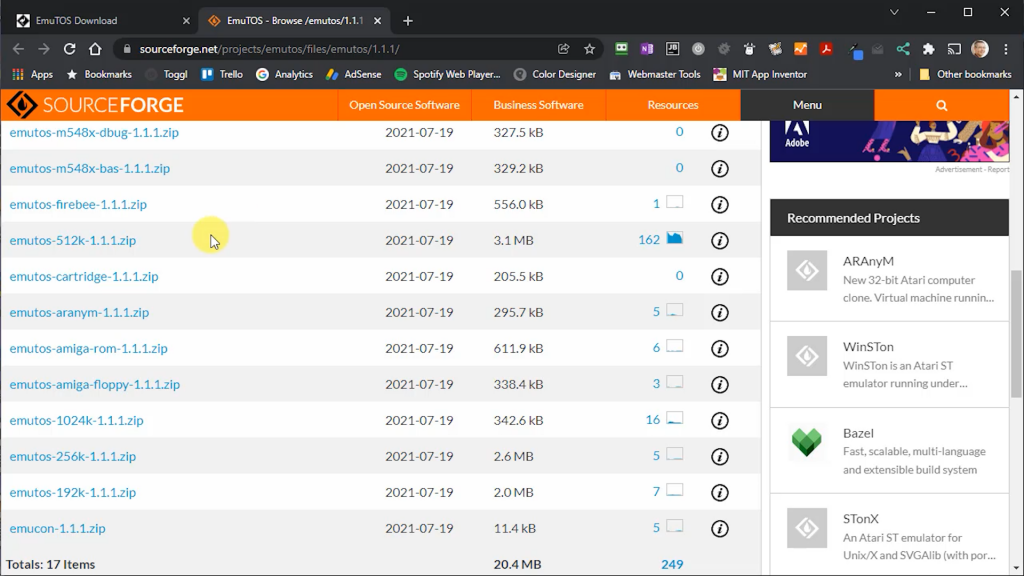
For whatever BIOS file you want to use you’ll need to rename it to tos.img. This is the file that RetroPie will look for when it first boots the emulator. You then need to copy this into the bios folder in your RetroPie SD card, either over the network using the \\retropie share, or by plugging your SD card into your PC and copying the files that way.
If you plan on using a range of BIOS files just copy those over using their original filenames and I’ll show you how to load them after we get the emulator started.
Adding Games
We now need to add some games to get the Atari ST option appearing on our RetroPie menu.
Again you’ll need to get hold of these by yourself. You’ll disk images, usually in .st format, for each game you want to play. Google will help you out here.
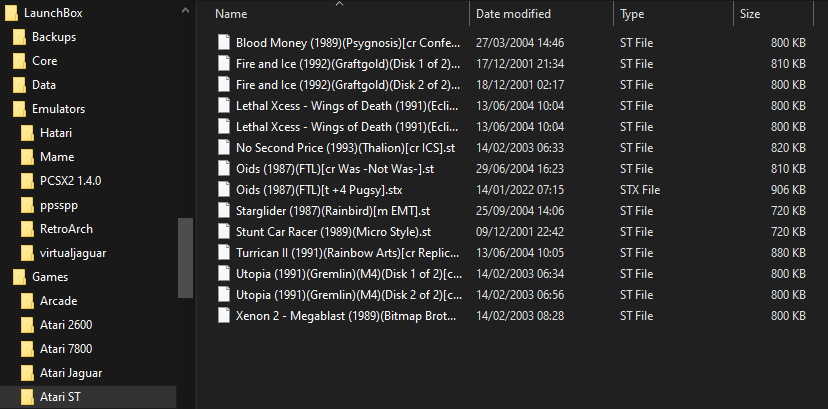
If you get stuck there are a range of Atari fan sites that will help you out. https://www.planetemu.net/ is a good all round retro gaming site.
Once you’ve got some game files just copy those onto your SD card in the atarist folder in the RetroPie roms folder.
We’re now ready to go!
Initial Emulator Setup
Reboot the Raspberry Pi and you’ll see the Atari ST appear on the RetroPie menu. Select that and you’ll see your game files.
We’ve got the last bit of setting up to do before we play a game, but we need to emulator to be running. It’s also important to have a keyboard and mouse attached for this stage, indeed, as we’re emulating a computer keyboard and mouse will make the whole experience so much better. So get those plugged in and select any game to start the emulator.
Once it starts up, even before the game loads, we can press the F12 key on our keyboard. This takes us to the Hatari Main Menu. This is a screen you’re going to use a lot.
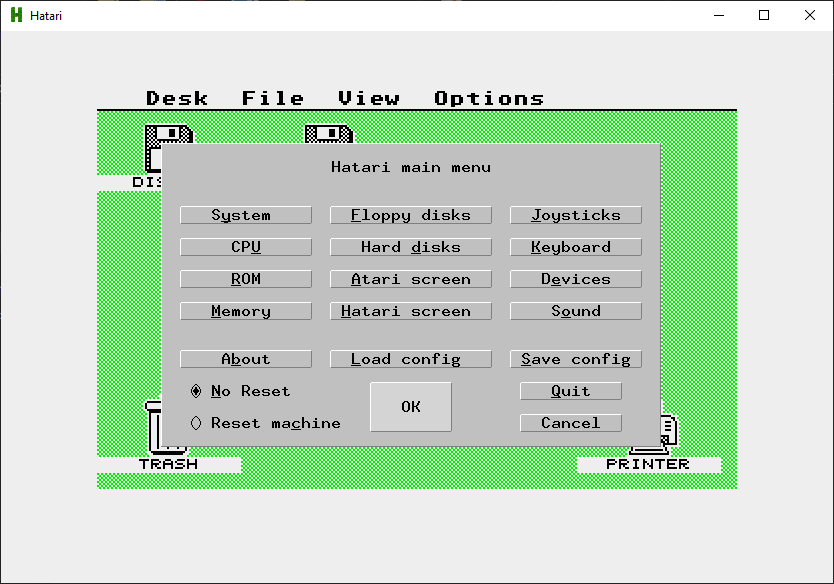
As you can see we’ve got access to view and edit the way the emulator works. So let’s create our default emulation setup.
Click on the System button. This screen lets you select the Atari ST model you want to emulate along with some model specific features. I’m leaving mine as a standard ST model as this will work with most games. Some title may need a more advanced model, but this is where you’ll make that change.
On the CPU screen you can select the processor options. Selecting the model on the previous screen will set these options to match that model, but you can override them here if you want. If you do find a piece of software is running slow you can speed it up a bit here by increasing the CPU clock. Hatari tries to accurately emulate the hardware so timings match the real world. I’m leaving mine as the standard ST.
Next we can open the ROM screen. This is where we can change the BIOS software. You’ll see that the system is set to use the tos.img file in the bios folder. If you decide you want to use a different BIOS just click the Browse button and find and select that file.
Back on the Main menu select the RAM option. Here we can set how mush RAM our ST has. I’m giving mine a bit extra at 4MB.
The Joysticks option lets you set up your game controllers. ST joystick 1 is the default port used for the player 1 controls. You can use the keyboard and set up your own keyboard mapping, or select a controller that you’ve got plugged in to your Raspberry Pi. ST joystick 0 is usually used by the mouse but you can set a second controller there if you want.
The next settings screen we need to look at is the Hatari screen option. RetroPie will have made most of the selections for you, but you’ll probably see a little green box in the top right corner of the screen. This is the floppy drive activity light. If you want to turn it off just set the Indicators option to none.
Lastly go to the Floppy disks option. This is where we can add and swap floppy disks during the emulation. Some games come on multiple floppies so you’ll need to come here to swap them over as the software asks for them. For now we need to eject any floppy images in the drives as we’ll be saving this setup as our default configuration.
We then need to set the Default floppy directory to make it easy for us to find the game files. Click the Browse button and navigate to the roms folder. This will be in RetroPie, roms, atarist. OK that and you’re all set to go.
On the Main menu screen select the save config option and just click OK to the options.
Finally click Quit and this should drop you back into RetroPie, but with our emulator default settings all in place.
Now we just need to play some games.
Playing the Games
Back in the Atari ST section just select a game and RetroPie will sort things out to get it running.
When you get hold of games try to get cracked versions. Original disks quite often have some form of protection where you might need some unlick device that came in the game box. Hacked versions make sure you get through this and usually add some extra features into the game as well.
In a game like Fire and Ice you’ll be asked to insert different disks as the game loads. Simply press F12 to get back to your Hatari Main Menu and select Floppy Disks. Eject the current disk in drive A and then browse for disk 2, etc. Back on the Main menu make sure that the No Reset option is selected. The OK button will take you back into the emulation. If you select Reset this will also reset the Atari ST. Sometimes you need to do this to get games to start, but if you’re switching a disk we need to resume where we left off.
Conclusion
So that should get you up and running with the Atari ST in RetroPie. Make sure you explore the system as there are a lot of really great titles out there. With Hatari you can also have a play with some of the applications from the day. If you’re into music you’ll probably know that the Atari was THE music production tool of the 80’s and 90’s due to its built in MIDI interface, so why not have a go with some of the original DAW software.


