Install Retropie and Download All The Games You Could Ever Wanted
2nd October 2021
How To Add The Commodore 64 To RetroPie – Installing VICE
7th October 2021Make Retropie Look Great With Themes and Images
Once you’ve installed Retropie and loaded a few games you’ll start to notice that the user interface is a bit boring with just simple lists of games. But we can easily turn this into a really slick gaming system with lots of box art, game info and more. So lets give Retropie a make-over!
Get Rid Of the Black Border
You might find that there is an ugly black border around the whole screen. This is due to the Raspberry Pi compensating for something called overscan. We just need to stop it doing this.
Select the Retropie configuration option in the main menu and then start the Raspi-Config utility.
Select display options, and underscan. You’ll then be asked if you want to turn on overscan compensation. Use the TAB key to select no, and then from the main menu select Finish. You’ll be asked if you want to reboot, so select Yes and the Raspberry Pi will restart.
You should now have Retropie filling the whole screen.
Box Art and Game Info
The clean install just presents you with a simple list of games. It would be great if we could get some images and game info to make it easier to browse through the thousands of games we’ve just installed. To do this we need to scrape one of the online games databases.
This is all built into Retropie, or at least EmulationStation.
Call up the EmulationStation menu by pressing the Start button and select the Scraper option. In the Scrape From option make sure it’s set to THEGAMEDB, turn ratings on or off as you prefer, and then select Scrape Now. This lets us set up what to scrape from the database.
In the filter section select All Games as this is our first scrape. We can then specify what systems we want. Select the Systems option and you’ll get a list appear. Select any option to turn it on or off. Then go back to the Scrape menu.
If you’re updating a system you can leave the User Decides option On, but this will stop the process and ask you for input every time is can’t work out what to do. I usually leave this turned off so the process just runs by itself.
Now just select the start button and your Raspberry Pi will start downloading the box art and game info. This will take a while so just let it run through.
When it’s finished you can go to a list of games and you’ll see the box art and game text as you scroll through the list.
Changing Theme in Retropie
The biggest change we can make to the look and feel of Retropie is to change the theme. Themes are different layouts for the home page and game pages that you can download and install. If you’ve scraped the game images these will be incorporated into the theme design to make scrolling through your games collection a real pleasure whilst making it easier to see what each is game is about before you try them.
Go to the themes page in the Retropie website and you’ll get some instructions on how to install them along with some previews of how they look. Just scroll down through the list until you find one that you like and make a note of its name. We’ll also see in a second that we can preview the themes on the Raspberry Pi so you can see it on screen before you install.
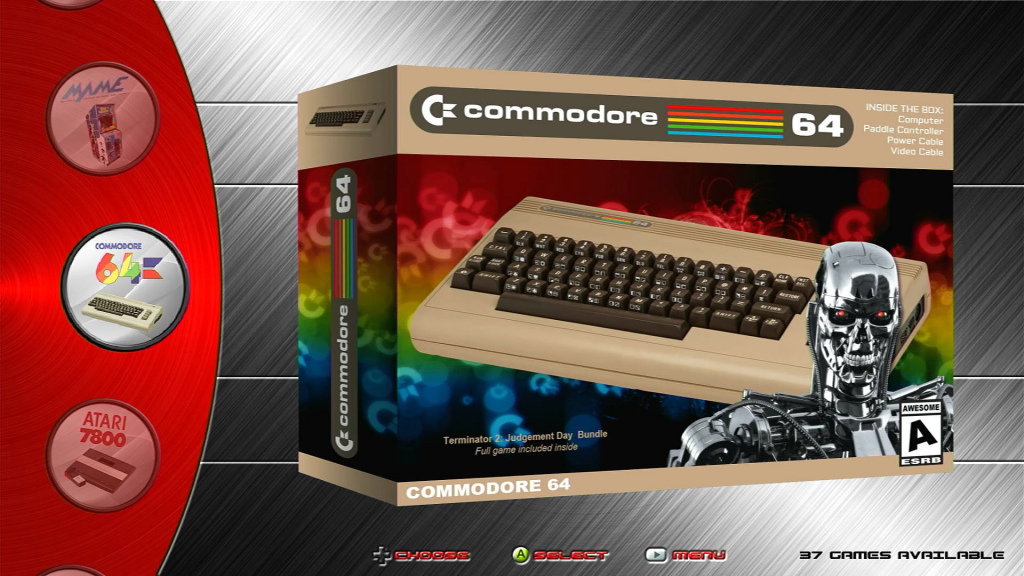
I’m going to install the boxalloyred theme but you can basically try one out and if you don’t like it just install another in its place.

So back in Retropie we need to go to the Retropie configuration menu and then select the ES THEMES option. This will open up one of the Retropie console apps. When you first get here the top option will be to install the theme gallery. Click on that and wait for it to install.
You’ll now be able to view and update the gallery so select that option and then the option to view theme gallery. This will start to show you full-screen images of what the theme will look like. It will automatically run through the main menu screen followed by a game screen And you can use the A button to step forwards and B button to go back. When you’re finished just press the X button to take you back to the themes app.
You now need to scroll down the list to install the theme that you want to use. Selecting it will cause the Raspberry Pi to download and install the relevant files. Once that process is finished just select the cancel option to get back to the main Retropie screen.
You know I need to enable the theme by pressing the start button to call up the Emulation Station menu. Then select the UI Settings option, followed by the Theme Set option. This will bring up a list of the installed themes. Highlight and select the one you want to use and then use your B button to get back to the main Retropie display. Retropie should now look completely different.
As I said earlier if you install a theme and don’t like it just something or through the process again to try others out.
Much Better
Hopefully you’ll agree that Retropie now looks much better. All this left to do is to go on scrape all the images for all the other systems and you have a fantastic retro gaming console.


