Learn to Code Asteroids – Lesson 5 – Scaling Vector Graphics
14th January 2020
The Central Processing Unit – CPU
19th January 2020Learn to Code Asteroids – Lesson 6 – Polygon on Polygon Collision Detection
In the last lesson we completed the collision code for shooting asteroids. Our point in polygon collision detection signals to our software when an asteroid has been hit and we can now break them into smaller pieces until they are finally destroyed.
But we haven’t yet completed the code to detect when an asteroid strikes the player ship. To get this to work will need to upgrade our point in polygon collision detection to a full polygon on polygon collision detection system. To see how this works let’s examine the actual situation were trying to detect.
Both our ship and the asteroids are modelled in our software as vector shapes. Each uses an array of points stored as X and Y coordinates. Using these together with the shape’s position on screen and its rotation angle we can calculate the screen position of each point and construct lines to draw the shape. As an asteroid and the player ship come together eventually the two ships will overlap. This overlapping can be detected as a point in the player ship object moving inside the polygon of the asteroid. This point in polygon collision detection is code we’ve already written.
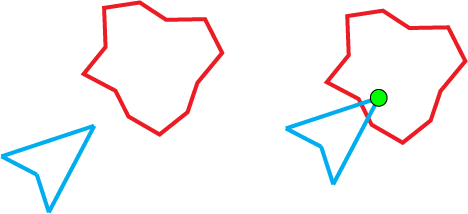
But we can’t just check for one point on the player ship. Depending on the angle of the collision it could be any point which has moved inside the asteroid. So our polygon on polygon collision detection code needs to loop through every point in the player ship object to check if it’s moved inside the asteroid.
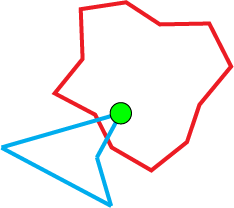
However, even if we check every point in the player ship we can still get the situation were no player ship points have moved inside the asteroid but the asteroid has still hit the ship.
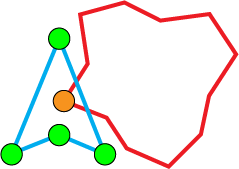
So our polygon on polygon collision code also has to check for every point in the asteroid moving inside the polygon of the player ship. So we need a second loop which will take every point in the asteroid and do a point in polygon collision detection to see if it is inside the player ship polygon.
If our code finds any point in any shape inside the other shape then the two objects have collided and we need to handle this.
In the video I’ll take you through the full code to complete this collision detection and we end up with a very accurate system to detect when two polygons collide.
Once we’ve got the asteroid hitting the player ship collision detection ready we need to work through some of the game state changes. At the start of this lesson we only have a game start screen, a play game state and an endgame state. Once a player ship has been hit our game needs to go into a new “player ship exploding” state. To complete the state will actually have to create a number of states to handle each stage of the ship exploding and responding cycle.
Once we detect that an asteroid has hit the player ship we first have to start the explosion sequence. In this lesson we’ll simply trigger an explosion sound. Later we’ll be adding explosion graphics. Once we triggered the explosion sequence our game then has to go into awaiting state to allow any signs or animations to finish. Once that delay is over we then need to respawn the player ship. But if we simply put it back on the screen there may be asteroids directly over the respawn position or very close to it which means the player will be instantly killed as soon as the respawns. Our code therefore needs to go into a third game state where we wait until there are no asteroids close to the respawn point. Once we detect that the respawn point is clear and it’s safe to respawn the ship we can put it back on screen and continue the game.
Again the video goes through all of the code to detect this safe situation. Because we’ve written a lot of helper functions you’ll find that the main bulk of the programming has already been done in our check separation function.
With the player ship being able to be hit we now need to add in the player life system so that the game allows the player to have three ships before the game ends. We’ll also improve our game info function to display these lives as small icons in the top corner of the screen.
The lesson finishes off by making the start and end screens a bit more interesting by adding the asteroid animations in the background. For the start screen we’ll use a fresh set of asteroids, and in the end screen will keep the set of asteroids left over when the player ship was killed.
All the code for this lesson is available to download using the link below.

