
Play Halo from the start on your modded Xbox 360 – first 4 Master Chief main titles
28th April 2025
Mod your PS4 with GoldHEN and run Homebrew apps
8th May 2025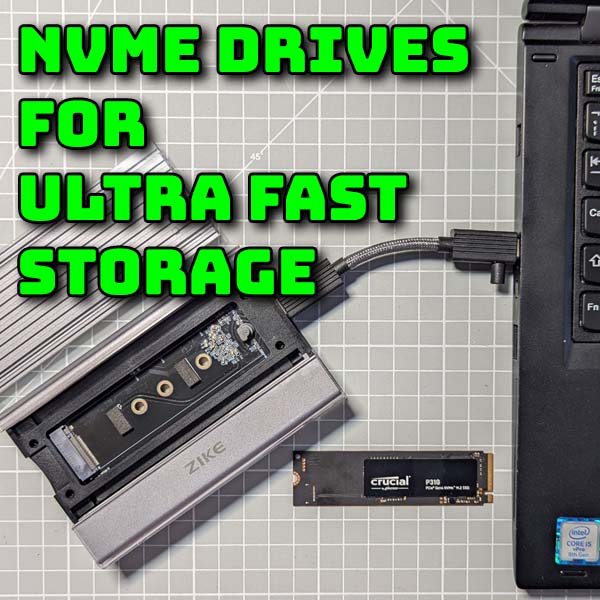
Using NVMe drives for ultra fast storage – internal and portable drives to upgrade your laptop & PC
The size of our data files seems to get bigger and bigger every year. This puts a lot of strain on our internal laptop hard drives in terms of storage space and can quite often make external drives impractical because of speed.
But what if we could add large scale, plug in, external storage that works even faster than an internal SSD drive?
NVMe drives are here and able to provide just that. But how can you get the speeds promised by an NVMe solution on your laptop or PC?
Lets find out.
Parts Used In This Project
Get your own Zike NVMe enclousure at https://bit.ly/4hJrdlq
Use this code for 20% off!! BYTEZ666
NVMe drives – I use these Crucial drives
https://amzn.to/3GyyxU2
But any NMVe drive will work well
https://amzn.to/3YjoU1F
PCIe NVMe Adapter cards
https://amzn.to/3RD7mtH
NVMe vs SSD vs Mechanical Hard Drives
Hard disks are the best way to get large scale storage for your computer. USB thumb drives top out at about 500GB so if you want Terabytes of space you need a hard drive.
They come in 3 main flavours.
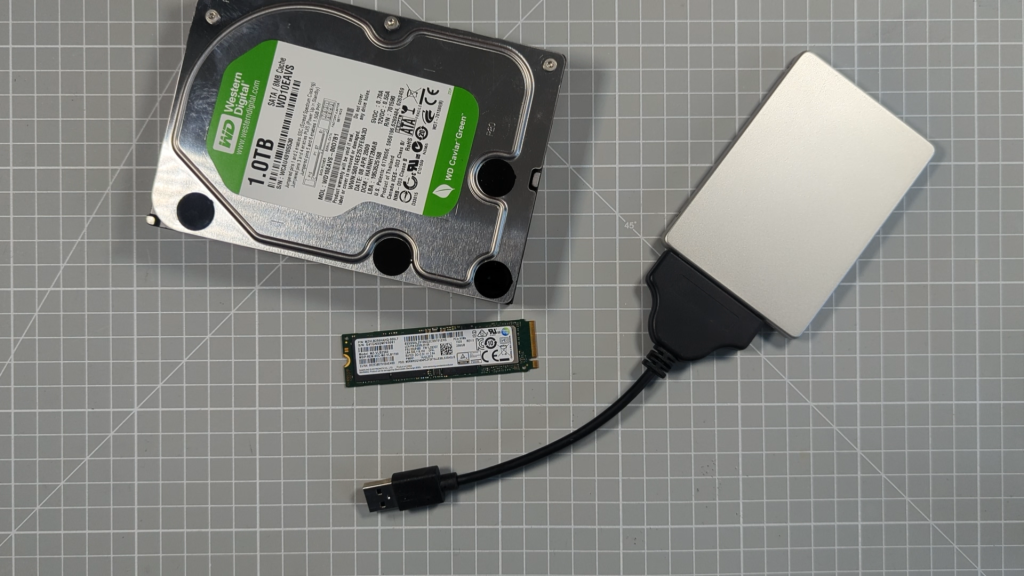
The older mechanical drives use a spinning, magnetic, metal disk to store the data. A reading head moves over the disk to read and write your files. This slows the process down. When we measure disk speed we use the amount of data we can move per second, usually in megabytes of data. Megabytes are written with a capital B. If you see speeds quoted with a lower case b these are usually megabit or gigabit speeds which you have to divide by 8 to get to the same numbers we use for file size. Using bit rates makes the numbers look bigger!
Mechanical drives can transfer data at up to 150MB per second. In reality this means that reading or writing a 1GB file will take around 10 seconds. These drives are however the cheapest option, especially when you get to very large, over 10TB, disks. If you need somewhere to store or backup data these are ideal.
Solid State Drives or SSDs use memory chips to store the data so there are no moving parts. The speed you can read and write data is then down to the electronics. Most SSDs will use a SATA interface, which is just the name for the way in which they plug into your computer. This SATA interface dictates the maximum speed you can move data which for SSDs tops out at around 500MB per second. About 4 times faster than the fastest mechanical drives.
Non-Volatile Memory Express or NVMe drives again use memory chips for storage but this time they are configured differently in the electronics. NVMe drives are designed to use the same interface that your graphics cards use. This is the PCI Express bus on your motherboard. The advantage here is that this interface is very fast, and offers multiple connections or lanes for each device. This lets NVMe drives get up to around 7000MB per second data rates, about 10 times faster than an SSD!
Choosing an NVMe Drive
Most NVMe drives end up being plugged directly into your laptop or PC motherboard, or into an internal PCIe adapter card. This is because of the way the NVMe drive achieves its speed using the PCI Express bus.
When you go to buy an NVMe drive you’ll find a number of specs that you need to pay attention to. First is the form factor, basically the shape, size and connections on the drive. If it’s for your personal computer or laptop, not a server, then you’ll almost definitely want an M.2 form factor.
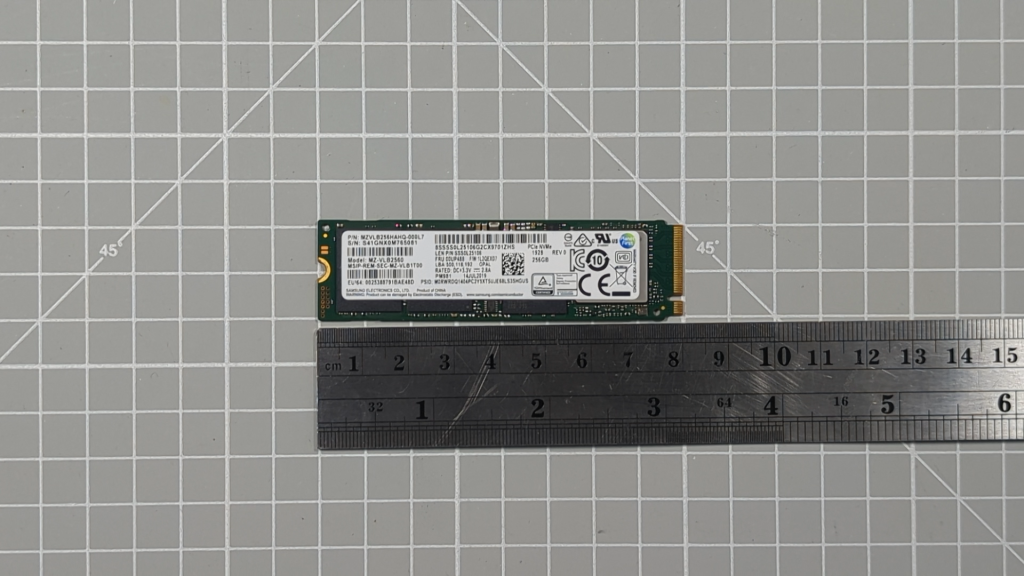
M.2 drives are usually 22mm wide with a range of standard lengths. M.2 2280 is an M.2 connection on a card 22mm wide and 80mm long. 2230, 2242 and 22110 are different length cards with the same width. So you need to make sure you get a physical size that matches your drive connection.
Next you need to make sure that you’ve got a real NVMe drive. The M.2 card format is also used for SATA hard drives. These use a different interface that runs at a normal SATA SSD speed of around 500MB per second transfer speed.
If you want to reach the 7000MB per second rate of an NVMe drive you need to make sure the unit uses the proper NVMe interface. This interface uses one or more PCIe lanes to move data around. These are the same interface lanes that your graphics cards and other internal cards use.
When you look at the drive specifications you’ll see two numbers quoted, e.g. Gen3x4. The first number tells you the PCIe generation or version being used. The higher the number the faster the data transfer rate. In general, increasing the Gen number by one doubles the data rate.
The second number tells you how many lanes the drive can use at the same time. The more lanes the more data.
So our example of a Gen3x4 uses Generation 3 PCIe lanes which can read at about 1000MB per second. Using four lanes gives you a maximum read speed of 4000MB per second.
Also be careful that the manufacturer is quoting either a read or write speed. NVMe drives are designed to be able to read and write at the same time so beware of maximum data rate figures as these can combine the two operations to give a bigger number.
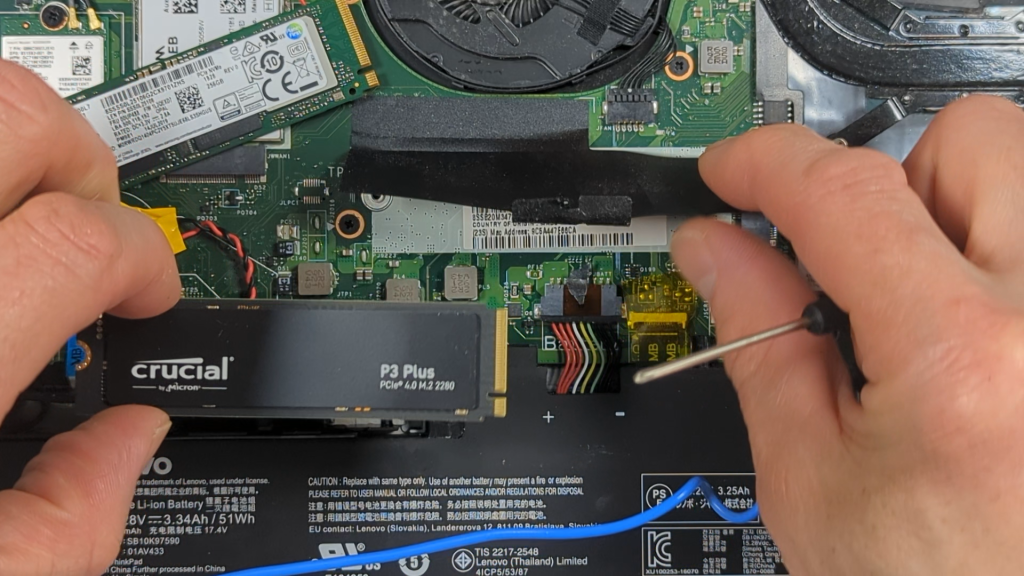
Adding an NVMe Drive to your Laptop or PC
Now that we know how the drive works and how to choose one we need to connect it to our computer.
For internal drives you might have an M.2 slot on your motherboard. Most modern laptops will use this connection. So you’ll need to open up your machine and either swap or add your new drive.
For desktop machines without a slot on the motherboard you can buy PCIe adapter cards. Your NVMe drive plugs into the adapter card which then plugs into a PCIe x4 slot on the motherboard.
With this setup you’ll get the best performance for your drive.
External Drives
But what if you want an external drive that you can use as a normal hard drive but can then carry your files from one computer to another?
For this you’ll need an NVMe drive enclosure. This is another adapter board, but this time it will use a USB or Thunderbolt cable to connect to your laptop.
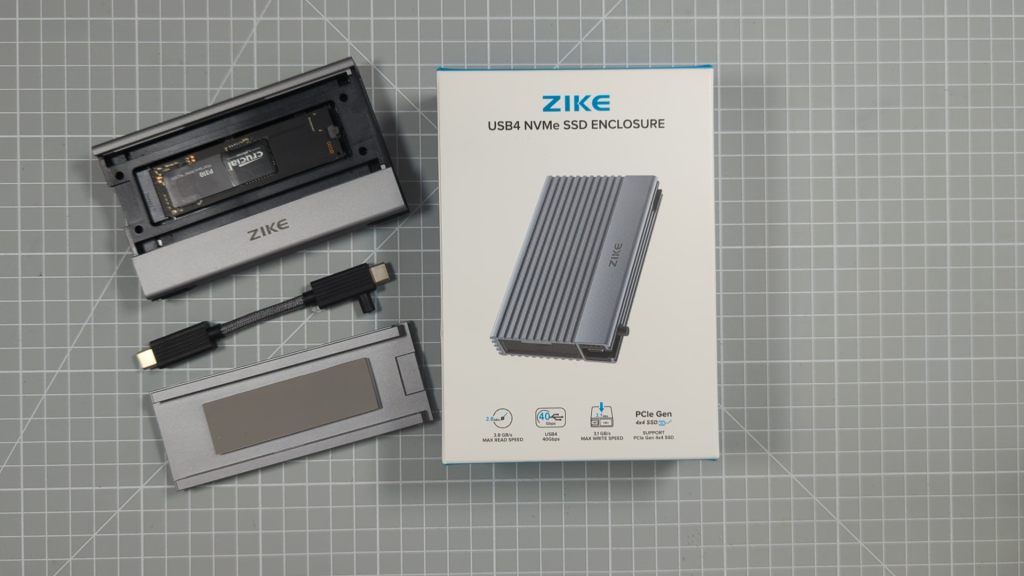
The one I’m using here is from a company called Zike who kindly sent one over for review. This unit does show off the features that you want to look out for when choosing your drive enclosure.
First we want it to work almost as fast as our internal drive. For this we need the interface on the enclosure’s motherboard to be able to use the full PCIe lanes of our drive. My Zike device is built with PCIe Gen 4×4 support so we can internally talk at Gen4 speeds over four lanes. It will work with almost any spec NVMe drive but using lower than Gen4 may not be using the full potential of the enclosure. But as we’ll see in a second this might not be the limiting factor.
So once we know that the drive caddy can communicate with the NVMe drive we need to look at the interface to our computer.
The Zike device uses a USB4 connection. This gives us a 40Gbps (Giga bit per second) port which works out at around 4000MB per second data transfer. USB 4 is backwards compatible with USB 3 and 3.1, 3.2, but will also work with a Thunderbolt connection at the full 40GBps speed. USB 3 works at around 5Gbps or 500MB per sec rising to around 20Gbps or 2000MB per second for the latest USB3.2.
So our limiting factor on data speed is really going to depend on the connection we have to our laptop or computer.
If you’ve got a USB 4 or Thunderbolt 3 or 4 connector you’re in luck. This will give you the best performance which is theoretically around 4000 MB per second.
The last part of the speed spec is the cable you use. We all have USB cables lying around for our phones and game controllers and so on. But these aren’t usually high enough quality to work with our NVMe drive speeds. The cables that come with the Zike using are full specification cables that can cope with the data rates. It’s best to either use these, or the ones that come with your unit, or pay out for a good quality Thunderbolt or USB 4 cable. USB 3.2 will also work but you may get some reduction in speed. You should also try to keep the cable length short. The shorter the cable the faster the speed as well.
You may also need an adapter to take you from USB type C to the larger USB type A. Again make sure you get one that’s fully rated for the NVMe speeds. And I’ll put links to all the parts I’m using in the description.
Other features to consider
There are also some other aspects you should think about when choosing your drive enclosure.
Most M.2 drives are held in place by screws. This stops them moving around and breaking their connection. The Zike enclosure uses a novel rubber securing bolt that keeps the board held against the internal heat sink pads so that it is both secure and not putting any bending strain on the circuit board through over tightening. A really nice feature.
As I mentioned you also need to consider heat dissipation. This unit is basically one big metal heat sink. As you read and write data to the NMVe memory it will start to heat up. The more data you transfer in and out the hotter it will get. With the drive locked away inside a closed box you need to get that heat off the circuit board and dump it into the surroundings. If you don’t the drive may well slow itself down to protect its circuits, or indeed shut itself off to cool down if it gets too hot. So do make sure your enclosure can keep your NVMe drive running at full speed.
Speed Tests
Well, hopefully you now know a bit more about connecting an NVMe drive to your computer. So lets test mine out to see what sort of performance we can get.
First we’ll look at my desktop PC. This is an Intel Core i7 system with a PCIe Gen3 bus. I have all three types of hard drive attached so lets see what speeds I can get.
For my mechanical drives I’m getting around 140MB/s data rate which is sort of what we expected. Internal SSD is running at around 500MB/s, again what we expect.
My NVMe drive is topping out at around 2500MB/s. Not quite the theoretical maximum but again around 5 times faster than even the SSD drive. I use this drive for my video work where I’m working with large video files and believe me when I say it really does make a difference.
If we now move on to my laptop.
This is an Intel Core i8 system. I run an internal NVMe hard drive again on a PCIe Gen3 motherboard. Running the disk benchmark gives me up to 3500MB/s data transfer which is pretty much within the range you’d expect and about 7 times faster than if I had an SSD internal drive.
The telling part is now to test the Zike enclosure.
First I’ll try it using the laptop’s USB 3 connection. For this I’m using the Zike cables with a USB C to USB A adapter rated at USB 3.2 speed. So we should be limited here by the laptop’s USB 3 connection. But when I first ran the benchmark I got a dismal 40MB/s data rate. This is about as bad as a USB mechanical drive. A bit of Internet research suggested that I had my USB C to A adapter plugged in upside down?? I didn’t think that made any difference to USB C but I tried swapping it over and, what do you know, I’m now getting 400 – 450 MB/s. So the external drive unit is working great and pushing my USB 3 port to its limits.
Now for the Thunderbolt connection. The Zike unit is USB 4 but this is compatible with my Thunderbolt connection and they both run at the same 40Gb/s data rate. So running the benchmark I’m getting my external NVMe drive hitting just over 1000 MB/s. This is not as fast as the internal connection, but for a six year old laptop I’m still very impressed with the performance. Compared to a full speed SSD we’re still getting twice the data rate and this is over a USB C cable. I do expect performance over a proper USB 4 connection with a modern motherboard to be faster, and the quoted maximum of 3500 MB/s doesn’t seem unreasonable.
So with the proper connection to my laptop I can now have an external, transportable drive that I can use with really fast file transfer speeds that I can swap between my computers. Even when my PC only has a standard USB 3 connection I’ll still get full SSD speeds.
Conclusion
So hopefully this has given you some insight into what NVMe drives are, what to look out for and how to create a high speed, portable, hard drive for your everyday use. Big thanks to Zike for supplying the drive enclosure and do please check out their website if you want to get hold of one for yourself.