The PlayStation 3 is the best value for money gaming console today
7th March 2025
Use a Real Commodore 64 as a USB Keyboard for the VICE emulator
22nd March 2025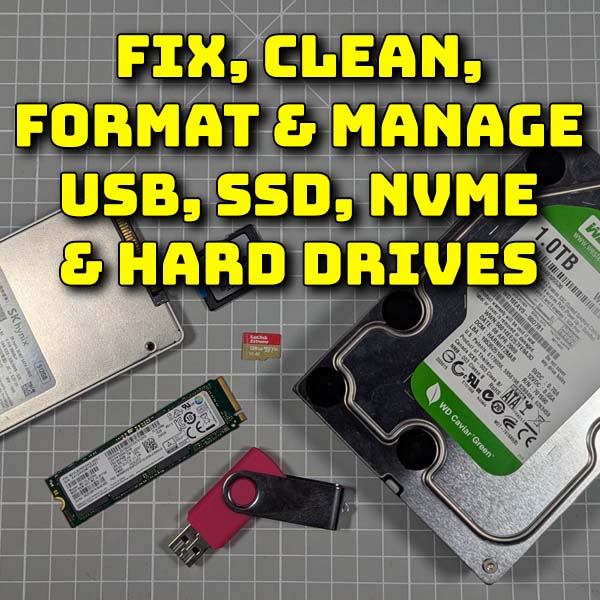
Fix, Clean, Format, Clone and manage all your USB, SDD, NVMe and Hard Drives with Partition Wizard
If you use USB drives, hard drives, SSDs, NVMe or any other sort of storage devices you need some way of keeping these in good working order. Especially if you’re swapping them around your retro gaming systems, Raspberry Pi projects or any other sort of work involving mass storage. In this video I’ll walk you through my setup for managing your disks. We’ll cover formatting to various specifications, cleaning partitions from drives, resizing drives, recovering lost data and cloning drives.

There are a number of applications that help you do this but my preferred choice is the free version of Minitools Partition Wizard. If you’ve watched my modding and SBC videos you’ll have seen me using this, but in this video I’ll show you how to make full use of this software to solve all your disk problems. This is a Windows only application so if you’re using Linux or MacOS you’ll need to find a similar application for those platforms.
Installing Partition Wizard
To install Partition Wizard you just need to go to the main website at
https://www.partitionwizard.com/
Then in the home menu click the link for the free version. This will download an EXE file that you need to save to your computer and then run to install the software. You can use the default settings for all the options and you should then have the application ready for use.
Cleaning Drives
One of the first tasks in using or re-using a drive is to make sure it’s properly cleaned and prepared for formatting. If you’ve been using any sort of single board computer like a Raspberry Pi, or just setting up a Linux boot disk you’ll know that those systems create a range of disk partitions, formatted in various ways with potentially hidden partitions that your normal tools can’t see.
Again this is why using a specialist application like this one comes into its own.
If a plug a drive into my Windows PC, even if it has non Windows compatible sections you’ll be able to see and manage them. Partitions are simply the way your computer can split up a drive into smaller sections that can then be treated like individual drives in their own right. On this Raspberry Pi boot drive you can see a couple of partitions; a boot drive formatted as FAT, and a retropie section formatted as EXT4 which is a Linux format.
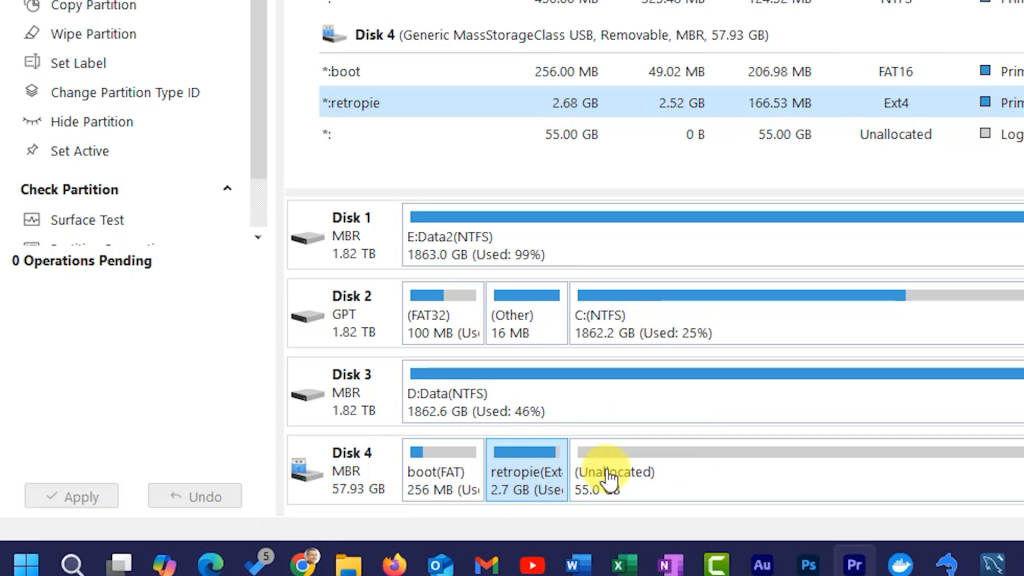
If we were to try to clean this drive using the standard Windows formatting tools it wouldn’t clean the whole disk.
Using Partition Wizard we can simply go to the drive letter, right click and select to delete all partitions. This will clean all the drive formatting and prepare it for our next project. Note that this does not delete the data on the drive, just the formatting information. As we’ll see later we still have a chance to recover our files.
With Partition Wizard we don’t perform the clean operation right away. Instead all of our tasks are lined up ready to go in our task list. This gives us a chance to verify what we’re doing before actually altering the disk. So I’m happy now to clean the drive. Clicking Apply does the actual partition deletion.
Low Level Drive Structure
Now that we have cleaned our drive we can look one step deeper into the base structure of the storage. If you look at the drive letter area you’ll see it’s listed as an MBR drive. This is the older structure for the way the drive data is organised. The newer version is GPT which is needed for drives larger than 4TB. We are getting into the more technical aspects of drives here and I did make a video looking at drive structure so do have a look at that.
In essence MBR drives will work with most computers and consoles, including your retro machines such as the Nintendo Wii, Xbox, PlayStation and so on. GPT drives give better performance for computers that can use them.
So you get to choose how to structure your drive and if you need to change the low level formatting you can do it with tools like Partition Wizard.
Partitioning and Formatting Drives
So we’re now ready to partition and format our drive.
First off, we need to create at least one partition. If I right click on the free drive space I’ll get a pop up menu and from here I can create a new partition. Partitions can be any size you want up to the currently available space on the drive. If you wanted to split this drive into two logical drives, i.e. let the computer think that you’ve attached two separate drives, you can create two partitions. Just the same as the Retropie drive we started with.
More commonly though you’ll probably want to just create a single, primary partition that uses the whole drive space.
Once we have the partition we need to format it so this tool lets you specify the format as we create the partition. Here I’m going to set this as an NTFS drive for use with my PC.
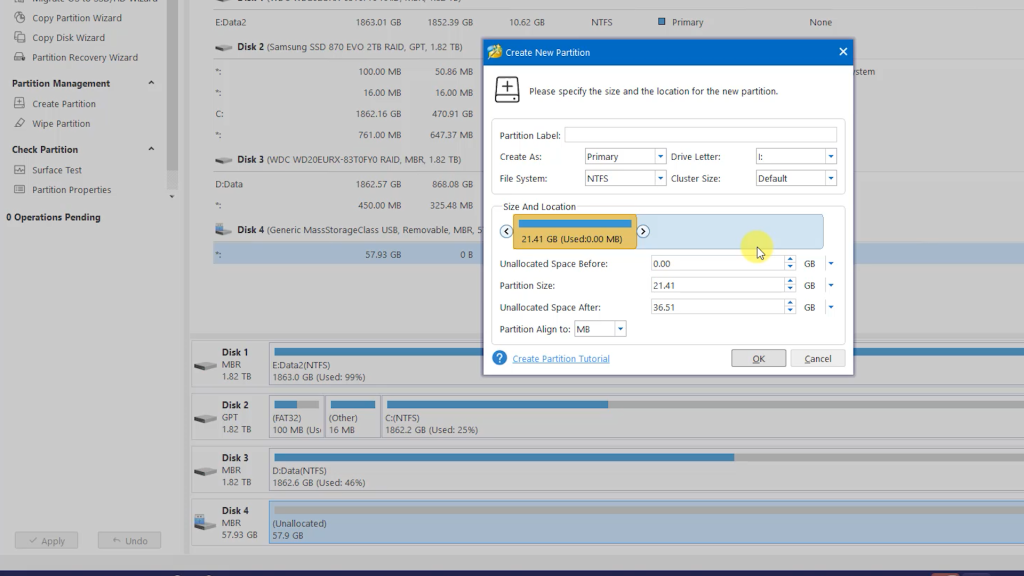
On the format choice you do need to be aware of what format is going to work with the system you’re setting up. For example a lot of my console modding videos need FAT32 formatted drives with specific cluster sizes. Again all of this can be specified in Partition Wizard.
Once we’ve set our options and clicked Ok you’ll see the task listed in the queue. So let’s just apply that and our cleaned drive is ready for re-use.
Cloning Partitions and Drives
So we’ve now seen how to clean and create a new blank drive. But what if we want to make a copy or backup of a drive.
Here I’ve got an SD card from my hacked Nintendo Wii. This allows me to play any Wii or Gamecube game on my Wii console using backup game files. If you want to know how to hack yours just watch this video.
So I want to copy this SD card to a bigger capacity card to give me more space for my game files. I can easily do this with this tool.
First I’m going to clean the new card. This is straight out of the box but has been factory formatted with 2 partitions. So I’m going to clean those off to give me a fully unallocated drive.
Next we simply need to copy the partition from the Wii drive into that unallocated space using the copy wizard. We simply select the partition we want to copy, then specify where we want to copy it to and we then get this copy dialog appearing. The software understands that the new drive has more free space than the old so it’s offering to resize the partition as we copy it. This let’s us use the full free space on the new drive. Of course we could just copy and manually resize the partition if we wanted to.
Once this has finished we’ve effortlessly doubled the capacity of our console’s internal storage.
Other Tasks
That’s pretty much the main tasks that you’ll want to do to your drives. You can now clean and recover used drives, including fixing badly formatted drives, format them to exactly the format you need and copy drives and partitions to new devices.
Of course there are a whole range of other features in this package. Some are available on the free software but some, like the copy system disk and data recovery options only come with the paid versions.
So do give this software a look. It’s a powerful piece of kit and I use it for my daily drive cleaning, formatting and all those other tasks for my single board computers, consoles and PCs.