
ESP32 Bluetooth Keyboard As A Retro Game Controller
15th November 2021
Recalbox 8 Released for the Raspberry Pi Zero 2W – Full install and Nintendo 64 test
6th December 2021Raspberry Pi Pico MicroPython – Getting Started
The Raspberry Pi Pico is a very cheap, but powerful microcontroller board. This is very different from the usual Raspberry Pis which are single board computers that run a full Linux operating system. The Pi Pico is more like an Arduino where we need to add our own code before the board can do anything.
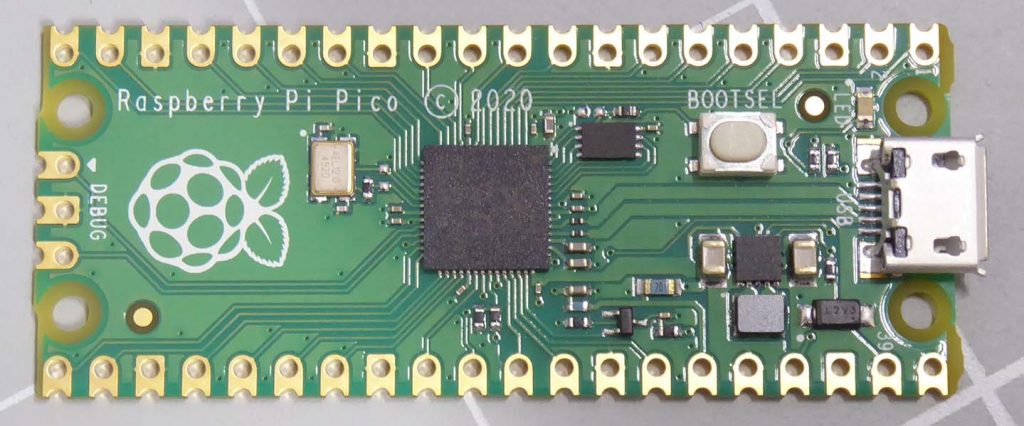
But unlike the Arduino Uno or Nano boards with their 20Mhz processor and small memory, the Pi Pico has a powerful dual core ARM processor chip running at 133Mhz with 2MB of onboard Flash memory for your code and 264KB of static RAM for your data. With 26 multifunction GPIO pins providing analogue inputs, UARTs, SPI, I2C, PWM and even USB support, the Pi Pico is orders of magnitude more powerful.
With this amount of processing power and memory the Pi Pico is also able to run MicroPython.
MicroPython
If you’ve been using Arduinos you’ll know that they are programmed in C++. This is a very powerful language but can be a bit awkward to use, especially if you’re new to coding.
MicroPython allows you to code your microcontroller using a slightly cut down version of Python. All of the core functionality is there with some added extras to allow you to control the extra hardware on the Pico. So you can do almost anything you could do with C++, but using a much more beginner friendly language. If you head over to the MicroPython website at
you’ll find full details of the language and the libraries that have been developed to run with it.
What We’ll Cover in This Tutorial
In this tutorial will take a brand-new Raspberry Pi Pico, load MicroPython onto it, set up a Python development system on our PC and then get some basic input and output working using switches and LEDs.
So let’s get started!
Installing MicroPython On the Raspberry Pi Pico
As usual, the good people at the Raspberry Pi Foundation have made it incredibly easy to get MicroPython up and running on your Raspberry Pi Pico. All we need to do is copy a single installation file onto the device and it’s ready to go.
If you go to the microcontroller section in the Raspberry Pi documentation website you’ll find a link to the MicroPython information.
https://www.raspberrypi.com/documentation/microcontrollers/micropython.html
This page has links to lots of documentation about using MicroPython with the Raspberry Pi Pico, but if you scroll down the page a bit you’ll come to the drag-and-drop section. This shows you the simple steps required to install the software.
You’ll find a link to a downloadable UF2 file.
https://micropython.org/download/rp2-pico/rp2-pico-latest.uf2
This is the file we need to transfer onto the Raspberry Pi Pico, so download this and save it somewhere sensible on your computer.
We now need to turn the Raspberry Pi Pico into a disk drive attached to a computer.
Plug a USB cable into your PC making sure that is not yet connected to your Pico. Then hold down the BOOTSEL button on the Pico and plug the USB cable into it.
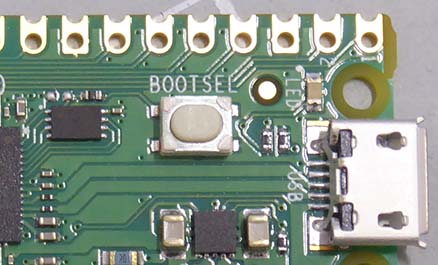
Your computer should immediately recognise that you’ve connected a storage device so you can release the BOOTSEL button and open up the RPI-RP2 drive in your normal file explorer application.
Then find the UF2 file you downloaded earlier and simply drag it onto the root folder of the new RPI-RP2 drive.
The Raspberry Pi Pico will reboot and you’ve now got a MicroPython enabled device.
Installing a MicroPython Development System
To be able to work with MicroPython on your microcontroller you need a Python IDE that understands how to communicate with it. The Thonny IDE is the software recommended by the Raspberry Pi Foundation. It’s a great IDE, especially if you’re just starting out, but it can get a bit limiting as you start to create more complex projects.
I prefer to use the PyCharm IDE from JetBrains. The free community version has everything you need for a professional level Python development system. It is a bit more complicated to use than Thonny, but you’ll quickly get the hang of it which then let you use a much more powerful and helpful programming environment.
To install PyCharm you’ll first need to install Python. Go to
Click on the download link and then download and install the latest version for your operating system.
Then head over to the JetBrains website at
https://www.jetbrains.com/pycharm/
If you click on the download button and then select the Community Edition download, you’ll receive the installation package which you can then install as normal.
Configuring PyCharm To Work With MicroPython
Now that we got all the software in place we need to set up our development system so that PyCharm understands that we are using MicroPython and not the full version of Python, and that it is able to communicate with the microcontroller board to upload and run our software.
If you start PyCharm you should get to the Welcome page. If you’ve already been using PyCharm it will probably open your last project so simply close the project which will take you back to the Welcome screen.
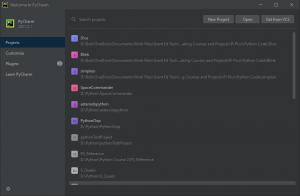
PyCharm needs some extra software to tell it how to program your Raspberry Pi Pico. Click the Plug-ins option in the left-hand menu and you’ll see a list of add on modules we can install. Make sure you have selected the Marketplace tab, click in the search box and type MicroPython. You should see the MicroPython plug-in appear in the list below.
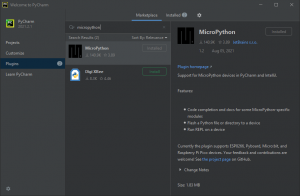
Select it and install it.
PyCharm is now ready to work with your Raspberry Pi Pico in MicroPython.
Your First MicroPython Project
From the Welcome page make sure you click on the Projects option on the left which will bring up a list of your previous projects. This will probably be blank. In the top right corner you’ll see a few buttons for opening projects. Click the New Project button and a dialogue window will open.
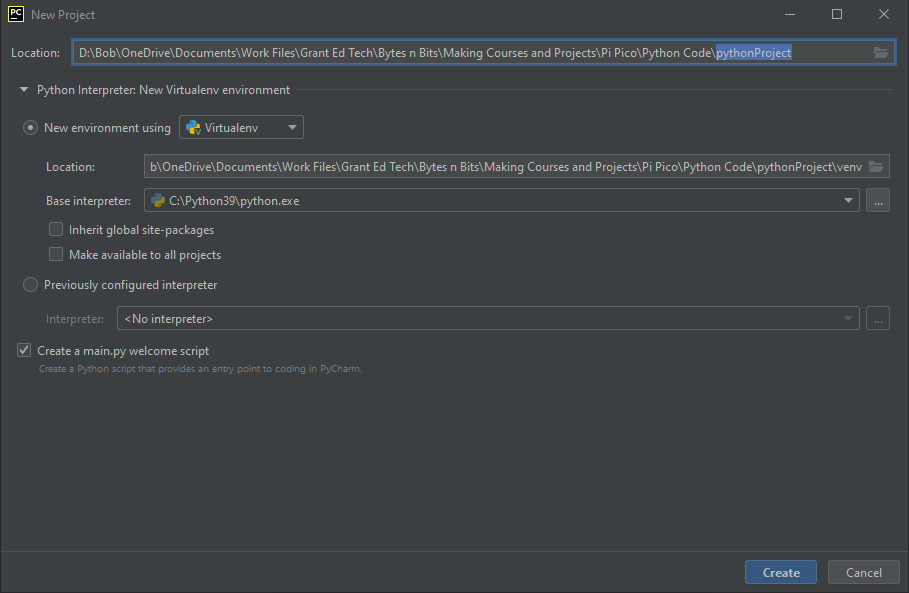
In the location box you need to specify a folder to hold all your project files. Make sure that this points to a new, empty folder as PyCharm needs to save if you extra files relating to your project set up.
Next we need to specify an environment for your project. This looks a bit intimidating but all we are doing is telling PyCharm how we want Python to work within this project. Python is able to use Virtual Environments that encapsulate all the plug-ins and libraries that you need for this particular project. New projects will have their own virtual environments which may have a completely different set up, so you’re able to keep each project tuned into its own requirements.
There are a number of ways of creating and running virtual environments but Virtualenv is fine for our MicroPython projects.
Next we need to specify where we would like to see our virtual environment files. Once you’ve selected the location for the project in the top input box, PyCharm will default to saving your virtual environment inside this folder. Sometimes you’ll want to set up a virtual environment for a particular type of project so it may make sense to save the environment settings in its own folder. For now I’m just going to set up a virtual environment for this particular project.
We next need to specify which version of Python we want to attach to this project. Usually PyCharm is able to detect any versions of Python you’ve installed, so you should see one listed in the drop-down. If not, simply click the browse button at the end of the line to find the python.exe file that you want to attach.
If you’ve added some global libraries to your version of Python you can have this project automatically import them by ticking the “Inherit global site packages” option.
We will eventually be adding extra packages and settings to this virtual environment which will tailor it to work with our Raspberry Pi Pico and MicroPython. We can share this setup with other projects so that we don’t have to go through the whole process each time we want to write some software for Pico. If you take the “Make available to all projects” checkbox this virtual environment will then appear as a “Previously configured interpreter” when we start subsequent projects.
At the very end of this dialogue you’ll see a tick box to create a main.py file. This will create a dummy file for us to our software to.
Once you got all the settings in place click the create button at the bottom of the screen and PyCharm will create and open the project for you.
Connecting PyCharm With Your Raspberry Pi Pico
At the moment PyCharm think you’re working on a normal Python project. We now need to tell it that this is a MicroPython project and connected to your development board.
From the File menu select the Settings option and then click to open the Languages and Frameworks section. Inside this you’ll find a MicroPython option. Click this and you’ll see some options appearing in the main dialogue box.
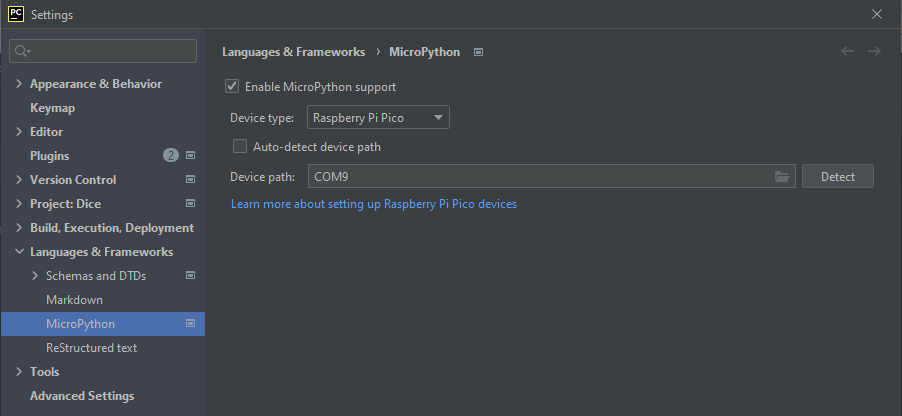
Click the checkbox to Enable MicroPython support and select Raspberry Pi Pico as your Device type. We now need to tell PyCharm where on our computer we’ve plugged in the Raspberry Pi Pico.
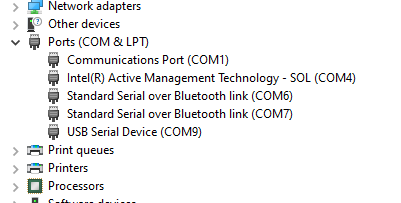
If you’re using a Windows computer you’ll get this information from Device Manager. Press your Windows button and then type Device Manager. You should then see the application listed so just click it to open it. In the Ports(COM & LTP) section you should see a USB Serial Device listed with a COM port after it. On my PC it’s listed as COM9. COM9 is the Device path that PyCharm needs.
If you’re using a Mac or Linux computer or a Raspberry Pi you’ll need to open a Terminal window and change directory to the dev folder.
cd /dev
If you now unplug the Raspberry Pi Pico and list the tty devices,
ls tty*
Then plug the Pico back in and list again, you should find the name of the Pico as the device that has just appeared. On my system this comes up as
/dev/ttyACM0

Once we’ve got this information entered into the correct box click the OK button.
PyCharm will now take you back to your source code but you’ll probably see a warning appear at the top of the window. This is prompting you to install a number of extra packages that MicroPython needs. Just click the Missing required packages link at the end of this warning.
PyCharm should now install the last few pieces of software needed before we can start coding.
Testing Our Setup with a Simple Blink Program
The following code simply makes the on-board LED on the Raspberry Pi Pico flash on and off every second. Delete everything in the main.py file and type in this code.
from machine import Pin
import time

led = Pin(25, Pin.OUT)

while True:
  led(1)
  time.sleep(1)
  led(0)
  time.sleep(1)
The first line imports the Pin object from the machine library. The subject let us control and monitor the GPIO pins on the Raspberry Pi Pico. Next we import the time library which will be using to generate delays.
Next we create a variable called led which is attached to pin 25 which we’re setting as an output pin. Pin 25 is connected to the on-board LED.
We finish the code with an infinite loop that simply turns the led on (led(1)) and off (led(0)) with a one second delay between each change.
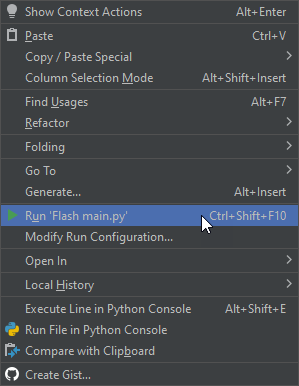
To install this code on our Pico you can either right click on the main.py file, or go to the Run menu. You should then see an option to Run ‘Flash main.py’. Select this and your code will be uploaded, the Raspberry Pi Pico reset and your code started.
If everything is work correctly you should now see a flashing green LED beside the USB port on your Pico.
Congratulations, you’ve finished your first MicroPython project.
Adding an Input
We’ve now seen how we can create an output pin and turn it on and off. Reading values from input pins is just as easy. First we’ll need to add a few components to our circuit to create a pushbutton that we can sense with a MicroPython code.
Usually when we want to add a switch input to microcontroller we have to use a switch connected in series with either a pull-up or a pulldown resistor.
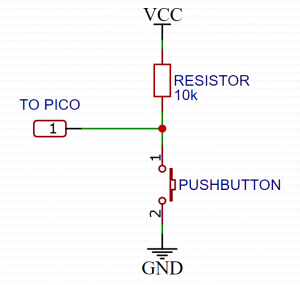
The Raspberry Pi Pico helps reduce the number of components we need by having built-in pull-up and pulldown resistors.
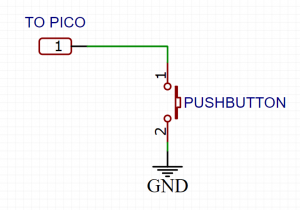
We can activate this option on all input pins by creating a Pin object and specifying the GP number, setting it as an input and then specifying that we want a pull-up or pulldown resistor.
switch = Pin(0, Pin.IN, Pin.PULL_UP)
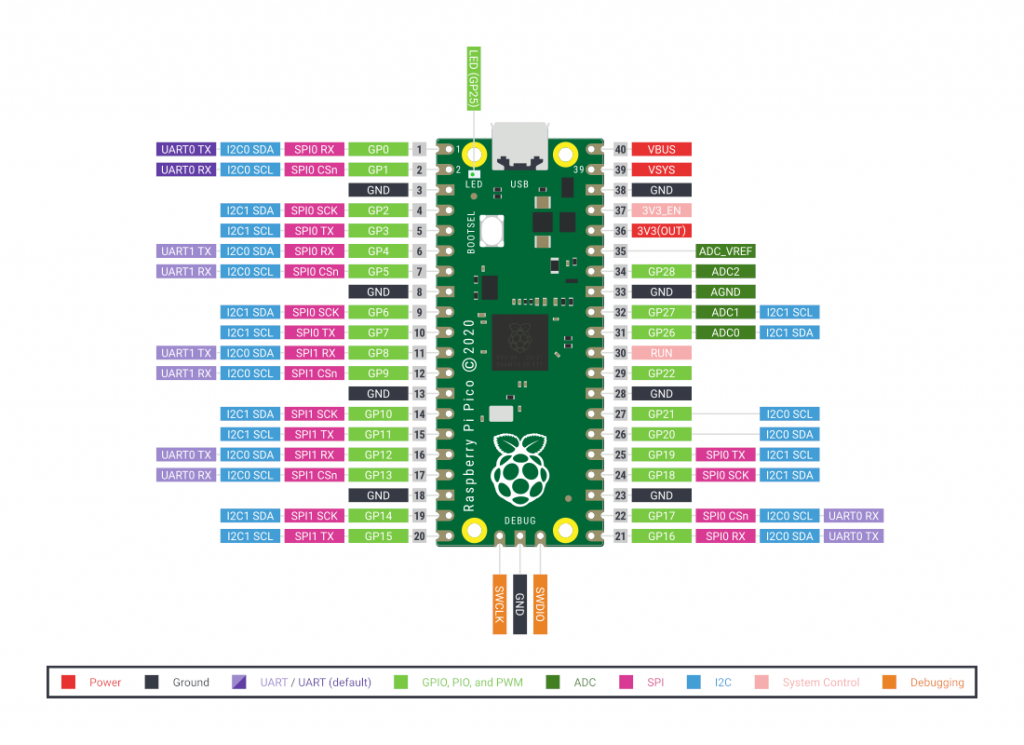
At this point we also need to make sure that we know which pins can perform which functions on our Raspberry Pi Pico. The diagram below shows you the full range of functions that each pin can perform.
I’ve specified a pull-up resistor from my input. So this means that when I press my pushbutton the input pin will be pulled low. So getting a low or zero reading from the input pin means that the pushbutton is being pressed.
We can then rearrange our Blink project code to only flash the LED when the push button is pressed.
from machine import Pin
import time

led = Pin(0, Pin.OUT)
switch = Pin(0, Pin.IN, Pin.PULL_UP)
led(0)

while True:
if not switch.value():
led(1)
time.sleep(0.1)
led(0)
time.sleep(0.1)
Adding an External LED
We’ve now got an external pushbutton controlling the internal LED. We can of course connect external circuits to our Raspberry Pi Pico and control them through the GP pins.
To connect an external LED will need to use a current limiting resistor connected in series with the LED which is driven by one of our output pins.
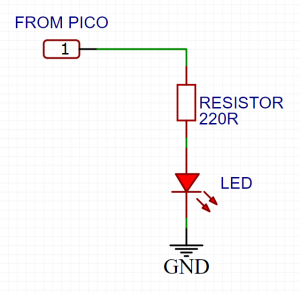
Looking back at our Pico pinout diagram we can use pin 2 which is GP1 to drive our LED.
We simply need to change our code to connect our led variable to pin GP1.
from machine import Pin
import time

led = Pin(1, Pin.OUT)
switch = Pin(0, Pin.IN, Pin.PULL_UP)
led(0)

while True:
  if not switch.value():
    led(1)
    time.sleep(0.1)
    led(0)
    time.sleep(0.1)
And that’s all there is to it.
A Very Simple Electronic Dice
There are a range of projects you can make with just simple inputs and outputs. If we expand our current pushbutton and LED circuit by adding six more LEDs we can make a very simple electronic dice.
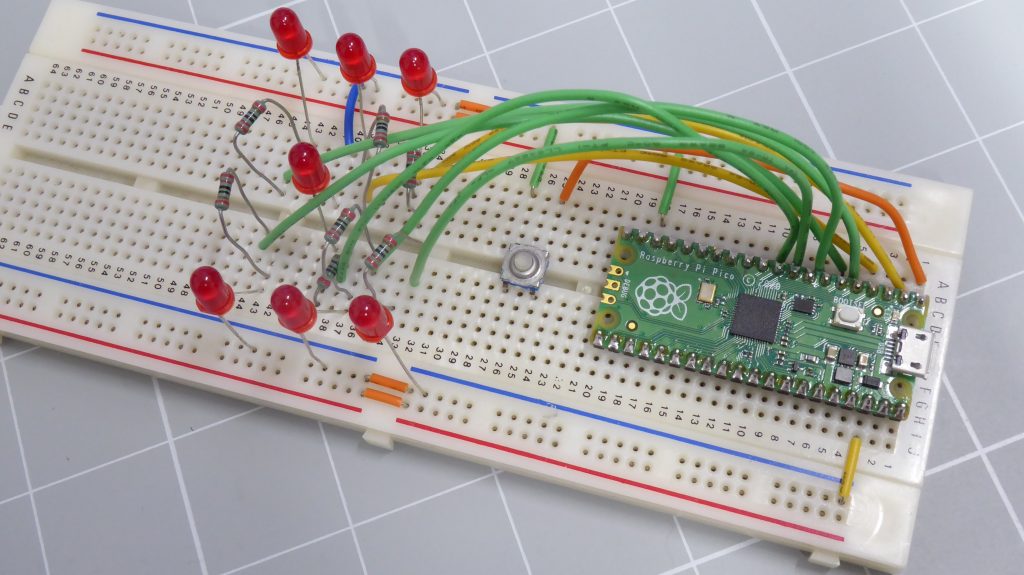
The code to drive this looks more complicated but it’s really just using exactly the same functions as before, just more off them.
from machine import Pin
import time

switch = Pin(0, Pin.IN, Pin.PULL_UP)
led1 = Pin(1, Pin.OUT)
led2 = Pin(2, Pin.OUT)
led3 = Pin(3, Pin.OUT)
led4 = Pin(4, Pin.OUT)
led5 = Pin(5, Pin.OUT)
led6 = Pin(6, Pin.OUT)
led7 = Pin(7, Pin.OUT)


def show_number(number):
    if number == 0:
        led1(0)
        led2(0)
        led3(0)
        led4(0)
        led5(0)
        led6(0)
        led7(0)
    elif number == 1:
        led1(0)
        led2(0)
        led3(0)
        led4(0)
        led5(0)
        led6(0)
        led7(1)
    elif number == 2:
        led1(1)
        led2(0)
        led3(0)
        led4(1)
        led5(0)
        led6(0)
        led7(0)
    elif number == 3:
        led1(0)
        led2(0)
        led3(1)
        led4(0)
        led5(0)
        led6(1)
        led7(1)
    elif number == 4:
        led1(1)
        led2(0)
        led3(1)
        led4(1)
        led5(0)
        led6(1)
        led7(0)
    elif number == 5:
        led1(1)
        led2(0)
        led3(1)
        led4(1)
        led5(0)
        led6(1)
        led7(1)
    elif number == 6:
        led1(1)
        led2(1)
        led3(1)
        led4(1)
        led5(1)
        led6(1)
        led7(0)


diceValue = 0
show_number(diceValue)

while True:
    if not switch.value():
        diceValue += 1
        if diceValue > 6:
            diceValue = 1
        show_number(diceValue)
I’ve created a function which accepts one parameter that tells it what number to display on the dice. It then decodes this numeric value and turns the LEDs on and off to give that dice representation of the number. I’ve set number 0 to represent all LEDs being off.
In our main program loop we use a global diceValue variable to keep track of what number the dice should be displaying. When we press the pushbutton we increment diceValue, resetting it back to 1 once it goes past 6. We then call the show_number function to turn on the dice LEDs.
Once we take your finger off the pushbutton the last number displayed will remain on the LEDs.
Because our code executes a few thousand times per second we effectively get a random number being produced.
Take It Away from Here
So that’s MicroPython on the Raspberry Pi Pico up and running with a powerful Python development system on your main computer. From here there are endless opportunities for building exciting projects using this very powerful, cheap microcontroller.
I’ll be releasing a number of tutorials to show you how to add extra hardware and functions to your Raspberry Pi Pico projects so please make sure you subscribe to my channel and click that like button to help other people find my content.


