Temu and AliExpress – Good or Bad?
17th December 2023
Play Wii Games From Your USB Drive with USBLoaderGX – Wii Homebrew
2nd January 2024Wii Softmodding – Hack your Wii and play games from USB – Homebrew setup
In one of my recent videos I looked at how we can use a PC to emulate and play Nintendo Wii games with full support for Wii remotes including the sensor bar. But what about using the real Wii console for some retro gaming, both Wii games and other emulation?
So in this tutorial I’m going to show you how to modify your Wii by installing the Homebrew channel which opens you up to a massive resource of software you can run on your original Wii hardware.
So let’s see how it’s done!
What is the Homebrew Channel
The Homebrew channel adds a software layer on top of the Nintendo software that lets you bypass the built in security so that you can use the Wii hardware with your own code. Basically this gives you the ability to run whatever software you want. And the Homebrew community has been very active in creating some fantastic applications to take advantage to the Wii.
In this video we’ll mainly be looking at running Wii games from code backups on a USB stick, but you can also play GameCube games and emulate many other consoles from the 8 bit era and beyond.
To start with though I have to make you aware that installing the Homebrew channel will invalidate any sort of warranty or guarantee your Wii console has. But as we’re talking about a 10 year old system I guess this doesn’t probably won’t apply.
Also, there is a slight risk that you will kill, or brick, your console during the process. Really this would only happen if you were to lose power during the critical software update phase, so make sure there’s no electrical work going on, or you’re in the middle of a lightning storm!
So if you’re happy to go ahead let’s make a start.
Installing the Homebrew Channel
There are quite a few ways to install the Homebrew channel, but all of them involve exploiting some sort of bug in the Nintendo operating code to allow you to override the console’s security and install a software fix.
The easiest exploit is the str2hax method. This requires you to have an Internet connection for the Wii but I’m assuming that most of you will have WiFi available. If not I’ll put some links in the description below for you to have a look at the other methods. Most of these require you to build an exploit SD card image but it’s not that hard, just a bit more of a faff that the str2hax method.
To use the str2hax we need to go through a number of steps. I’ll put all of this information on the project page in my bytesnbits.co.uk website so check the description below for some links.
str2Hax
The first step is to change the DNS settings for the Wii internet connection. Go to the Wii options menu and select Wii settings. Go right to get to the second page and select the Internet settings.
Select Connection Settings and then your active internet connection, usually the top one. You then need to click the change settings option and then scroll to the right until you get to the Auto-Obtain DNS screen. Make sure you skip past the IP Address screen which looks very similar.
This exploit works by getting your Wii to use special DNS servers that will redirect it to the str2hax exploit when it tries to connect to the Nintendo servers. So we need to force the Wii to use these DNS server IP addresses.
On the Auto-Obtain DNS screen select No and then click the Advanced Settings button. This will now ask you for primary and secondary DNS server IPs.
Type 18.188.135.9 for both the the primary and secondary servers.
Note : this IP address may change so make sure to check online for the latest str2hax settings.
Then Confirm and Save these settings.
The Wii will probably start a connection test automatically or you might have to click OK to start one. If everything has gone OK the connection test will succeed and it will ask you to update your Wii System.
Make sure to click No!
If it didn’t work go back and check your DNS settings, but if you still have no luck you’ll need to try a different exploit.
The Wii is now talking to the str2hax servers so we need to trigger the exploit. This is done by trying to update the User Licence Agreement.
Go back in the menu until you get to the Internet Section and then select the User Agreement or Agreement/Contact option. Click Yes to start the process and then wait.
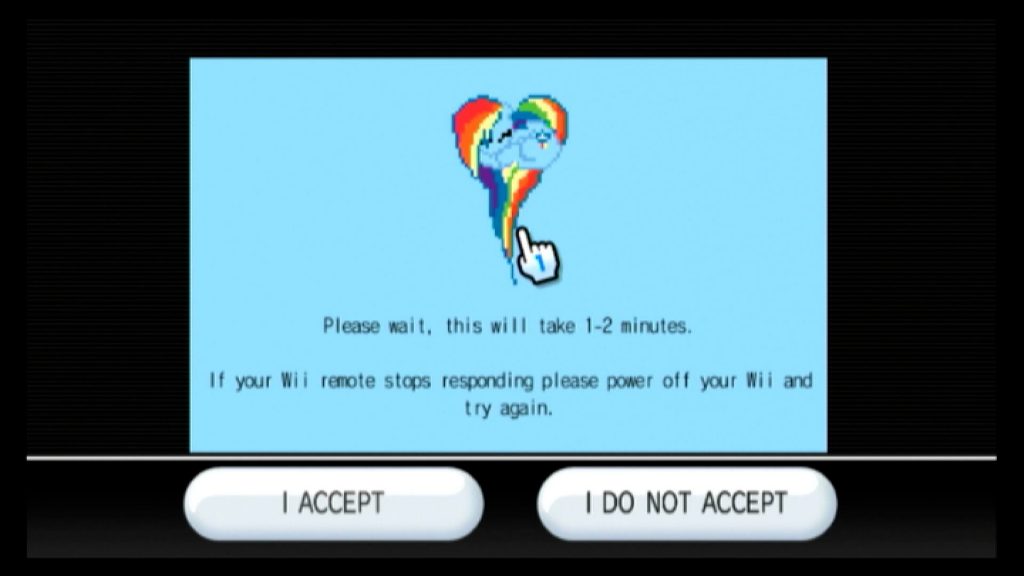
You should see an image on a light blue background appear.
 This is the exploit installing itself on your Wii. Don’t click any of the buttons on the screen, just wait for it to finish. After 1 to 2 minutes you’ll see some console text appearing on the screen as the code runs and eventually you’ll drop into the Homebrew and BootMii installation screen.
If you find your console doesn’t run the installation code after a few minutes, or if your on screen cursor freezes then you’ll need to restart your Wii and try the process again.
Installing Homebrew
Once the str2hax exploit has finished it will start the Homebrew Channel installation. Just press the A button to continue with the installation and you’ll see the software being installed.
Installing BootMii
BootMii provides a layer of protection for your Wii in case something on the Homebrew side causes the system boot to fail. To install BootMii you’ll need an SD card formatted for use in the Wii.
The Wii will work with standard (full size) SD cards, SDHC and SDXC micro SD cards. You need to format them as FAT32 drives using a 16KB cluster size. This is especially important for the larger capacity SDXC cards which will tend to use a different cluster size if you don’t specify it. The easiest way to set this up is to use a partition tool such as Partition Wizard (https://www.partitionwizard.com) for Windows.
Make sure your SD card is in the front SD card slot of the Wii and then select the BootMii option.
You’ll have either one or two installation options showing. If there is an install as Boot2 option select that to install BootMii into the Wii boot sequence. This provides an extra layer of protection but is only available on early models.
Everyone should have the install as an IOS option. Even if you’ve installed as Boot2, now select the IOS option and install BootMii as an IOS. This will let you run BootMii from the main user interface.
Congratulations! Your Wii is now softmodded.
Exit from the HackMii installer and you should drop in to the Homebrew App. At the moment this will be empty, so let’s install some apps.
Installing Homebrew Apps
Installing Homebrew apps is relatively easy. You simply need to download the app files and then copy them onto the Wii SD card.
First we need to install a couple of housekeeping apps to make our Homebrew system easier to use and protected from bricking.
If you go to the https://wii.guide website and click the navigation link you’ll get a list of aps and tutorials for setting up Homebrew. Click the link to the Priiloader app (https://wii.guide/priiloader). Scroll down to the download link and download the zip file. If you open the zip file you’ll see an apps folder. Simply copy this onto your Wii SD card and the app is installed.
Repeat this process for the LoapPriiloader and cIOS apps.
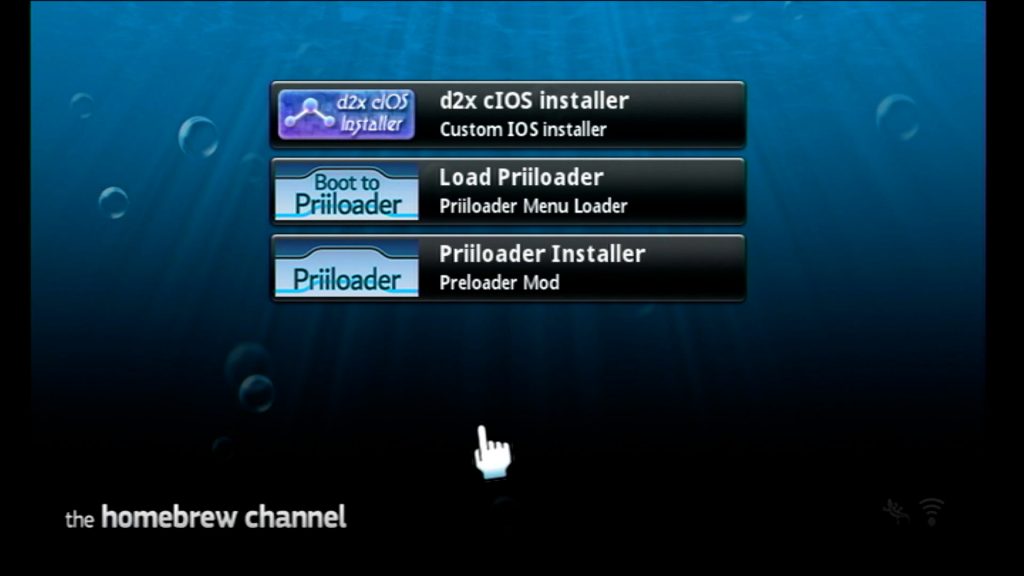
Put the SD card back into the Wii and start the Homebrew App. You should now see a list of available apps.

Select the PriiLoader installer and follow the instructions to install it.
To test it’s installed come back to the Homebrew loader page and select the LoadPriiLoader app. PriiLoader should now run. PriiLoader provides a failsafe way to get control of your Wii should you do something to brick it, but it also lets you override some Wii settings.
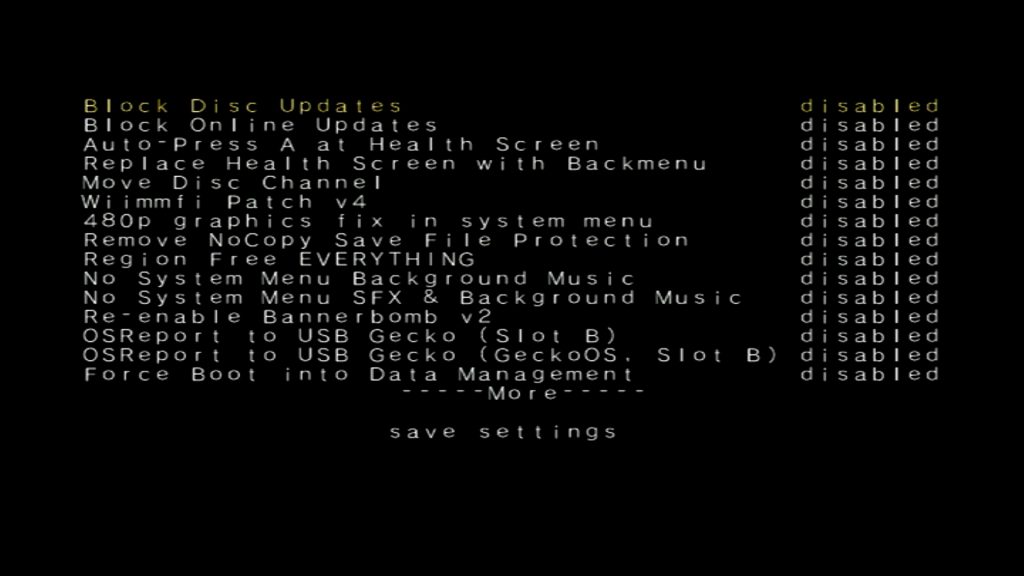
Use the d-pad to select the System Menu Hacks option.

Enable Block Disc Updates, Block Online Updates and Region Free Everything. Then scroll down until you can select the save settings option.
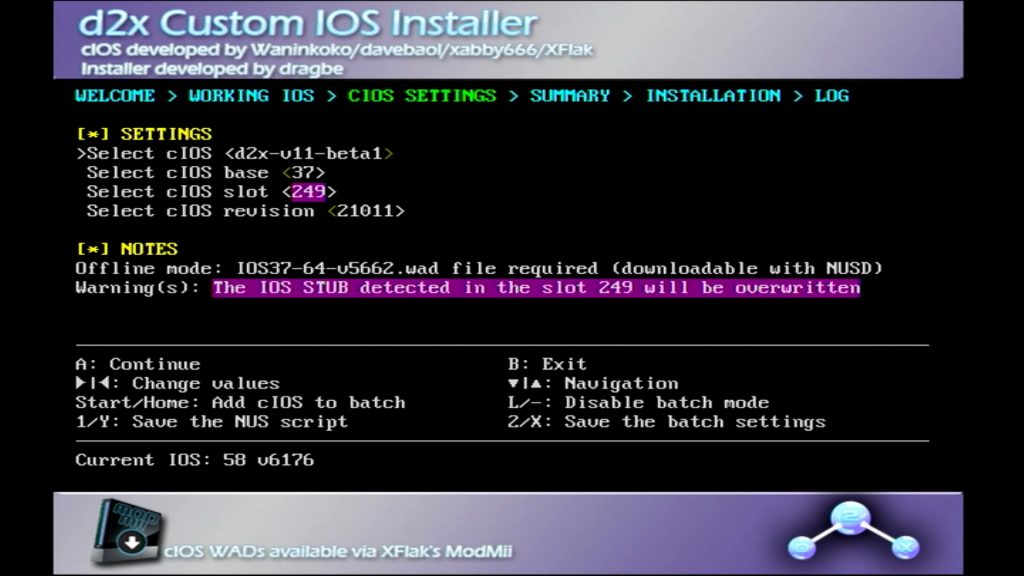
Back on the Homebrew screen we can now install the cIOS system. Select this and you should get to the IOS installer page.

You need to use the d-pad to select and change the 4 settings values as we install 4 cIOS apps.
For the first one …
Select cIOS: d2x-v11-beta1
Select cIOS base: 38
Select cIOS slot: 248
Select cIOS version: 65535
Then click A to install the cIOS.
Second…
Select cIOS: d2x-v11-beta1
Select cIOS base: 56
Select cIOS slot: 249
Select cIOS version: 65535
Third…
Select cIOS: d2x-v11-beta1
Select cIOS base: 57
Select cIOS slot: 250
Select cIOS version: 65535
And fourth…
Select cIOS: d2x-v11-beta1
Select cIOS base: 58
Select cIOS slot: 251
Select cIOS version: 65535
That’s the basic Homebrew setup complete.
What’s Next
In the video I show you how to install a USB loader to allow you to play game backups from a USB drive, so please have a look at that for the basic setup.
In this blog series I’ll cover USB loaders and many other emulation and gaming apps in more detail as separate posts.
Have fun playing Wii games.
Installation downloads from
Wii Guide : https://wii.guide/
str2hax : https://wii.guide/str2hax
Priiloader : https://wii.guide/priiloader
cIOS : https://wii.guide/cios
USBLoaderGX : https://oscwii.org/library/app/usbloader_gx
Wii Backup Manager : https://www.gamebrew.org/wiki/Wii_Backup_Manager
cIOS Settings
Select cIOS: d2x-v11-beta1
Select cIOS base: 38
Select cIOS slot: 248
Select cIOS version: 65535
Select cIOS: d2x-v11-beta1
Select cIOS base: 56
Select cIOS slot: 249
Select cIOS version: 65535
Select cIOS: d2x-v11-beta1
Select cIOS base: 57
Select cIOS slot: 250
Select cIOS version: 65535
Select cIOS: d2x-v11-beta1
Select cIOS base: 58
Select cIOS slot: 251
Select cIOS version: 65535


