Get RetroPie running On The Raspberry Pi Zero 2 W at 1.4 GHz
5th November 2021
Raspberry Pi Pico MicroPython – Getting Started
24th November 2021ESP32 Bluetooth Keyboard As A Retro Game Controller
The ESP32 microcontroller is a powerful device that can be programmed just like your trusty Arduino. It uses the same Arduino IDE and is compatible with many of the Arduino libraries.
But it has a few fantastic advantages. Apart from having a dual core, 32 bit processor clocked at up to 240Mhz, 520Kb of RAM and 448Kb of ROM it also has built in Wi-Fi and Bluetooth connectivity.
It’s this Bluetooth connection we’re going to make use of in this tutorial to make a game controller that mimics a Bluetooth keyboard. This lets us map buttons on the controller to key presses so that we can use the gamepad in some home computer emulators that don’t normally allow joystick control. Of course the ability to send keypresses to your computer either manually or automatically opens up a lot of possibilities, but for me this is the first step towards a bigger game controller project that will allow a single controller to cope with most console and computer gaming.

As an example for this game controller, I love playing old BBC Microcomputer games such as Acornsoft’s Monsters. This uses the Z, X, / and ‘ (apostrophe) keyboard keys for movement and D and F to dig and fill holes. As standard the game, like a lot of BBC games, doesn’t support a joystick. So it would be great if we could attach a game controller that has all the mappings set up so that the buttons on the gamepad will press the game control keys for me, and all over a wireless connection.
Setting Up ESP32 Support
First you need to make sure that your Arduino IDE is ready to work with your ESP32 board. If you haven’t already got this set up please have a look at the Espressif guide for installing support.
https://docs.espressif.com/projects/arduino-esp32/en/latest/installing.html
Once you’ve got that set up we’re ready to code.
Building a Bluetooth Keyboard
For this first tutorial we’ll use a ready made library to do all the hard work of creating a Bluetooth connection to our PC and making it work as a keyboard.
If you go to
https://github.com/T-vK/ESP32-BLE-Keyboard
Click the green Code button and select the Download Zip link.
This will download the library as a Zip archive to your computer. Just save it somewhere sensible.
We now need to import this into our Arduino IDE.
So open up the Arduino IDE and go to the Sketch menu, Include Library and Add .ZIP library. Then select the file you just downloaded.
That’s the library installed into the IDE.
Testing With the Sample Sketch
There’s an example sketch we can use to make sure everything is set up correctly. Go to the file menu, Examples and then to the ESP32 BLE Keyboard section. You’ll see an example for SendKeyStrokes. Open that up.
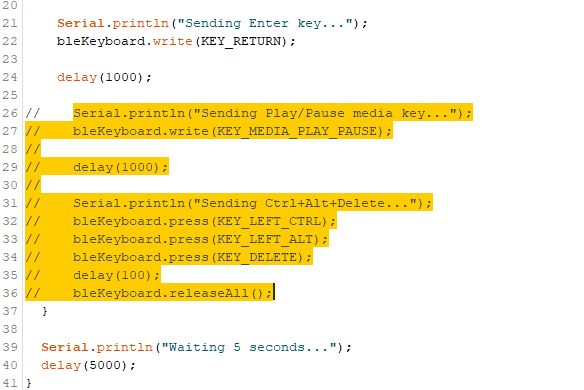
To start with I’d comment out the second half of the main loop code and this plays with your media keys and then sends a Ctrl/Alt/Delete signal.

This code works by importing the BleKeyboard library and then instantiating an instance of the class.
#include <BleKeyboard.h>

BleKeyboard bleKeyboard;
Once we call that object’s begin method it will start to broadcast its existence and try to connect to a host.
bleKeyboard.begin();
When the sketch is running, if you look at your computers Bluetooth device list you should see ESP32 Keyboard listed. Pair with that and the code loop should then start to execute.
If you look at the loop you’ll see that the keyboard code is inside an if statement that only runs if the keyboard has connected to a host.
void loop() {
if(bleKeyboard.isConnected()) {
It simply sends a string of key presses to type in Hello World, waits for one second, then presses the return key, waits for another second and then repeats.
bleKeyboard.print("Hello world");

delay(1000);

bleKeyboard.write(KEY_RETURN);
Testing the Connection
So you simply need to connect the ESP32 via USB to your computer to get this to run. We don’t need any additional hardware.
When you upload the sketch make sure you press the Boot button on the ESP32 board when the uploading process starts.
If you now open up a Notepad window and give it focus you should find some automated typing from the ESP32.
Making a Gamepad
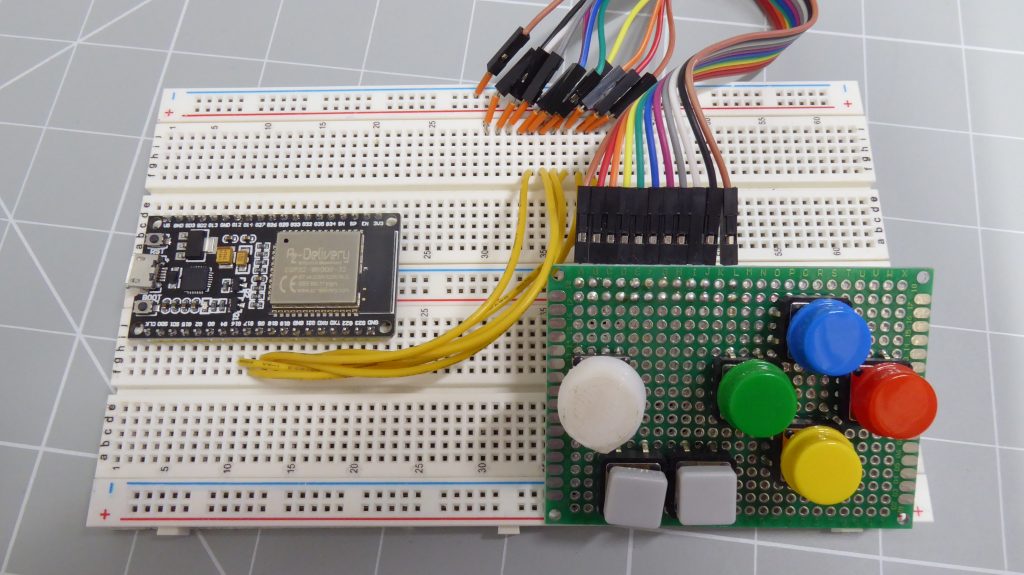
I had already been working on a gamepad as part of a Raspberry Pi powered console so I’ve already got a number of switches wired up and ready to go. But all you need are some pushbuttons to use as the inputs. On mine I’ve got a common ground connection on one side of each button so I can pull inputs on the ESP32 low. By setting them to use their internal pull up resistors we get a simple way of connecting the buttons without using any extra pull up or down resistors.
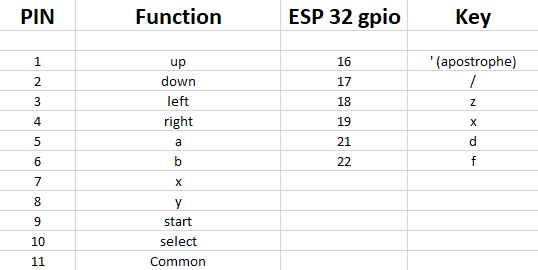
So I’m wiring up my gamepad buttons as shown in this table and to play the BBC Monsters game I’ll need to map these buttons to these keys.

So, at the moment I’m going to hard code this mapping but eventually I’ll work on a more complex controller where we can set up selectable game mappings as even create our own directly on the controller.
So looking at the game controller code you’ll see the mapping table implemented as a simple set of three arrays with each element matching elements in the other two.
bool keyStates[6] = {false, false, false, false, false, false};
int keyPins[6] = {GP_UP, GP_DOWN, GP_LEFT, GP_RIGHT, GP_A, GP_B};
uint8_t keyCodes[6] = {'\'', '/', 'z', 'x', 'd', 'f'};
By the way all this code is available at the bottom of this post.
At the top of this listing I’m telling the library to use the Nimble Bluetooth driver. This is optional but it saves a lot of memory on the ESP32. If you want to use Nimble you’ll need to use the Arduino library manager to install it. Just search for Nimble and install that.
#define USE_NIMBLE
Next I’m defining my button inputs before building my mapping arrays.
#define GP_UP 16
#define GP_DOWN 17
#define GP_LEFT 18
#define GP_RIGHT 19
#define GP_A 21
#define GP_B 22
The keyStates array will keep track of which buttons are currently depressed so we can work out when to depress or release them.
The KeyPins just maps the input pins and keyCodes specifies the keyboard keys. Note you need to specify the unshifted keys otherwise the code will send the shift key modifier along with the actual key press.
In the setup function we turn on the Serial monitor, setup the inputs to use the pull up resistors which is handled by the setInputs function and then initialise the keyboard.
void setup() {
Serial.begin(115200);
Serial.println("Code running...");
setInputs();
bleKeyboard.begin();
}
I’m using a single shot notification sent flag so I can see if the ESP32 has connected to my PC which gets set once the notification has been sent.
bool connectNotificationSent = false;
But the main loop simply runs through the 6 elements in the arrays and asks the handleButton function to work out what to do for each button.
for(counter = 0; counter < 6; counter ++){
handleButton(counter);
}
So looking at this function, we simple receive the array index so we can read the data we need.
void handleButton(int keyIndex){
// handle the button press
if (!digitalRead(keyPins[keyIndex])){
// button pressed
if (!keyStates[keyIndex]){
// key not currently pressed
keyStates[keyIndex] = true;
bleKeyboard.press(keyCodes[keyIndex]);
}
}
else {
// button not pressed
if (keyStates[keyIndex]){
// key currently pressed
keyStates[keyIndex] = false;
bleKeyboard.release(keyCodes[keyIndex]);
}
}
}
We check if the button is currently pressed, remember we’re pulling low when we press the button. If the button is pressed we check the current keyState and if it’s not pressed we then need to send the Bluetooth signal to press the key. This press method depresses the key and leaves it held down. The parameter we send to the press method can either be an ascii character for the key or a pre defined value for the special keys on the keyboard. Have a look at the library code to see what they are.
If the button is not pressed we check if the keyState is set to pressed. If so we need to release the key using the release method.
And that’s all there is to it.
So if we upload this to the ESP32. Get it running and then start up Monsters in BeebEm we should be able to play the game using the gamepad.
What’s Next?
So that’s a Bluetooth gamepad using an ESP32 that lets you mimic any keyboard keys so you can play retro home computer games where joysticks aren’t supported or are hard to set up.
As I said earlier this is the first step on a larger retro game controller project so please make sure you subscribe to my channel to get access to those videos as soon as I make them.


