ESP32 + 7in LCD + Fast RGB Interface – 30 fps frame rate
2nd February 2024
Protect your hard drive or SSD – for Raspberry Pi and projects
9th February 2024Easiest and Fastest Way to Hack Your Wii – Softmodding With ModMii
Hacking your Wii is a great way to explore the full potential of this great console. Not only can you download and play any game you want for the Wii from a USB drive, but also for the GameCube and a whole range of other retro consoles and home computers.
But the whole hacking process can be a bit confusing and there is a lot of file downloading, drive creation and app installation to get everything running smoothly. This is where the ModMii app comes to the rescue.
ModMii

ModMii is a Windows application, sorry nothing similar for Mac and Linux users, that basically gathers all the files and code that you need to hack your Wii, creates your SD card and USB drive images, and then takes you step by step through the whole hacking process.
You still need to manually hack your Wii, but everything you need is ready for you to just get on with the softmod.
In this video I’ll walk you through the whole process of taking your standard retail Wii and turning it into a fully softmodded Wii with a USB Loader GX channel and full GameCube compatibility using Nintendont.
So let’s get started.
Running ModMii
First we need to get hold of ModMii. Although this is a simple file download it can be a bit tricky depending on your PC security software.
ModMii is downloaded from it’s GitHub repository page at https://modmii.github.io/.
There’s lots of information on here about the app so please do have a look through to see what it can do and how you might want to use it.
Lower down on the page you’ll get to the download links. My advice is to download the portable version as this will work in it’s own stand alone folder without needing to go through an actual installation process, but the choice is yours.
Downloading the files can get blocked by both your browser and your anti virus software. The package contains a number of command line utilities bundled up in the archive and I guess this makes it look suspicious. I have found the files to be completely safe as long as you download them directly from this GitHub page but off course I can’t make any guarantees and you are doing this at your own risk. We’re going to have to bypass our security checks so if you are at all unsure about this stop and use another method – I’ve got a video that shows you a manual hack so please use that.
If your browser blocks the download you’ll need to go to your download list and tell it to accept the download. If your Internet Security software removes the file you’ll need to into it’s quarantine section and restore the file. In the end you should be able to force the file to be saved on your PC.
Once you download the portable version you’ll have a zip archive file on your PC. Simply extract the contents somewhere sensible. It you’re using the installation exe file just run that and install the code.
This should give you a folder in your PC with the two versions of the app ready for use. One is a GUI version which I think is actually harder to use, so I’m going to run the main app and take you through that.
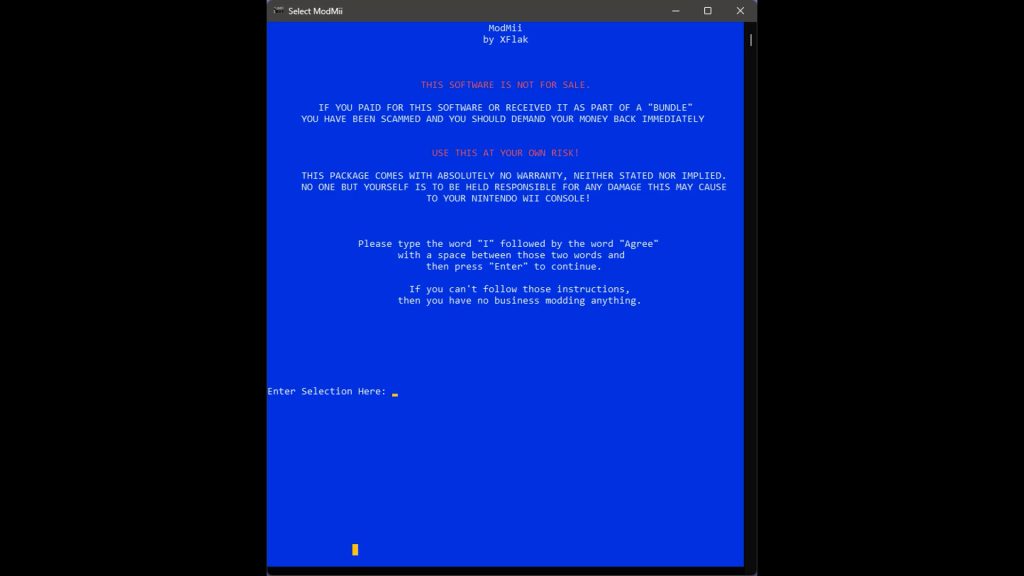
Double click the app and a blue window should pop up with some instructions. The app is basically going to take you through a number of these choice pages to work out what needs to be done and will then assemble your files.

The first screen is just to get you to accept responsibility for what you’re going to do. As with all system hacks there is a small chance you’re going to break your console so be aware.
The first option screen is for you to tell the app what you want to do. As you can see there are a whole range of hacking utilities built into ModMii. I’m not going to cover them in this video so we’re just going to select the first by typing in ‘W’ for our selection to start the ModMii Wizard.
The next page is a check to see if you are hacking from scratch or if you want to update the hack on an existing softmodded Wii. Either way we can choose Yes here. If your Wii is already modded this will simply overwrite everything with the latest hacks, but it will need you to reinstall your games, and set up your loaders. But it will bring everything up to date. If you’ve been having any issues with the machine this can be a great option to clear out any errors.
Now we need to tell ModMii what our current Wii menu version is. To find this power up your Wii console and click the Wii button on the home screen and go into the Wii settings. You should see the version number with a letter after it. The letter is the region code we’ll need in a second. Now tell ModMii what version you have. And what region your Wii is currently set to on the next page.
Next we need to select the hack we’re going to use.
To hack a Wii we have to fool it into loading a piece of software that will override the operating system. There are a number of ways this can be done. Depending on your Wii Menu version you’ll have a few choices. The main ones I’d advise you look at are…
Str2Hax is a very easy hack to use, but only works if you can connect your Wii to the Internet. It’s best if you can use an SD card but is the only hack that doesn’t need one to work. So if your SD card slot is broken or you don’t have an SD card use this one. I’m not going to use this hack in this video but please have a look at my manual hack video for a walk through of how to perform the hack.
The WiiBrand or LetterBomb hacks are equally as easy but they do require an SD card inserted into the front SD card slot of the Wii. So for my setup I’m going to select this option.
If you want to have a few options later on in case one doesn’t work you can choose the install all option and have them all set up for you.
For the WiiBrand and Letterbomb hacks we need our Wii MAC address. This is found in the Wii settings, Internet Settings and console information. So make a note of that and type it into the ModMii app.
The next page is asking is we need to install or refresh the Wii IOS files which are part of its operating system. At this point you have the option of upgrading your Wii to the last released version of the menu system, 4.3. If your Wii is below 4.1 this is the time to upgrade. If you’re at 4.1 or 4.2 the choice is yours. My advice would be to upgrade to 4.3 but it’s up to you.
If you don’t want to refresh your system select No, but although my Wii is at 4.3 I’m going to say yes so I can take you though the process.
Next we can specify the menu version we want to upgrade to. So I’m selecting 4.3.
On the following screen we can now select what channels we want to install if they are not already on the Wii. I’m just going to select none here as these channels are almost redundant.
Hacking your Wii lets you change the way the menu system looks. There are a few choices listed in ModMii. Do have a look on YouTube (option www) to see what they look like. I’m going to keep my Wii looking like a Wii so I’ll select No.
Next we can get ModMii to install a USB loader app so we can play downloaded Wii games, or I mean backups of our purchased Wii games. So this will be a Yes.
USBLoaderGX is the preferred choice of USB loader app but WiiFlow is a great alternative. I do prefer USBLoaderGX so I’m choosing that one.
Both will also connect to Nintendont, the GameCube emulator, which ModMii will also install for you.
Next you can specify where you want to save your game files to. I’m going to be using a USB hard drive so I’ll select USB. But you just as easily store your game files directly on your SD card. Just make sure you use a big enough one.
We’re almost there now. This page is just a final check so look through the info and if everything is OK select Yes.
Now we need to tell ModMii where to save all the files for our SD card. You can specify your own folder or let it create a COPY_TO_SD folder in the ModMii folder.
The same goes for our USB drive folders. Again I’m just using the default COPY_TO_USB setting.
And now it will do its magic.
Your Personalised Guide
Once the process has finished you can exit out of ModMii and have a look in your ModMii folder. You should find the COPY_TO_SD and COPY_TO_USB folders and inside the COPY_TO_SD folder you’ll find your personalised hacking guide – ModMii_Wizard_Guide.html. Open that up and it will tell you exactly what to do.
So let’s get ready to hack our Wii.
Drives
First we’re going to need an SD card and USB drive to store our files. Both of these need to be formatted as FAT32 drives using a 16KB cluster size. It’s important to get this correct as the Wii can be picky about what drives it can use, especially if you use a larger capacity micro SD card. This format gives you the best chance of having your drive recognised.
My advice for formatting your drives is to use a free app called Mini Tool Partition Wizard. I covered this and choosing an SD card in my manual hack video so if you need more help please do go and have a look at that, and I’ll put timed links in the description below.
This app lets you both clean your drives in case you’ve been using them for something like a Raspberry Pi, and also create the correctly formatted FAT32 partition. The standard Windows formatting tool doesn’t always create usable drives.
For my setup I’m using a 64GB micro SD Card and a 250GB laptop hard drive.
Once you’ve got the drives formatted you then need to copy over the files. Everything inside the COPY_TO_SD card folder needs to be saved into the root of that card. Same for the COPY_TO_USB folder. Just copy all the contents into the root of your USB drive.
You should then have an SD card that looks like this, and a USB drive like this.
We’re now ready to perform the hack!
Hacking the Wii
The first step is to perform the actual hack and install the Homebrew app so we can then install all of the code downloaded by ModMii.
Check your ModMii guide before you start to make sure you know what’s coming and what information you need.
For our WiiBrand hack ModMii has prepared everything for us.
Pop the SD card in the front of the Wii and plug the USB drive into USB port 0 at the back of the Wii. This is the port closest to the edge of the Wii.
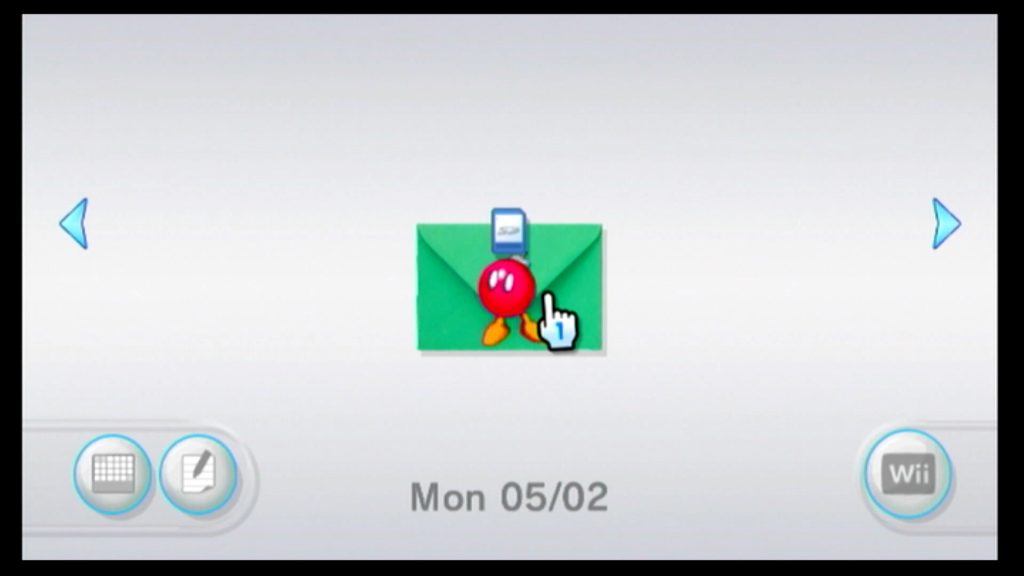
Power on the Wii and open up the message centre using the little envelope icon in the bottom right of the home screen. Use the back arrow to go to yesterday’s messages and you should see a letter bomb message.

Open that to trigger the hack.
You’ll get a black screen followed by a warning message. This will stay static for around 30 to 40 seconds before you can press the 1 button to continue.
You’re now into the HackMii application. Use your WiiMote D pad to navigate and A to select. So continue from here and then select the Install Homebrew option. Follow that through to install Homebrew.
Click continue and now install BootMii. First you need to prepare the SD card and then install BootMii as an IOS.
Once that’s complete look to see if you have the option to install BootMii as Boot2. If you do install that. If not don’t worry. We’ll be adding extra brick protection another way.
Once BootMii is installed go back to the main menu and exit HackMii.
This should drop you into the Homebrew channel and you should see a range of apps that ModMii has installed for you.
Backup Your Wii
The first job we need to complete is to make a backup of our Wii. From the Homebrew page click the home button on your WiiMote and then select the BootMii option.
In BootMii your remote doesn’t work so you need to use the button on the Wii console. Power changes your selection, Reset selects the highlighted option.
Go to the settings (gears) icon, select it and then select the backup NAND option with the green arrow. This will start the NAND backup process. It takes about 8 to 10 minutes to complete so just let it run through and verify the backup. Bad blocks are completely normal so don’t worry, just let it do its job. Once it’s finished press a button on the Wii and then select the back icon and then exit to the Homebrew channel.
We then need to take the SD card out of the Wii and save the BootMii folder, nand.bin and keys.bin files somewhere safe. These are important files that will let you recover your Wii if something goes wrong so don’t loose them! Once you’re sure you’ve backed them up you can delete them from the SD card, or store them in a folder on the card just in case!!
Eject your SD card and pop it back in the Wii.
Priiloader
Priiloader is an app that helps you recover your Wii if you manage to brick it (destroy the operating system so it doesn’t work). It loads itself before the main system menu is activated to give you a route back into the system, but also provides you with a number of very useful hacks to make your modded Wii work so much better.
From the Homebrew app launch the Priiloader installer. When prompted press + to install it. Then exit back to Homebrew.
If your Wii isn’t booting you can start Priiloader by powering on the Wii whilst holding down the Reset button. But we just want to run it to do some setup so use the Priiloader Launcher app.
From the menu select the System Menu Hacks option.
Please do not play with the system hacks. Only turn on hacks you understand and know what you’re doing. You can lock yourself out of the Wii.
As per your ModMii instructions I’d turn on
- Block Disc Updates
- Block Online Updates
- Region Free EVERYTHING
- 480p graphics fix in system menu
- Remove Deflicker
- Wiimmfi Patch v4
- Remove NoCopy Save File Protection
Once you’ve selected those scroll down and save your changes.
Also, if you’re using a hard drive for USB storage enable the Ignore Standby option. This will power off the Wii instead of going into standby which will stop your hard drive from spinning while you’re not using the Wii. This option is in the main Priiloader settings area.
Then go back to the main menu and exit back to the Homebrew channel.
Installing the WADs
The last step of the actual hacking process is to install some WAD files. These are packages of code that can update, alter or expand the software inside your Wii console. If you remember back to the ModMii setup app it asked about updating the IOS system for your Wii menu, etc. This is where those changes will be made along with some other IOS and cIOS drivers so that the Wii can talk to the USB drive and so on.
To install the WADs we need a WAD manager. ModMii has packaged up a version of YAWM (Yet Another WAD Manager) for us to use. From the Homebrew screen navigate to the page showing YAWM and select it. This will start the application.
You need to tell it where you’ve saved the WAD files. ModMii will have put them on the SD card if you’re using one, or it will be on your USB drive if that’s not available. YAWM looks for a special wad folder to find the files.
You should now have a list of available WADs.
Your ModMii guide will tell you how many WADs it created for you. If you hold down the + key for a few seconds you’ll select all the available WAD files. This will first tell you how many files you’ve selected. This number should match the guide. If you’ve added some of your own WADs, or some were left over from a previous install you’ll need to go through and unselect the ones not in the guide, or deselect all and install them one by one. Installing bad WADs or ones that are incompatible with other WADs can brick your Wii, so play safe and just install the WADs in the guide.
Once you’re happy with your selected WADs press A again to install them.
After the WADs have been installed press any key to continue and then press the Home button to exit from YAWM.
Congratulations
Your Wii is now softmodded.
Games
The rest of the guide talks you through setting up your games using USBLoaderGX and Nintendont.
As I’ve made separate guides for each of these emulators I’m going to leave you to look through those and again I’ll put some links in the description below.
Just to help you out ModMii has done the majority of the work for you. All the files you need have already been downloaded and your USB drive has been set up for you. You’ll also find the Wii Backup Manager software in the COPY_TO_USB folder inside the Program Files area and the GameCube Backup Manager in the program files area in the COPY_TO_SD folder.
Nintendont, the GameCube emulator has been installed and you can start it from the main Homebrew screen. You’ll need to set that up though so please refer back to my video.
USBLoaderGX has also been installed and ModMii has added a channel to the main Wii menu to let you start it from there. If you installed it to your SD card you’ll also be able to access USBLoaderGX from the Homebrew menu. Again this will need to be set up and connected to Nintendont. You’ll then be able to launch your games library directly from the Wii menu and play all the Wii and GameCube games. Again, check the description for a link to my USBLoaderGX setup video.
From there you’re free to add whatever Homebrew software you want. The Wii can emulate a whole range of consoles and home computers. I’ve also made a video to walk you through that process so go and check that out.


