Using GPIO Pins For Button Inputs in RetroPie – Building Your Own Retro Gaming Handheld
9th May 2021
Fix Sound Problems on Raspberry Pi Zero With GPIONext – Building Your Own Retro Gaming Handheld
24th May 2021
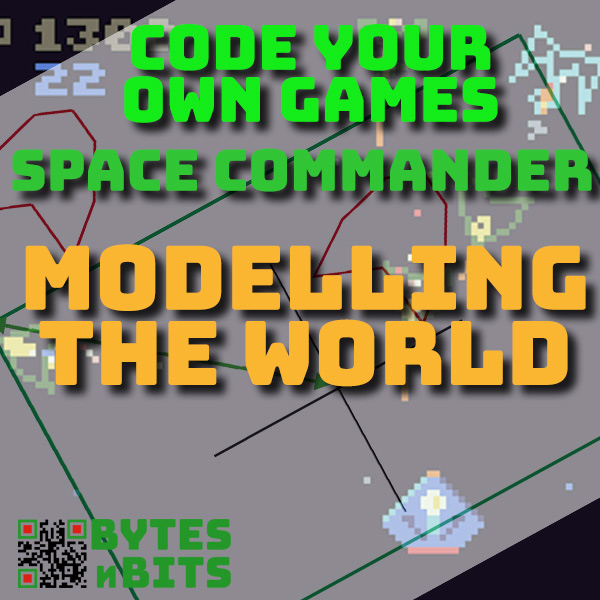
Vector Graphics for Space Commander – Learn to Code Your Own Games
Vector Graphics – Space Commander Part 1
Most computer games make use of sprites. These are small bitmap images that we use the represent the game elements such as ships, bullets, etc. Modern coding systems are able to rotate and scale bitmap images, but TIC80 forces us to think old school.
We can rotate bitmaps in 90 degree increments and we can scale in whole numbers (integers) this means that we can take our player ship and rotate and scale as shown below.
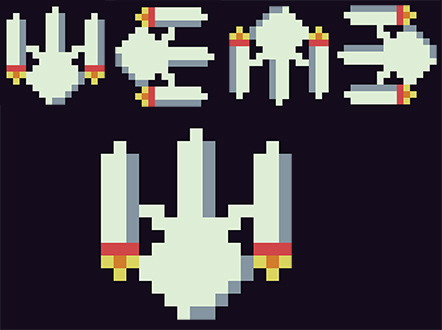
If we want smoother rotation we need to create versions of our sprites at the in between angles. But even this has limits as we generally only redraw a couple of versions, maybe just the 45 degree angle version, which still gives jerky movement. If you’ve ever played retro games you’ll have seen this effect.
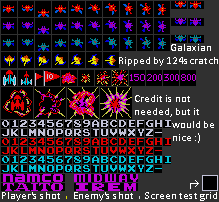
This is the sprite sheet for the game Galaxians. You can see multiple images for each alien type to allow it to be rotated on screen.
Vector Graphics to the Rescue
In Space Commander we can use bitmap sprites for the main player ship as that stays stationary in the centre of the screen. But the enemy ships need to be able to rotate freely to make the game ‘feel right’. If we had a ship pointing at 45 degrees but moving at 20 degrees it would spoil the gameplay.
Vector graphics provides a solution.
In vector graphics we use a series of lines to draw the image. We define a number of end points and then draw lines between them. To rotate an image we just rotate the end points around the centre of the element and then redraw the lines using the rotated points.
But we then need a way of describing these lines to the software. We also want to be able to use colours and have separate line sections rather than just one continuous line per game element.
Defining and Drawing Vector Shapes
To define our shape we can create a simple, sort of, language that describes our lines. Each point in the image can be encoded with a set of data. For each point we need an x and y coordinate, a colour and a flag to say if this is a new line or if it should be drawn from the previous point.
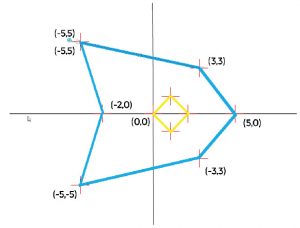
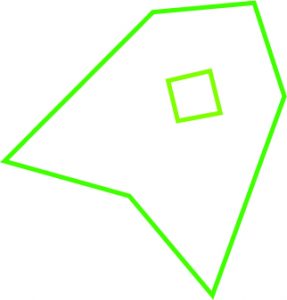
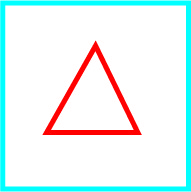
We can then create a list of these points that describe the lines needed to draw the image. For example, to draw a red triangle inside a blue square we could code… (pseudo code)
shape = array [ // use array to hold a list of points
[x=10, y=10, colour=blue, newline=true], // sets first point in square
[x=-10, y=10, colour=blue, newline=false], // defines second corner but draws a line from the first point
[x=-10, y=-10, colour=blue, newline=false], // second side
[x=10, y=-10, colour=blue, newline=false], // third side
[x=10, y=10, colour=blue, newline=false], // completes the blue square
[x=0, y=5, colour=red, newline=true], // first point in the triangle, but starts a new line
[x=-5, y=-5, colour=red, newline=false], // first edge of red triangle
[x=5, y=-5, colour=red, newline=false], // second edge
[x=0, y=5, colour=red, newline=false] // last edge of triangle
]
And this would describe the following image.
Once we’ve encoded the point and line data our rendering code simply needs to step through each element in our shape array (we use tables in Lua) and either draw lines from the previous point or not.
Placing a Shape On the Screen
If you notice in the above example all my shapes were centred round the origin. This makes it very easy to place vector objects on screen. The local origin for the shape definition creates a centre point or insertion point. We can then place this shape anywhere on the screen by simply adding the coordinates of where we want it to appear to the coordinates of each point.
Screen Position = Point Position + Position on Screen
Rotating a Shape
To rotate a shape by a defined angle we simply need to rotate each point in the object around its centre point. We can then use these rotated points to draw the image as before.
To rotate a point in 2D space we need a bit of mathematics. We need to define the point around which we’re going to rotate and the angle we want to rotate by.
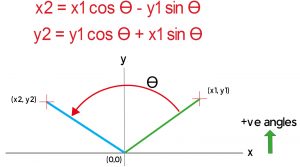
The coordinates of the new point are then given by :-
x2 = x1 cos Ɵ – y1 sin Ɵ
y2 = y1 cos Ɵ + x1 sin Ɵ
(for a proof of this formula please go to https://matthew-brett.github.io/teaching/rotation_2d.html)
For our vector shapes we defined the coordinates of the points around a local origin which becomes the centre of rotation. To place a rotated version of the shape on the screen we first rotate the points around the shape’s local origin and then move the shape to the required position on screen.
Creating a General Purpose Rotate Function
In our game we’re going to have to rotate points around different origins. For example the background stars will need to be rotated around the player ship position as we animate the ship turning. So we need a general purpose rotation function that will cope with this, as well as our vector shape requirement above.
To do this we need to know the coordinates of the centre of rotation. We then need to recalculate the coordinates of our points relative to this new origin. We can then apply our rotation equations which give us the rotated point relative to the new origin. And finally we can move our rotated point back into position relative to the normal origin.
translated coordinates = point coordinates - centre of rotation coordinates
rotated point = rotatePoint (translated coordinates)
final point = rotated point + centre of rotation coordinates
Summary
Using vector graphics techniques lets us create much smoother rotations of the game elements. We loose a bit on the detail and complexity of the images compared to bitmap graphics, but we gain the ability to have our ships travel at any angle we want.
Code
-- title: Space Commander
-- author: Bob Grant
-- desc:
-- script: lua

ship = {
position = {x=120, y=70},
velocity = {magnitude=0, angle=0},
scale = 1
}

function TIC()

cls()

if btn(0) then
-- bigger
ship.scale = ship.scale + 0.1
elseif btn(1) then
-- smaller
ship.scale = ship.scale - 0.1
end

if btn(2) then
-- left
ship.velocity.angle = ship.velocity.angle + 0.05
elseif btn(3) then
-- right
ship.velocity.angle = ship.velocity.angle - 0.05
end

ship.velocity.angle = wrap_angle(ship.velocity.angle)

draw_object(1, ship.position, ship.velocity.angle, ship.scale)

end -- TIC

function draw_object(object_type, origin, angle, scale)

local object_shape = get_object_shape(object_type)
local point={}
local last_point={}
local rotated_point

for index,point in ipairs(object_shape) do
-- rotate object point around {0,0}
rotated_point = rotate_point({x=0, y=0}, point, angle)
point.x = rotated_point.x
point.y = rotated_point.y
-- scale
point.x = point.x * scale
point.y = point.y * scale
-- move object point to correct screen position
point.x = point.x + origin.x
point.y = -point.y + origin.y
if (point.newline) then
last_point = point
else
line(last_point.x, last_point.y, point.x, point.y, point.colour)
last_point=point
end
end -- for
end -- draw_object

function get_object_shape(object_type)
local object_shape = {}
-- level 1 ship
object_shape = {}
table.insert(object_shape, {x=-5, y=-5,newline=true, colour=5})
table.insert(object_shape, {x=0, y=-4,newline=false, colour=5})
table.insert(object_shape, {x=5, y=0, newline=false, colour=5})
table.insert(object_shape, {x=0, y=4, newline=false, colour=5})
table.insert(object_shape, {x=-5, y=5, newline=false, colour=5})
table.insert(object_shape, {x=-4, y=3, newline=false, colour=5})
table.insert(object_shape, {x=-3, y=0, newline=false, colour=5})
table.insert(object_shape, {x=-4, y=-3, newline=false, colour=5})
table.insert(object_shape, {x=-5, y=-5, newline=false, colour=5})
table.insert(object_shape, {x=4, y=0, newline=true, colour=14})
table.insert(object_shape, {x=2, y=1, newline=false, colour=14})
table.insert(object_shape, {x=0, y=0, newline=false, colour=14})
table.insert(object_shape, {x=2, y=-1, newline=false, colour=14})
table.insert(object_shape, {x=4, y=0, newline=false, colour=14})
table.insert(object_shape, {x=0, y=0, newline=false, colour=14})

return object_shape
end -- get_object_shape

function rotate_point(origin, point, angle)
local transposed_point = {}
transposed_point.x = point.x - origin.x
transposed_point.y = point.y - origin.y
local rotated_point = {}
rotated_point.x =
(transposed_point.x * math.cos(angle))
- (transposed_point.y * math.sin(angle))
rotated_point.y =
(transposed_point.y * math.cos(angle))
+ (transposed_point.x * math.sin(angle))

-- update provided point
rotated_point.x = rotated_point.x + origin.x
rotated_point.y = rotated_point.y + origin.y
return rotated_point
end -- rotate_point

function wrap_angle(angle)
local new_angle = angle
if (new_angle > (2*math.pi)) then
new_angle = new_angle - (2*math.pi)
elseif(new_angle < 0) then
new_angle = new_angle + (2*math.pi)
end --if
return new_angle
end -- wrap_angle