
PS4 firmware 13.52 hacked by just visiting one website
22nd September 2026
Peer Pressure – The impossible Xbox360 softmod – Full installation and setup
10th October 2026
Save your Xbox360 from console bans with AutoDNS for Bad Update and ABadAvatar
If you’ve been modding your Xbox360 with either Bad Update or ABadAvatar you’ll know that you need to disconnect from the Internet before you turn off the console. If you don’t you run the risk of getting a console ban when the exploit runs. Basically there is a delay between the exploit starting and XeUnshackle, or whatever payload you are using, getting control and locking down the Internet connection. This creates a small window of time where your Xbox can connect to Microsoft whilst the exploit is running. If this happens it can trigger a console ban.
So the general advice is to always disconnect. But this can be a real pain in the arse. Especially if you’re using a WiFi connection.
But a clever developer going by the tag dclstn has released their Xbox360AutoDNS plugin to get around this issue. This plugin runs when XeUnshackle is triggered and automatically swaps around your DNS settings to make sure that your non exploited console never has access to Microsoft.
Note that if you have a hard modded RGH or JTAG console this issue does not exist. You boot straight to a protected system. Do check out my RGH3 modding video if this appeals to you.
How Does It Work?
The plugin works by getting you to set your default DNS servers to an unused internal network address. When your unmodded console wants to access a url it needs the DNS server to resolve this to an actual IP address. Since your console DNS is essentially faked it can’t resolve or connect to anything, including Microsoft.
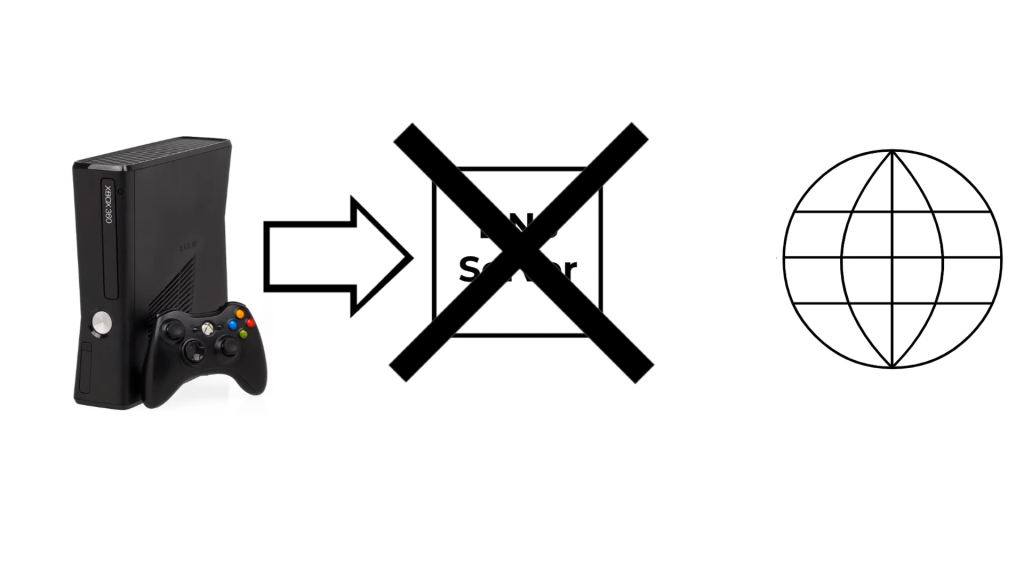
When the exploit runs XeUnshackle executes the AutoDNS plugin which swaps your console’s DNS temporarily to real DNS settings. So while you are protected by XeUnshackle you can access the Internet safely.
When you turn off the console it defaults back to the broken DNS settings so you are safe on the next boot.
So now you know what’s happening, let’s install it.
Installation
First turn off your Xbox360 and take your Bad Update or ABadAvatar USB over to your PC.
Next head over to this GitHub repository.
https://github.com/dclstn/Xbox360AutoDNS
Here you’ll see instructions on how to set up the plugin but we’ll go through that in a second. Just click on the latest releases section and you’ll see a number of download options. The .xex files are the actual plugin files we need, but we only need one.
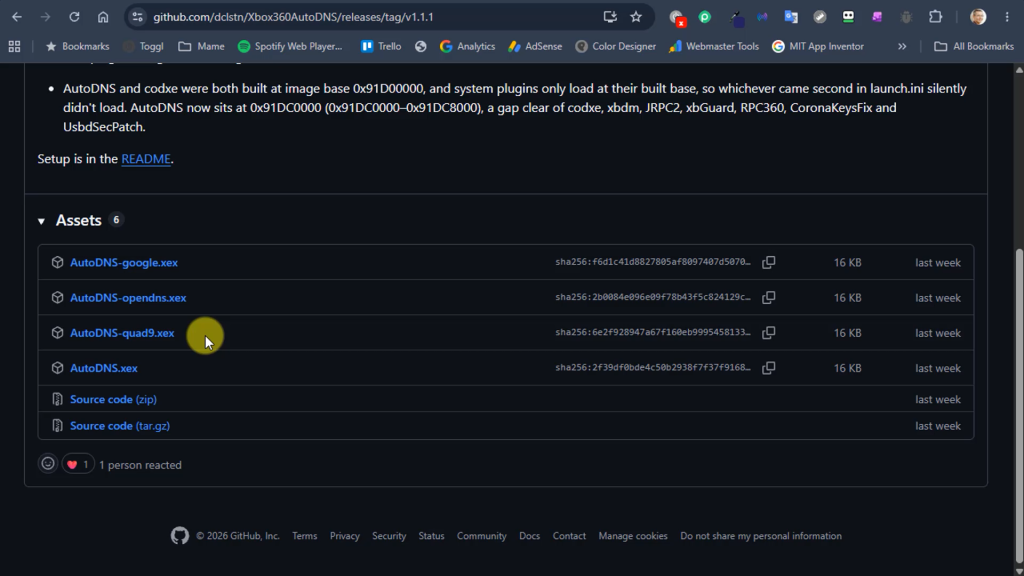
AutoDNS.xex is the original plugin and it uses the CloudFlare DNS servers when it’s active. The -google version uses Google’s DNS servers, opendns OpenDns servers and Quad9 uses their malware filtered system. Which one you use is really up to you, they will all work.
So I’m going to use the Google version so you can see how to set it up.
If you click the filename you can download the xex file. Either save it directly onto the root of your USB drive, or download it and copy it over. As long as you put it in the root of the USB drive it’s fine.
Next we need to browse to our USB drive using your file explorer app.
Here you should see the downloaded file and also the launch.ini file which is the XeUnshackle settings.
First we need to make a note of the exact filename of the AutoDNS file we downloaded. This should end in .xex. If you can’t see that make sure to turn on file extensions from the view menu, show and file extensions. If you want you can right click in Windows on the filename, rename it and then copy the whole filename onto your clipboard. We do need to get the name exactly as it is with all the correct capitalisation.
Next we’ll edit the launch.ini file with Notepad or any other text editor. I’m using Notepad++ which gives me code highlighting.
Scroll down until you get to the Plugins section. You’ll probably see a list of other plugins. We just need to add AutoDNS in here as well.
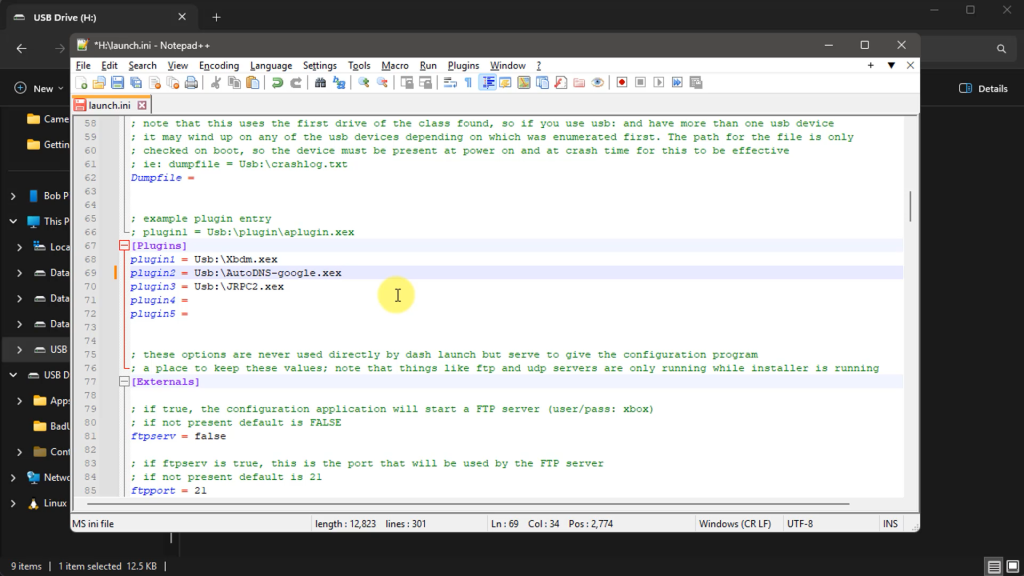
Find a blank plugin slot. I’m using plugin2 here. And just use the exact same format as the others,
Usb:\ AutoDNS-google.xex
And that’s it installed!
Make sure you save the file before exiting and then eject the USB.
But DO NOT PLUG IT INTO YOUR CONSOLE.
Setting Default DNS
Power on the Xbox360 without the USB drive so that we boot to an unmodded Xbox.
Go to the settings page and select system settings. Go to the Network option. You should see your network connection listed. If not make sure you set up the connection as normal and then come back to this page.
Select your Internet connection and then select the Configure Network option. This will show you the current network setup. Click down until you highlight the DNS settings section and select that. We now want to set up manual DNS so select that.
DNS generally has a primary server and a backup or secondary server so we need to change both settings.
Click on the primary server and change the IP address to 192.0.2.1. Click your Start button to save that setting and now edit the secondary server IP address to that same value.
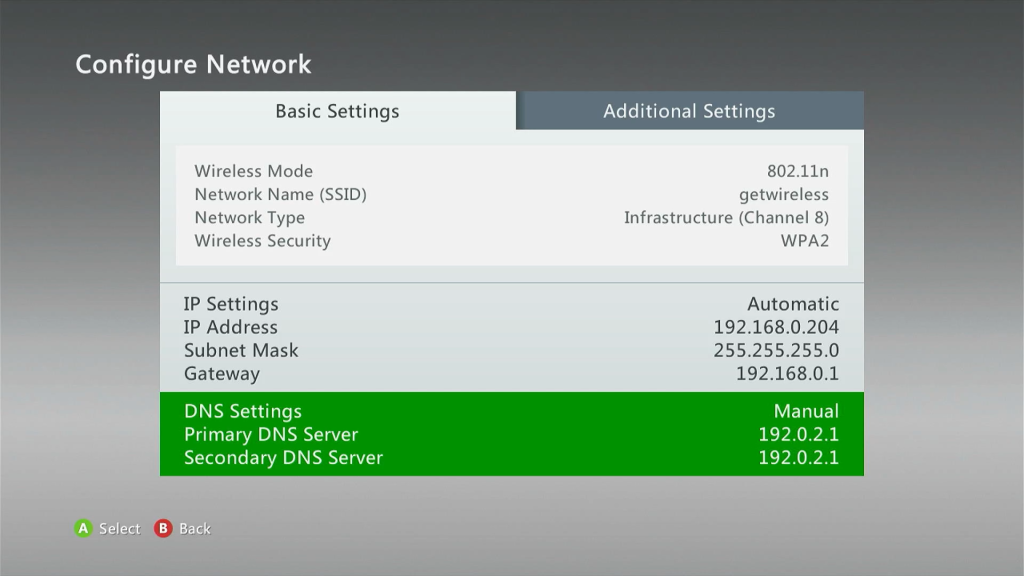
If you now click the Done option you should get back to the settings list so just make sure that those values are in place for the Primary and Secondary servers. If that’s all in place we’re fully setup.
Testing
So power off your console and plug in your USB drive.
When you power on you’ll either go straight to your modded console with ABadAvatar or you’ll need to start Rock Band Blitz. But once the get past the XeUnshackle screen you should now have a fully modded console with full Internet access.
When it’s time to turn off the console you don’t have to worry about disconnecting WiFi or unplugging your Ethernet. You can safely just leave everything turned on and AutoDNS will keep your console safe.
Accessing Microsoft
The only downside to this setup is if you do want to connect to Microsoft.
If you do first of all make sure you are not running the exploit. The easiest way to do this is to power off, take out the USB and then power back on. You’ll now need to go to your settings and system and network and again edit your active connection. In there select configure and then select the DNS settings. This time select Automatic and let the Xbox setup everything for you.
Once that’s finished you should now have access to online services.
But here’s the payoff. Before you shut down you MUST set the DNS back to the 192.0.2.1 IP address or yet again you’ll open the console up to a ban on the next start.
Conclusion
So that’s a great way to get around the problem of the active Internet connection. Just leave it on and safely boot into your Bad Update based exploit.