
Why are new computers so expensive?
4th August 2026
Mod your PlayStation 3 with Flash Writer – full installation tutorial
Installing Custom Firmware or CFW onto your PS3 unlocks the full potential of this great console. Play games from your legally obtained backup files, preserve your original disks, play games for PS1, PS2 and PSP consoles and so much more. You can use a number of different techniques to exploit the PS3. Usually we use Bguerville’s PS3 Toolset as it streamlines the whole process of checks and backups during the custom firmware installation to make sure that everything runs smoothly.
But sometimes this tool isn’t available, or as at the moment, it’s not compatible with the latest PS3 firmware version. If this is the case you can use the Flash Writer method that I’ll be covering in this video. This still performs all the checks and backups but is a slightly longer process.
At the moment my PS3 is running firmware version 4.93. It’s been a couple of months since the update was released, but the PS3 Toolset hasn’t yet been updated. PS3 homebrew software is written and maintained by PlayStation enthusiasts in their spare time and totally for free so we do just have to wait until they get a chance to update the code.
But Flash Writer has been updated to support 4.93 so let’s go ahead and mod this console with the latest 4.93 Flash Writer CFW version.
Future Releases
Just a note for future firmware updates. I’m installing 4.93 today as we have an updated CFW from Evilnat and an updated Flash Writer app. As both are compatible with 4.93 the mod is possible. When the PS3 firmware gets updated again you do have to wait until both the CFW and the Flash Writer code gets updated. Once you’ve got both of these you can follow this video by just swapping in the newer versions of the downloads.
Is My PS3 Modable?
Before we start we do need to make sure that our PS3 is CFW compatible. CFW requires your console to be compatible with firmware version 3.55 so that it can take control of the system. To check we first need to look at the model. All original Phat models are fully compatible. If you have one of these you’re good to go. All Super Slim models are not compatible so you’ll need to go the PS3HEN route. This gives you most of the important features of a modded console including all the games.
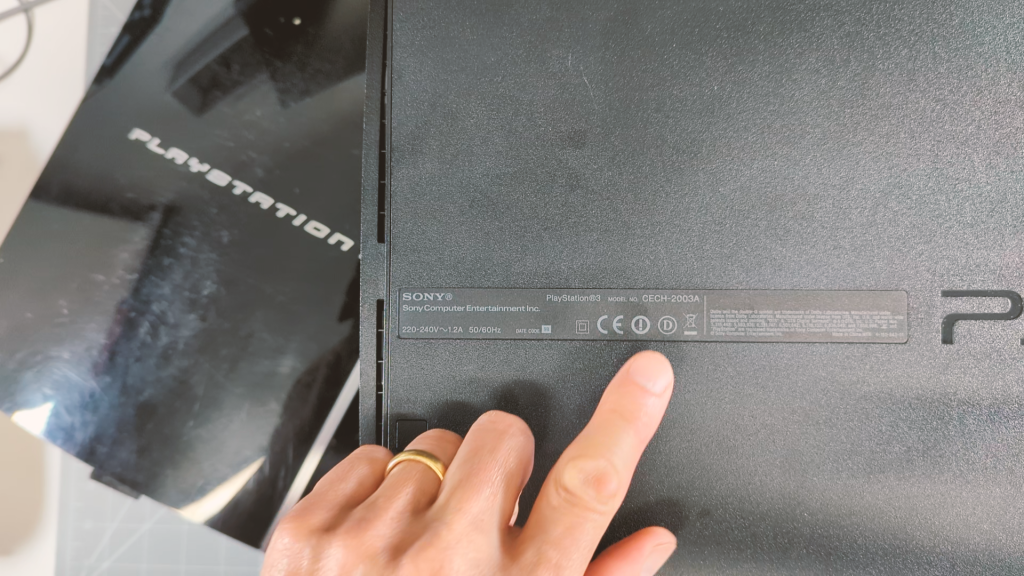
If you’ve got a Slim model then only the older versions are compatible. To check you need to look underneath the console and find the model number. It will start with CECH and end with a number. If your number starts with 20 or 21, e.g. mine is CECH-2003A, then your PS3 is CFW compatible. If your number starts with 30 you’re out of luck and you’ll need to go the PS3HEN route.
For console models starting with 25 we need to run a check. Some are compatible some aren’t. We’ll do this as part of our preparation.
Parts You Need
To install CFW we’ll need to get a couple of items ready.
Original PS3 controller – https://amzn.to/4gTpCwa
Mini USB cable – https://amzn.to/4qEWzzy
PS3 – https://amzn.to/4gy9EWN
USB drive – https://amzn.to/4gAoRqm
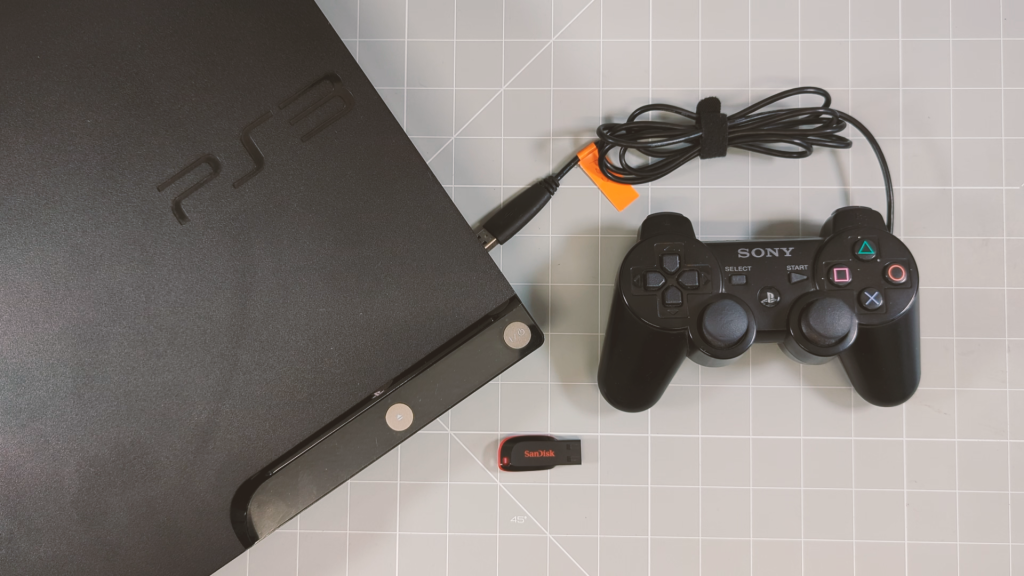
First you need a working PS3 console that can connect to the Internet. If you’ve already got some sort of CFW mod on the system I’d advise doing a factory reset to get to a clean starting point. Take a look at my factory reset video to find out how to do this.
You’ll also need an official Sony controller with a mini USB cable to connect it to the PS3. We might need to use something called Safe Mode and most third party controllers don’t work for this.
Lastly you’ll need a USB drive that you can plug into the PS3. This needs to be structured as an MBR drive and formatted as FAT32. The best way to do this is to use an app like MiniTools Partition Wizard. You can get the free version from this web address.
Open up the app and plug your USB drive into your PC. Make sure you can identify the drive and then look at its details. Most likely it will already be an MBR drive, but if not just right click on the drive info and select the option to convert it. This will start to build up a task list of operations. Next right click the drive info and select Delete All Partitions if it’s there. This will wipe the drive clean so make sure there’s nothing on there that you need. Next right click the Unallocated space and select Create. We want to create a primary partition and format it as FAT32.
You should now have a list of tasks on the left. Click apply to run them. Your USB drive is now ready.
Checking For CFW Compatibility
First we can check for CFW compatibility. If you know your console is compatible you can skip this next section. Otherwise we’ll be downloading the MinVerChk app to find out.
Pop your USB drive into your computer and create a PS3, all caps, folder in the root of the drive. Then open the PS3 folder and create an UPDATE folder, again all uppercase. Next head over to this web page and click on the download link.
https://consolemods.org/wiki/PS3:MinVerChk
This should try to download a MINVERCHK.PUP file.
Make sure you save it into the PS3/UPDATE folder on your USB drive but also rename it to PS3UPDAT.PUP.
Next we need to check the integrity of the file using the MD5 checksum from the download page. Make a note of the number and then head over to this web page.
https://webencrypt.org/onlinetoolsjs/md5_checksum.html
Make sure you’ve selected MD5 in the Checksum section and then select the file on your USB drive by clicking in the upload box. This should generate a checksum number below which should match the number from the download page. If they don’t match the file you’ve downloaded is corrupt so you’ll need to redownload and recheck it until you get a match.
It’s important to run these checks on the firmware files as any corruption can brick your console.
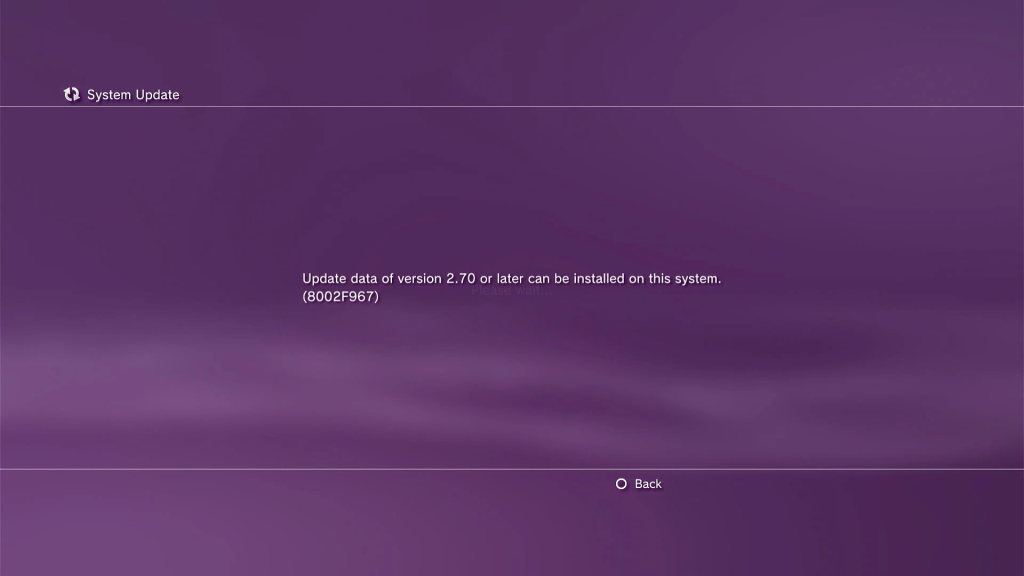
If all’s OK eject the USB drive from your computer and plug it into the rightmost USB port on the PS3. This is USB port 0 and most low level apps will expect the device they are looking for to be plugged in here. Now go to the Settings Menu and select System Update. Choose Update Via Storage Media and run the update. This will run the MinVerChk app and display a message about the minimum firmware version your console can run. This must be 3.56 or lower to be CFW compatible. 3.56 uses 3.55 hardware keys so is still OK for the latest CFW releases.
If your console reports later than 3.56 then you’ll need to use the PS3HEN mod.
Install HFW
So now that we know that our console is compatible with the Custom Firmware mod we can start getting the final code together.
First we need the Hybrid Firmware which will enable us to use Flash Writer. This can be downloaded from this web site.
https://www.psx-place.com/threads/hfw-4-93-1-hybrid-firmware-official-release.49792/
The Hybrid Firmware is basically a modified official firmware with some code blocks replaced so that we can get limited access to the PS3 system. For the moment just download the files to a folder on your computer. The best way to download the file is to right click it and save link as. Your browser may complain as it won’t recognise the file type but there should be some sort of option to keep the file. While we’re here also make a note of the MD5 checksum value as we’ll need to check the file integrity when we copy it over to our USB drive.
Now make sure that your USB drive is back in your computer and we’re going to open up the PS3/UPDATE folder and delete the PS3UPDAT.PUP file that’s already there. Remember this was our MinVerChk code. We now need to copy over that downloaded Hybrid Firmware file to this UPDATE folder and again rename the file to PS3UPDAT.PUP.
As a final check we need to do a run a checksum verification so start up your web browser and go to the MD5 online checker site. Again make sure you’re running the MD5 checksum and select the PS3UPDAT.PUP file from your USB drive. Check the MD5 checksum against the HFW checksum from the download site.
If everything matches, we’re ready to install the HTW onto the PS3.
On the PS3 make sure the USB drive is plugged in to port 0, the right most USB port, and then go to the Settings menu and System Update and Update via Storage Media. The PlayStation should find your HFW file and offer to install it. If it does go ahead and run the installation. If it talks about not being able to install this version you’ll need to use Safe Mode which we’ll go through in a second.
Once the installation is complete the console will reboot and you should have a running PlayStation. Everything will look and work as normal but we have modified the system software to allow us to hack the console.
To avoid issues later in the process the best idea is to repeat the HFW installation a second time. If you can do this again through the Settings menu then do that. Otherwise I’m going to go through the Safe Mode installation now. If you weren’t able to use the XMB install the first time just do two Safe Mode installs.
Getting into Safe Mode
Safe Mode is a special state you can force the PS3 into to perform some lower level tasks. First you need to power off the console by holding in the power button until the LED goes red. Next power on again but hold in the power button. Keep it held in until the console turns itself off again. Finally press in the power button and keep it pressed until you hear one beep followed by two beeps. Release the power button and you should be into Safe Mode.
The console will prompt you to plug in a controller using the USB cable, so do that and press the PS button. This should bring up the Safe Mode menu. Scroll down to the System Update option and select that. Make sure the USB drive is plugged in and press the Start and Select buttons together. The console will check the USB drive and then prepare the update. Let it run through and reboot itself and you should get back to the System Update page with the HFW firmware version showing. Press the PS button to start the installation.
You’ll need to go through the terms and conditions pages but then the firmware will be installed and the system rebooted. If it asks about HDMI connections just set things up as normal.
So you should now have two successful installations of the Hybrid Firmware.
Running Flash Writer
We’re now just about ready to run Flash Writer to mod the console. First we need to tweak a few settings.
In the Settings menu select System Settings and make sure that Automatic Updates are turned off. If the system performs an automatic update it will overwrite our CFW. Next go down to Display [What’s New] and turn that off as well.
Next we need to clean up the browser so back out to the main menu and open up the browser app. Press triangle to bring up the menu and go to the tools section. In here we need to set Confirm Browser Close to On. Back into the menu and tools and set the home page to a blank page. Back to the tools menu and we now need to delete all of the browser stored information. You’ll see four delete options at the bottom of the list so just go through each in turn to give us a completely fresh browser before we start the main installation.
Once that’s done exit out of the browser to have all the changes take effect.
Open the browser back up and press the start button. We now need to go to FlashWriter webpage which is currently hosted on evilnat’s GitHub account. As new versions are released I’ll make sure to update the link in the description.
https://xxevilnatxx.github.io/flash-writer/
Type in the exact page address and open up the page. You should get to this screen.
We’ll need to come back here a few times so hit the select button and add this page to your bookmarks. We can then use this bookmark to get back without having to type out the address again.
To run Flash Writer we need to first tell it which port our USB drive is plugged in to. If you’ve plugged it into the right most port that will be dev_usb000. The ports are numbered from right to left so dev_usb001 will be the left port. If you have four ports they will be numbered 0 to 3 going left.
Now we need to work out what memory technology your console uses. This will be NAND or NOR. If you’ve got a slim model PS3 your system uses NOR flash memory.
If you’ve got a phat model you need to check the model number on the bottom of the console. If it starts with CECHA, CECHB, CECHC, CECHE or CECHG then you’ve got an older NAND model, otherwise your system is a NOR motherboard. If you’re in doubt check out this web page which details each model number and its specs – https://www.psdevwiki.com/ps3/SKU_Models.
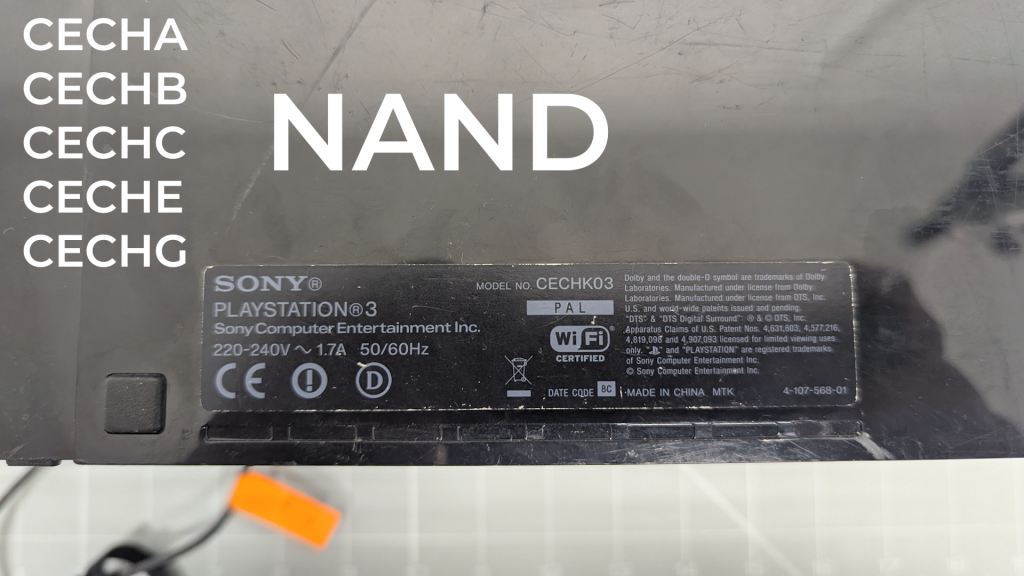
My console is a slim so I’ve got NOR flash memory.
When I select NOR the Flash Writer website will run scan for some data and you should get a success message. We can now click the Run Checks. The software will start to check your console for CFW compatibility and if everything is OK it will download a patch file. Just let that download. Once finished press O to go back to the website and then software will verify the download.
If you get a success message then great. Click the Dump flash memory button and the code will dump a copy of your console’s flash memory to your USB drive. This process will take a few minutes to complete so just let it run. If you get an error message at any point in this process it will most likely mean that your console is not CFW compatible. If that’s the case you’ll need to go the PS3HEN route.
Eventually you’ll get a success message so we now need to backup and check the dumped file. Leave the PS3 browser open and take the USB drive over to your computer.
Checking Your Flash Memory Dump
The first bit of software we need is the PyPS3Checker. So head over to littlebalup’s PyPS3tools GitHib page
https://github.com/littlebalup/PyPS3tools
From here we need to download the PyPS3checker standalone package. You can get to the download link through this menu button and just download the zip archive file to your computer. Once downloaded use something like 7-Zip or Zip-Pro to extract the archive into its own folder. If you now open up that folder you’ll see a number of files. This application is going to take our PS3 memory dump and check it to make sure it’s safe to install the custom firmware.
We now need to copy the PS3 memory dump file from the root of our USB drive into the PyPS3checker folder. Once that’s copied over you simply drag the bin file and drop it onto the batch file labelled as drag and drop your dump file here. This will trigger the code to process your flash memory dump.
A command window will pop up and show you some check results. Here we’re looking for the number of dangers and the number of warnings. Both should be zero. If they are not your best bet is to go back to the HFW download phase, verify your downloads, do two more installs and then re dump your flash memory. Hopefully this will clear the errors.
If you still have errors or warnings there is a note on this page about later slim and super slim models giving false positives. Follow the instructions and get some advice before going any further. If you have real warnings or dangers you risk bricking your console.
But hopefully everything is OK so you can just say No to the log file.
This file is unique to your console. If you ever brick your console in the future this is the only file that will save your PS3. So make sure you back it up somewhere safe, preferably in some sort of cloud storage. On my system I have a console backup folder that’s connected to my OneDrive account.
We now need the actual Evilnat custom firmware code. The latest release is always linked to from the psx-place.com website. There are other versions of CFW but I’d currently stick with Evilnat’s code.
https://www.psx-place.com/threads/4-93-evilnat-w-cobra-v8-5-cex-pex-d-pex.39743/
Again make sure you check that you’re downloading the latest version. I’ll keep the link in the description updated.
The firmware provides a whole raft of great features to unlock your PS3 so have a read through as you scroll down to the download link. This will likely be to a Mega folder. Click the link and you should see a number of options.
CFW comes in a range of flavours depending on how you want to use the system. DEX and D-PEX contain developer options. Only use these if you know what you’re doing.
CEX is basically the same as a retail PlayStation but with the ability to run homebrew code and play games from backup files. PEX gives you everything from CEX plus some extra developer features that allow you to modify certain aspects of the PS3. If you’re only modding the system to get access to all the games go with CEX. You can always switch versions by re installing the CFW later. With either version you have to be very careful if you want to play online games. Sony can detect any modified console and can ban your PSN account. My basic rule is to not play online games with a modded console. If you want to, you need to prepare the PS3 before going online and always use a throw away PSN account. NEVER use your real PSN account with purchased games etc. I’m not going to cover online play in this video but it can be done.
Having said all that I’m going to install PEX so I have the extra features available.
Inside the PEX or CEX folder you’ll usually find a number of versions depending on what bits of your PS3 are working. The noBD and noBT stand for no Blu-Ray and no BlueTooth. If your console’s disk drive or BlueTooth are broken make sure you download the version that matches your setup. Otherwise just download the full version.
This will probably download as a rar archive file so you’ll need install something like 7-zip or Zip-Pro to be able to extract the files. But download the appropriate CFW archive file to your computer. Once downloaded extract the contents.
Inside the extracted folder you should see these files. The md5.txt file will be the checksum that we’ll use to verify the integrity of our CFW file. The file itself should be inside the PS3 folder, UPDATE and should be named PS3UPDAT.PUP all ready to be copied over to our USB drive. If it’s not PS3UPDAT.PUP rename the file.
Now open up your USB drive and delete the old PS3UPDAT.PUP file in the PS3/UPDATE folder and then copy in the CFW version.
Next we’ll check the CFW file on the USB drive with our MD5 checksum. If that all matches up then we are ready to mod the console.
Patching the Flash Memory
Back on your PS3 you should still be on the Flash Writer web page with it waiting for you to click the Patch button. Before you click, make sure that you’ve completed all the checks with PyPS3checker and backed up your dump file. If you loose power, interrupt the patching process or if your memory dump has any dangers or warnings it can brick your console. It all is OK and you’re happy to go ahead click the button and then leave your controller and the console alone.
The patching process is quite fast on NAND systems but can take a few minutes on NOR memory. Do not touch anything until the process is complete.
Once you get the success message the console has been patched. Quit out of the browser, then hold down the PS button on your controller and turn off the PS3. Reboot and you should still have a working PS3. Congratulations, your Flash memory has been successfully patched.
Install CFW
Finally we can install the custom firmware.
Make sure your USB drive with the CFW update file is plugged into the right hand USB port on your console. Now go to the settings menu, System Update and update from storage media. You should see the version number of the CFW file you downloaded.
If you’re happy to go ahead select OK and you’re now going to go through the same firmware update process as before. So work through that process including the file copy, reboot and final installation. Once the install is complete your PlayStation will reboot for a final time and you should get a different boot screen to show that you’re now running the Evilnat Firmware.
You’ve now got a fully CFW modded console.
What Next
Just to check that everything is installed you can go to your game menu and you should see a few new options; the PlayStation 3 menu and the Package Manager. If you now go the network menu you’ll also find some Custom Firmware Tools.
So now we’ve completed the process what next?
You’ve just unlocked a full range of new features on your console. You can back up your own game disks and then run any game you want from any legally obtained backup file. You can install emulators for PS1, PS2 and PSP games along with a whole range of other retro consoles turning your PS3 into a full retro gaming powerhouse.
So please do make sure to subscribe to my channel and check out my PS3 playlist to find out how to set all of this up and release the full potential of your Newly modded PS3.