Download Every Game For Your Retro System In One Go
30th March 2021
How To Decode and Display Bitmap Images Using an Arduino – Write Your Own Code
11th April 2021
How To Load Images Onto Your Arduino LCD Screen From an SD Card
Adding an LCD screen and SD card reader to your Arduino project opens up endless opportunities to build great visual feedback and control panels. In this tutorial I’ll show you the easy way to display bitmap images stored on an SD card on an SPI driven LCD panel connected to an Arduino Uno.
Connecting up the Hardware
To get started you’ll need to connect up and add some driver software for the LCD panel and SD card reader. I’ve covered this in previous tutorials so please have a look at these.
Connecting your LCD Touchscreen
Connecting your SD card reader
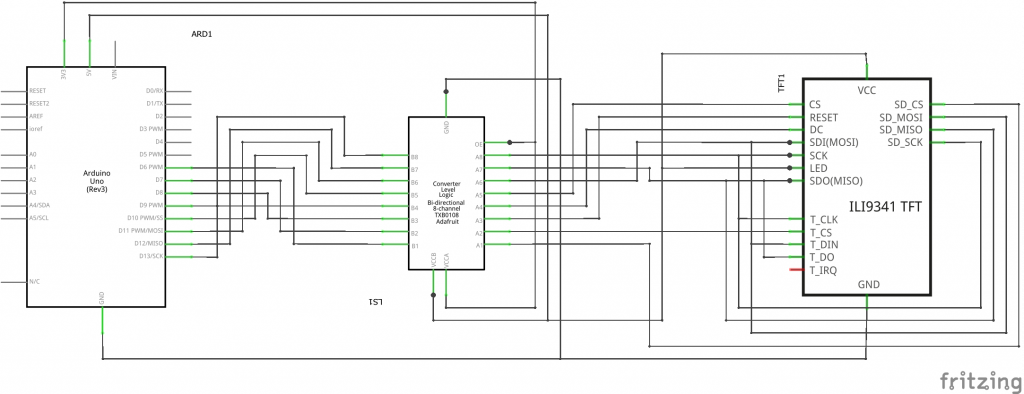
Circuit Diagrams for SPI LCD Touchscreen and SPI SD Card Reader
Breadboard Layout
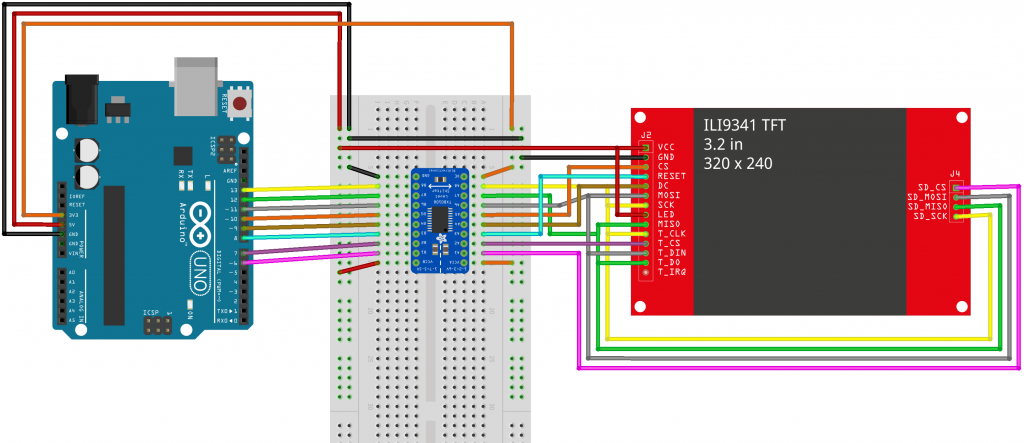
Circuit Diagram
The Easy Way!
Image files are simply blocks of data stored on your SD card. But you need some software to read this data and translate it into actual pixels that can be displayed on a screen. The easy way to solve this problem is to use someone else’s solution – Arduino libraries.
Adafruit to the Rescue
We’ve already used a number of driver libraries from Adafruit to connect the LCD panel and add some core level graphics functions. We’ll now use their image library to add the ability to read bitmap images from the SD card and send them to the LCD screen.
The image library we’ll use is the Adafruit_ImageReader library. You’ll find that in your library manager in the Arduino IDE. Make sure you install this before continuing with the tutorial.
The Adafruit_ImageReader library doesn’t work with the standard SD card library so you’ll need to download the Adafruit version of the SdFat library. Search for ‘adafruit sdfat’ in the library manager and install that. If you can’t find it listed you’ll need to download it from the Adafruit website and install it manually. Have a look at this tutorial to find out how to do that. https://learn.adafruit.com/adafruit-gfx-graphics-library/loading-images
Simple Method Call to Display and Image
Once you’ve got the hardware and software connected it really is just a few lines of code and one method call to display an image.
Note that images need to be 24bit bitmap images and sized correctly for your screen. You can make then any size you want and place them anywhere on the screen but the software won’t scale them, just display the full image or crop it if it hits the screen edges.
Include the libraries
#include "SPI.h"
#include "Adafruit_GFX.h" // Core graphics library
#include "Adafruit_ILI9341.h" // Hardware-specific library
#include "SdFat.h" // SD card & FAT filesystem library
#include "Adafruit_ImageReader.h" // Image-reading functions
#include "XPT2046_Touchscreen.h"
Initialise the objects
SdFat SD; // SD card filesystem
Adafruit_ImageReader reader(SD); // Image-reader object, pass in SD filesys
Display the image
ImageReturnCode stat;
stat = reader.drawBMP("/logo.bmp", tft, 0, 0);