Play arcade games on your Nintendo Switch – Easy Mame install and setup
6th April 2026
Fake SD Cards and USB drives – What they are and how to spot them
26th April 2026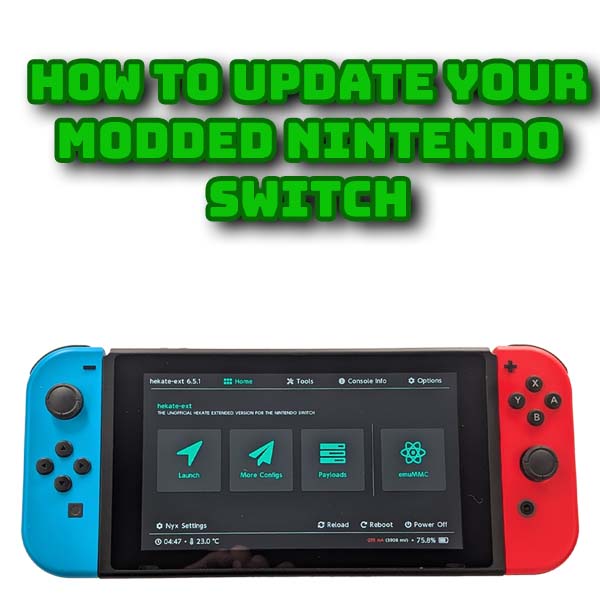
How to upgrade your Nintendo Switch CFW and OFW – Hekate, Atmosphere and OFW
We’ve been having a number of Switch firmware updates recently and it’s left us in a fairly unusual situation. We got the 22.0.0 update a couple of weeks ago and the Atmoshpere custom firmware was modified to work with it. But immediately the Atmosphere update was released Nintendo released firmware 22.1.0 which needed another Atmosphere fix.
So at this moment in time for me in April 2026 I’ve got a fully working modded Switch running on firmware 21.2.0. I’d like to update to the latest versions of Atmosphere and Hekate with firmware 22.0.0, but definitely don’t want to install the very latest official firmware, 22.1.0.
So in this video I’ll show you how to update your Atmosphere and Hekate custom firmware to the latest versions, but also how to control your official firmware version so you can safely install whichever one you choose.
So lets get started.
Parts You Need
First off you’ll need a modded Nintendo Switch. Controlling your firmware version and installing custom firmware requires you to have a modded console. RCM or ModChip will work, but it must be modded. If you haven’t modded your console yet then do have a look at my modchip tutorial. This will show you how to fit the Picofly modchip and get it up and running.
The only other thing you’ll need is a way to copy files to your Switch SD card. I’ll be connecting with a USB cable, but if you want to plug your card directly into your computer you’ll need an SD card reader.
Software
On the software side we’ll need the latest versions of Atmosphere and Hekate. You can install these separately, or if you’ve followed my modding tutorial, you may have used a homebrew package like the HATS package from Sthetix. If that’s the case you’ll need the latest version of the package, making sure that it contains the latest Atmosphere and Hekate versions. The HATS package is great for staying up to date, but not all of them are.
For the standalone updates the best place to go is the NH Switch Guide at
On the micro SD card preparations page
https://switch.hacks.guide/user_guide/all/sd_preparation
You’ll find links to the latest versions of both Hekate and Atmosphere. These are the only files you’ll need. Download them to your computer. For Hekate if there is an update to Nyx download that version.
Once you’ve downloaded the files we need to build an SD card update folder. In my download area I’m making an update folder. We’re going to pretend this folder is the root of our SD card and assemble all the files here so we don’t accidentally overwrite our real SD card files if we make a mistake.
Now open up the Hekate download and extract the bootloader and bin file to our update folder. If you’re using a modchip you’ll now need to rename the .bin file to payload.bin. If you’re using an RCM jig just delete the file.
Next open the Atmosphere archive and copy everything to the update folder. You should now have an update folder that looks like this.
If you’re using the HATS package head over to Sthetix’s GitHub page at
https://github.com/sthetix/HATS
In the releases section go to the latest release and then download the zip archive to your computer. Once that’s downloaded all you need to do is create the update folder and then extract all the files in the archive into that. The HATS package already has everything we need to update the Switch pre assembled for us.
At this point we now have an update folder inside which we have an update package to upgrade our Switch custom firmware.
We’re going to be installing a version of the Official Firmware so we’ll need an application called Daybreak.
We now need to get hold of the Official Firmware we want to install.
Head over to the Darthsternie website at
https://darthsternie.net/switch-firmwares/
Here you can download any Switch firmware version you want to either upgrade or downgrade your machine. Before you go mad though there are a few rules on what you can do.
As your Switch gets updated by the official Nintendo upgrades the firmware will blow some physical fuses inside the console. This allows the Nintendo code to keep a track of what firmware you should be running. If the fuses don’t match the firmware the console won’t boot.
Of course using a modded Switch allows us to bypass this fuse check but do be aware that if you use the 100% stock firmware OFW boot option any mismatch will stop the Switch from booting – you’ll just get a black screen. The Semi Stock option is designed to get around this and allow you to use OFW with a fuse mismatch. There is no problem with this, but just be aware that if your OFW boot option doesn’t work after playing with firmware versions this could be what’s happening.
On the emuMMC side of things we can do whatever we want. This is completely separate from our real sysMMC NAND environment and it doesn’t care what mismatches we have. It also doesn’t have to be the same firmware as your sysMMC side, so have knock yourself out with the versions.
So we need to decide what firmware to install. Usually this will be the latest version fully supported by Hekate and Atmosphere. As I mentioned at the beginning for me, today, this is 22.0.0 as the 22.1.0 updates are not fully ready.
So I’m going to download the archive file and again save it to my computer. Once that’s downloaded we need to add a new folder inside our update folder so we can copy the files to the Switch. Open your update folder and create a folder called firmware. Then open your downloaded firmware archive and copy all the files from that into the new firmware folder. If you’re using multiple firmwares just put each inside its own folder – make sure you label them!
We’re now ready to update the console.
Updating the Console
If you’re using USB to connect to the Switch, boot into Hekate and use the Tools and USB tools option to set the SD card as a removable drive on your computer. If you’re taking the SD out then just plug that into your computer. Either way you should now have access to the filesystem on the SD card.
For the standalone installation you just need to copy all the files from the update folder on your computer to the root of the SD card. If it asks about overwriting any files just say yes. That’s the software updated.
For the HATS update you first need to delete the Atmosphere, bootloader and Config folders. Then just copy the contents of the update folder to the root of the SD card. Any files that are getting replaced just say yes. If you had added any extra payloads or other files you’ll need to re install them.
That’s the custom firmware taken care of. If you now reboot your console you should find that you’re running the new version of Hekate.
Using Daybreak to Update Firmware
We now need to update our system firmware. There are a few ways of doing this. The easiest is to boot into the Official Firmware and just run a normal system update. This will of course upgrade you to the very latest OFW which I don’t want to do at the moment. This will also only update your sysMMC environment, not your emuMMC.
Instead we’re going to use the Daybreak app which comes as part of the Atmosphere firmware.
In the SD card setup we already downloaded our desired firmware version. So on your console power on and boot into Hekate. We’ll first update our sysMMC side, so launch sysMMC with CFW. This will take you to the main menu.
Open up your album and then select the Daybreak app, you don’t need to be in full memory mode for this.
Click the Install button and the app will now show you your SD card. Just select the folder where you saved the firmware files and select it. Daybreak will now scan the files in the folder to make sure it’s a valid firmware. If everything reports back OK you can click the continue button at the bottom of the window.
You may now get the option to either keep your settings or do a factory reset. If you get this choose to keep settings. You may then be asked to select the driver variant, so unless you know otherwise select FAT32 + exFAT.
At this point the software should be ready to compile the update so click Continue to start installing the new firmware. This can take a minute or so.
If everything has worked you’ll get a successful message. All we need to do now is reboot the console back into the sysMMC with CFW option. You’ll see a spinner for a few seconds while the firmware installation completes and then the system will reboot again.
Relaunch the sysMMC CFW option and if you now check your system settings you should find that you’re on a new firmware version with the latest version of Atmosphere.
That’s the sysMMC updated. All we need to do now is go through the same process with the emuMMC side.
Conclusion
So that’s your modded Switch all up to date, or at least as up to date as we can go at the moment. We’ve seen how we just need to load the new files for Hekate and Atmosphere and how we can control the updating of both our sysMMC and emuMMC environments.