Space Commander Overview – Learn to Code Your Own Games
9th May 2021
Vector Graphics for Space Commander – Learn to Code Your Own Games
20th May 2021Using GPIO Pins For Button Inputs in RetroPie – Building Your Own Retro Gaming Handheld
(This page is part of the Raspberry Pi Handheld Games Console series. Please click here for the full project.)
You can add buttons to your handheld Raspberry Pi games console in a number of ways. Most game controllers connect through USB so we could simply scavenge the buttons from that, put the circuit board inside our case and connect it to the USB port on the Raspberry Pi. Whilst this would give a working solution we have two chop up the controller which would get messy, and then tie up the USB port on the Raspberry Pi Zero.
A better solution is to connect the controller buttons directly to the GPIO pins on the Raspberry Pi. This way we only need to run connections from each button to the RPi without the need for an extra controller board.
How To Connect A Button to a GPIO Pin
First we need to work out how to connect the buttons to the Raspberry Pi.
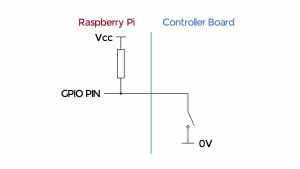
The Raspberry Pi is very flexible in how you can connect to it. Usually switches and buttons need a pull up resistor to hold the connection high when the button is open, which is then pulled low when the button is closed. Luckily the RPi allows you to attach pull up (or pull down) resistors internally through software so you only need to connect one end of the button to the Raspberry Pi and the other to 0V.

Mapping the Buttons
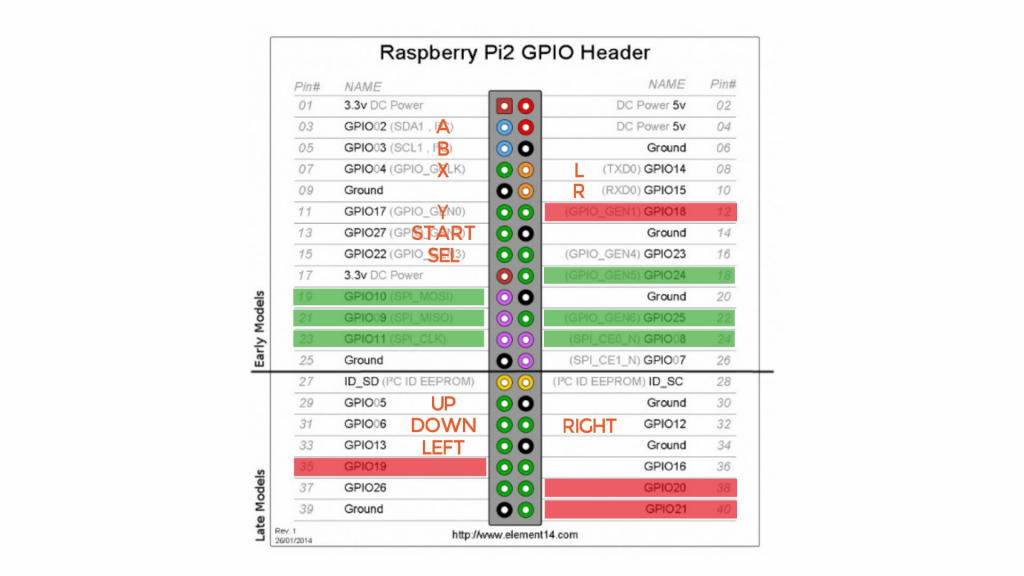
Now that we know how to connect we need to work out which buttons connect to what GPIO pins.
For this project I’m using a Raspberry Pi Zero. This is a lower powered SBC (Single Board Computer) so we’ll only be able to emulate older, 8 and 16 bit games, together with older arcade games. All of these used either D pads or microswitch joysticks for directional control rather than the analogue joysticks of the modern era. This means that the full set of buttons / switches we need is;
up, down, left, right, A, B, X, Y, Start, Select, Left Shoulder, Right Shoulder.
This gives us 12 switch inputs to connect to our GPIO header.
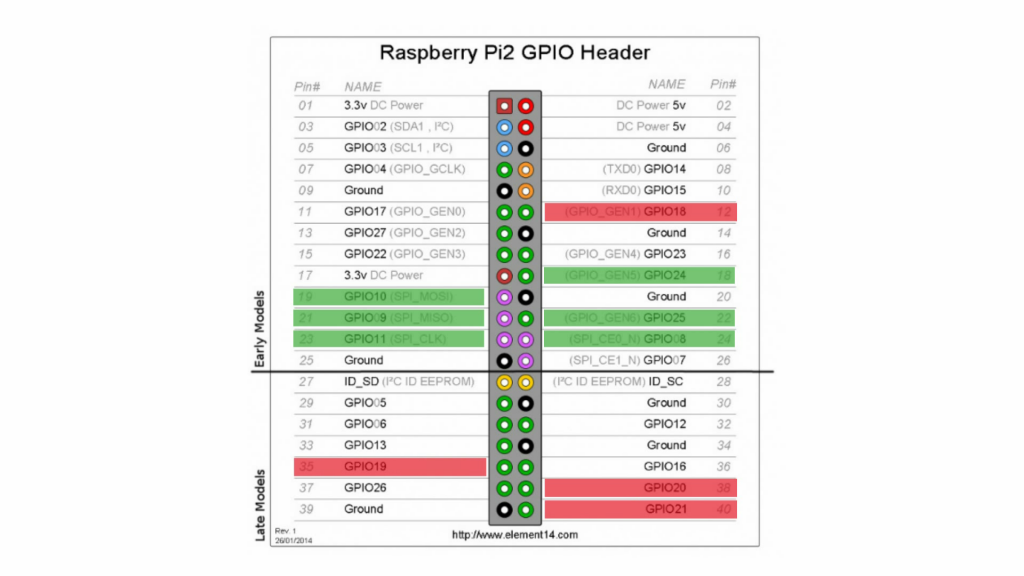
If we look at the 40 pin header we’ll see that we are already using a few for our LCD panel (from the last tutorial). We’ll also want to add sound to the console so we’ll need to leave the sound output pins free.

This still leaves us enough free GPIO pins to connect all the inputs. So I’ll be wiring up my controller as shown below.

What Switches and Buttons To Use?
It’s really personal choice which buttons you use. There are a wide range of tactile push buttons for the A, B, X, Y, etc. inputs. You can also use those for the 4 directional inputs to make up a D Pad. But I prefer joysticks to D Pads so I’ll be using a mini navigation joystick which has the 4 direction switches built into it.
Prototying the Controller
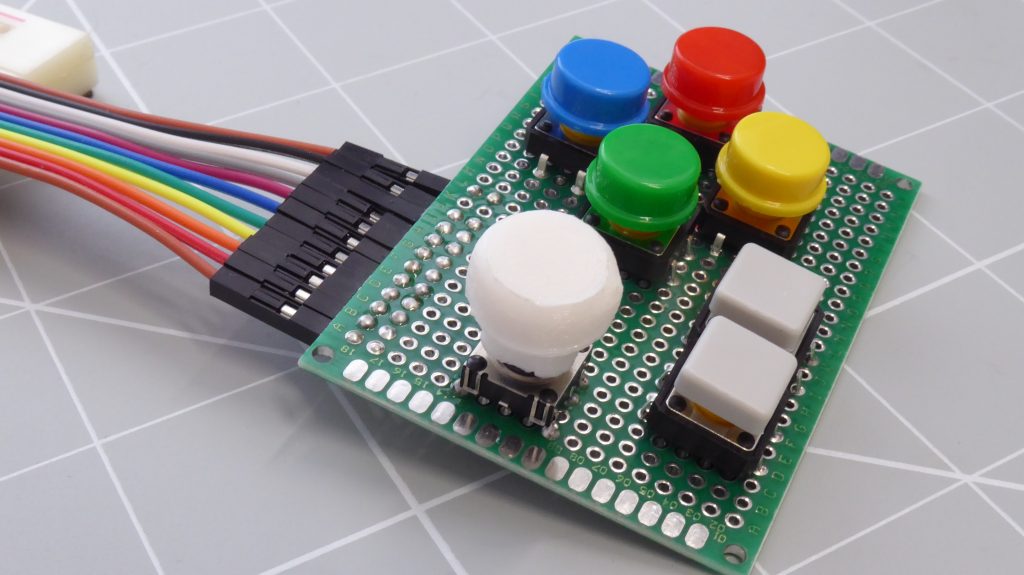
For testing purposes I made a controller on some prototyping board.

This has all the inputs except for the shoulder buttons which don’t seem to be used very often in games.
Driver Software – GPIONext
Once we’ve got the controller connected to the Raspberry Pi we need to add some driver software so that RetroPie can ‘see’ the button inputs and map them as a game controller.
For this we’ll use the GPIONext project.
https://github.com/mholgatem/GPIOnext
This software runs in the background on the Raspberry Pi and pretends to be a game controller. It reads the state of you buttons and turns those into button presses and joystick movements on the virtual game controller.
Software Installation
To install GPIONext you simply need to clone the GitHub repository into your home folder.
cd ~

git clone https://github.com/mholgatem/GPIOnext.git
You then simply run the installation script.
bash GPIOnext/install.sh
After this runs it will take you to the controller configuration screen. If you’ve got your buttons connected you can set this up.
Firstly you’ll be asked how many D Pads or joysticks you have. Next you need to select the buttons you’ve wired into the Raspberry Pi. Follow the onscreen instructions to put check marks by the inputs you’ve wired in.
Once you’ve specified the connections and pressed enter you’ll then be asked to press each switch so the software can sense what pins they are connected to. Make sure you hold in the button until it’s sensed – about 5 seconds.
After that you’re good to go! There’s no need to edit any startup files. The installer sets all that up for you.
You’ll probably need to reboot the Raspberry Pi to reset the LCD screen if you’ve got one attached, and then go through the RetroPie controller setup. But then it’s all go for the games!
Turning The GPIO Controller Off
Should you need to turn off the GPIO controller, maybe you’re plugging in another, simply get to the console on the Raspberry Pi and type
gpionext stop
This stops the driver and removes the controller from the list of connected devices.
gpionext start
will start it back up again and
gpionext config
will run the configuration code to remap all the switches if you’ve got them wrong or change things around.
Next
Now that we’ve got a screen and game controller we’ll need some sound. Make sure you subscribe to my YouTube channel to keep up to date with all my video releases.
Have Fun!


